
User Manual


9
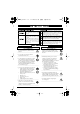
Attaching the GK-3B to the Bass
Attaching the Divided Pickup
There are two ways to attach the divided pickup.
●
Attaching the Pickup with Double-
Sided Tape (p. 9)
This provides the simplest way to attach the
pickup to flat-top basses.
●
Attaching the Pickup with Screws (p. 12)
This method features the benefit of allowing
the pickups to be finely adjusted later on, but
it is somewhat difficult to carry out.
* Do not place any unnecessary strain on the cable connecting the pickup and the controller. This may result in breaking.
* Do not bend or twist the pickup. Use particular care when removing the pickup.
■
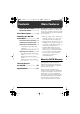
Attaching the Pickup with Double-Sided Tape
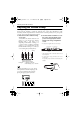
1.
You decide on the location in which to
install the pickup.
For a 4-string bass:
Attach the divided pickup so that the center
marker is between strings 2 (D) and 3 (A),
the 2nd string marker is directly below string
1 (G), and the 5th string marker is directly
below string 4 (E).
(Viewed from above)
fig.1060ae
(Viewed from the neck)
fig.1060be
* Depending on the GK-compatible device, it is
possible to install the pickup so that the center
marker is between strings 1 and 2, or between
strings 3 and 4. Refer to the manual for your GK-
compatible device.
For a 5-string bass:
Attach the divided pickup so that the center
marker is between strings 2 (D) and 3 (A),
the 2nd string marker is directly below string
1 (G), and the 5th string marker is directly
below string 4 (E).
fig.1070e
* Depending on the GK-compatible device, it is
possible to install the pickup so that the center
marker is between strings 3 and 4. Refer to the
manual for your GK-compatible device.
For a 6-string bass:
Attach the divided pickup so that the center
marker is between strings 3 (D) and 4 (A),
the 2nd string marker is directly below string
2 (G), and the 5th string marker is directly
below string 5 (E).
fig.1080e
1234
String
4321
2nd string marker
5th string marker
12345
String
123456
String
GK-3B_e.book 9 ページ 2004年7月23日 金曜日 午後2時53分