
User's Manual

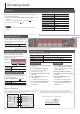


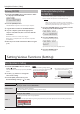

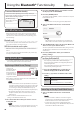
Table Of Contents
- Operating Guide
- Selecting a Tone
- Adjusting the Overall Volume
- Applying an Effect to the Performance
- Playing Back / Recording
- Using the Keyboard to Play Patterns (Loop Mix Function)
- Display
- Confirming an Operation / Changing a Value
- Making Various Settings (Setting)
- Sounding Patterns According to the Chord You Play (Interactive Chord)
- Clearing the Performance State
- Connecting Equipment
- Turning the Power On/Off
- Performing with the Loop Mix Function
- Recording with the Loop Mix Function
- Convenient Functions
- Setting Various Functions (Setting)
- Basic Operations in Setting
- Adjusting the Volume of the Part (PART VOLUME)
- Changing the Tempo (TEMPO)
- Adjusting the Reverberation (REVERB LEVEL)
- Changing the Pitch Range of the Keyboard in Steps of an Octave (OCTAVE SHIFT)
- Transposing the Pitch (TRANSPOSE)
- Matching the Pitch with Other Instruments (MASTER TUNE)
- Specifying the Feel (Touch Response) of the Keyboard (KEY TOUCH)
- Emitting an Operation Sound When You Press a Button (TOUCH SOUND)
- Muting the Speakers When Headphones Are Connected (SP PHONES SW)
- Displaying GM2 Tones (GM2 TONE)
- Preserving the Settings When the Power Turns off (KEEP SETTING)
- Making the Power Automatically Turn off After a Time (AUTO OFF)
- Adjusting the Brightness of the Display (LCD CONTRAST)
- Basic Operations in Setting
- Using the Bluetooth® Functionality
- Troubleshooting
- USING THE UNIT SAFELY
- IMPORTANT NOTES
- Tone List
- Loop Mix Set List

6
Recording with the Loop Mix Function
You can easily create a song by recording with the loop mix function.
* If you want to record a new song, clear the song before you proceed (p. 3).
Here we explain the procedure for recording the drum tone and bass tone.
4
7
1
3
2
5
6
Selecting a loop mix set
1. Press the [LOOP MIX] button to turn the loop mix function on (“ ” is lit).
2. Use the [–] [+] buttons to select the loop mix set that you want.
Recording your performance
3. Press the [
t
] button (“
t
” blinks).
Now you’re in the record-standby state.
4. Press a key in each area to start recording (“
t
” is lit).
When you press a key, recording starts and the number of recorded measures is shown in the screen.
Current measure
001
Record position
One measure
MEMO
Your performance using the interactive chord function (p. 3) is also recorded.
5. Press the [
s
] button to stop recording (“
t
” is unlit).
A conrmation message appears.
6. To save, press the [ENTER] button.
If you decide to cancel, press the [EXIT] button.
7. When you once again press the [
s
] button, the recorded performance plays back.