GO:MIXER PRO Owner’s Manual 01 Before using this unit, carefully read the leaflet “USING THE UNIT SAFELY” and “IMPORTANT NOTES.” After reading, keep the document(s) where it will be available for immediate reference.
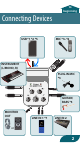
to beginning B pe ) TG ty MIC *3–*6 A m pe ty mini B B (OTG) micro B B Lightning B ty pe A ty pe ty B type -C pe Ty pe ht Lig micro B nin A g ty pe m -C pe Ty A type o icr m B g ) tnin TGh (OLig o icr B o icr B USB *1 *2 *5 (O m in iB ty pe m o icr B A ty m pe in iB Connecting Devices B type A type Type-C INSTRUMENT (L/MONO, R) (OTG) Type-C Lightning micro B B type micro B A type mini B PLUG-IN MIC *3 GUITAR/ BASS *3 B type B type A type A
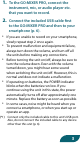
1. To the GO:MIXER PRO, connect the instrument, mic, or audio player etc. that you want to record. 2. Connect the included USB cable first to the GO:MIXER PRO and then to your smartphone (p. 6). * If you are unable to record on your smartphone, slowly repeat step 2 once again. * To prevent malfunction and equipment failure, always turn down the volume, and turn off all the units before making any connections. * Before turning the unit on/off, always be sure to turn the volume down.
ty A B ty m pe iB in (*2) If connecting an Android smartphone to this unit, connect the tagged plug to this unit. B ) TG (O B icro m g in htn Lig e-C Typ B ) TG (O icro m pe pe g in htn Lig ty ty e-C ty A A ty pe m icro B pe Typ B icro m pe iB in pe m ty B ty pe B A (*3) You must connect your guitar, bass, or mic to this jack. If a mic and/or guitar are not connected, turn the [GUITAR/BASS] knob and/or [MIC] knob all the way to the left (the minimum setting).
Phantom power supply conditions Using batteries Supplying power from the smartphone (USB) Android ( ( iPhone, iPad ( - (*7) Sound from a device connected to the LINE IN 1 jack can be used for karaoke (p. 19).
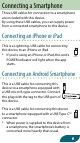
Connecting a Smartphone Three USB cables for connection to a smartphone are included with this device. By using these USB cables, you can supply power from a connected smartphone to this device. Connecting an iPhone or iPad This is a Lightning–USB cable for connecting this device to an iPhone or iPad. * If you’re using an iPhone or iPad, this unit’s POWER indicator will light when the app starts.
MEMO For information about smartphone compatibility, access the following link. http://roland.
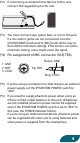
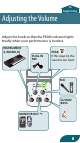
to beginning Adjusting the Volume Adjust the knob so that the PEAK indicator lights briefly when your performance is loudest. INSTRUMENT (L/MONO, R) PLUG-IN MIC PEAK If this stays lit, the sound is too loud.
(*1) The [MONITOR OUT] knob adjusts the overall volume that is recorded. MEMO To adjust the volume of the devices connected to LINE IN 1 and LINE IN 2, use the volume controls of those devices.
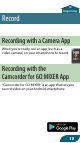
to beginning Record Recording with a Camera App When you’re ready, use an app (such as a video camera) on your smartphone to record. REC Recording with the Camcorder for GO:MIXER App “Camcorder for GO:MIXER” is an app that lets you record video on your Android smartphone.
Recording with the 4XCAMERA App “4XCAMERA” is an app that lets you record video on your iPhone or iPad.
to beginning Connection Examples Here are some examples of connecting mics or instruments to this device. Make connections and settings as appropriate for the equipment that you’re using.
Connecting a Mic MIC *1 *2 PLUG-IN MIC (*1) If you’re using a condenser mic that requires an external power supply, set the [PHANTOM POWER] switch to “48V.” (*2) If you need to supply phantom power when using an iPhone or iPad, install batteries in this unit. (If batteries are not installed, phantom power cannot be supplied even if the [PHANTOM POWER] switch is set to “48V.” In this case, the POWER indicator blinks.
Connecting a Guitar or Bass INSTRUMENT (L/MONO, R) *3 GUITAR/BASS *3 (*3) If you’re routing your guitar (or bass) through an effect device, connect it to the INSTRUMENT jacks.
Connecting to the Headphone Jack of an Audio Player or Computer LINE IN 1 *4, LINE IN 2 (*4) Sound from a device connected to the LINE IN 1 jack can be used for karaoke (p. 19).
Connecting a Keyboard INSTRUMENT (L/MONO, R) Connecting Monitor Speakers or Headphones MONITOR OUT or 16
Recording a Mix of Instrumental Performance and Smartphone Music USB *5 *6 LOOP BACK=ON MIC PLUG-IN MIC INSTRUMENT (L/MONO, R) GUITAR/BASS LINE IN 1 LINE IN 2 LOOP BACK=ON *5 (*5) If you want to record video using your camera app or 4XCAMERA while playing back music from your smartphone, turn the [LOOP BACK] switch “ON.” (*6) Audio is output to the smartphone as two channels (stereo).
Multitrack Recording with a DAW USB *7 *8 MIC PLUG-IN MIC INSTRUMENT (L/MONO, R) GUITAR/BASS LINE IN 1 LINE IN 2 LOOP BACK=OFF *7 (*7) If you want to use a DAW app to record your performance, set the [LOOP BACK] switch to the “OFF” position. In this case, you can’t use the [MONITOR OUT] knob to control the volume of the smartphone that’s connected to the USB port (p. 22). (*8) Audio is output to the smartphone as two channels (stereo).
to beginning Using a Backing Track for Karaoke (CENTER CANCEL) The sound from the device connected to LINE IN 1 can be used for karaoke (*1). 1. Set [CENTER CANCEL] to the “ON” position. CENTER CANCEL LINE IN 1 (*1) Depending on the sound, the instruments or vocals that are not in the center might not be canceled completely.
to beginning Using Batteries If you’re not supplying power from the smartphone, install batteries in this unit. 1. Turn the battery cover counterclockwise to remove it. + - 2. + Insert batteries as shown in the illustration (pay attention to the polarity). 3. Turn the battery cover clockwise to attach it.
4. Set the [BATTERY] switch to the “ON” position. *1 (*1) Don’t operate the [BATTERY] switch while a smartphone is connected. Doing so might destabilize the smartphone’s operation. * If operating on batteries, the POWER indicator blinks when the batteries run low. If you continue using the unit in this state, the power automatically turns off after approximately one minute. Replace the battery as soon as possible. * If you handle batteries improperly, you risk explosion and fluid leakage.
to beginning Block Diagram +48V PHANTOM POWER XLR MIC TRS L R PLUG-IN MIC GUITAR/BASS ON LINE IN 1 CENTER CANCEL Center Cancel OFF LINE IN 2 PEAK INSTRUMENT ON USB LOOP BACK USB OFF MONITOR OUT 22
to beginning Main Specification Roland GO:MIXER PRO: Audio Mixer for Smartphone Number of Audio Channels Connectors Power Supply Input Output INSTRUMENT (L/MONO, R) jacks 9 channels 2 channels 1/4-inch phone type Stereo miniature LINE IN 1 jack phone type Stereo miniature LINE IN 2 jack phone type 1/4-inch phone GUITAR/BASS jack type (supports high impedance) Miniature phone PLUG IN MIC jack type (supports plug-in power) Combo type (XLR, 1/4-inch TRS MIC jack phone, phantom power DC 48 V, 6 mA max.
Battery life for continuous use Current Draw Dimensions Approximately 4 hours 30 minutes * When setting the [BATTERY] switch to the “ON” position.