Owner’s Manual ° Play the Piano ˙ Play various sounds page 8 This piano contains a wide variety of tones (sounds). You can freely select and perform using these tones. For a list of the tones, refer to “Tone List” at the end of this manual. ˙ Play two layered tones (Dual Play) page 9 You can layer two tones on a single key. ˙ Play different tones with your left and right hands (Split Play) page 9 You can divide the keyboard into left and right zones, and select a different tone for each zone.
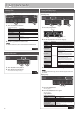
° Easy Quick Guide Selecting a Tone Selecting and Playing Songs This piano lets you enjoy performing with a variety of piano tones and other tones. 1 You can perform along with a song. Selecting a song 2 2 1. Press one of the tone buttons. Select a tone group. Button [Piano] button [E.
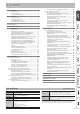
° Contents Easy Quick Guide . . . . . . . . . . . . . . . . . . . . . . . . . . . . . . . . . . . . . . . . . . 2 2 2 2 Main Specifications. . . . . . . . . . . . . . . . . . . . . . . . . . . . . . . . . . . . . . . . 3 4 4 Selecting a Tone . . . . . . . . . . . . . . . . . . . . . . . . . . . . . . . . . . . . Using the Metronome . . . . . . . . . . . . . . . . . . . . . . . . . . . . . . . Selecting and Playing Songs. . . . . . . . . . . . . . . . . . . . . . . . . . Using the Music Rest . . . . .
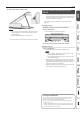
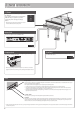
° Before You Play Using the Music Rest Opening/Closing the Lid Raising the music rest 1. Gently raise the music rest. Opening the lid * The lid must be opened or closed by an adult. * When raising the music rest, take care not to pinch your fingers between the moving part and the body of the unit. In places where small children are present, make sure that an adult provides supervision and guidance. 2. Fit the latch into one of the slots so that the music rest is at the desired angle.
Contents 3. Move the tip of the lid stick to lock it. Turning the Power On/Off (Opening/Closing the Fallboard) * Before turning the unit on/off, always be sure to turn the volume down. Even with the volume turned down, you might hear some sound when switching the unit on/off. However, this is normal and does not indicate a malfunction. You can turn the power on/off simply by opening/closing the fallboard. NOTE 55 The lid stick must be locked into the socket to prevent the lid from falling.
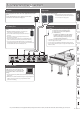
° Panel Descriptions [L] Button The power turns on/off when you open/close the fallboard. If you want to turn the power on/off with the fallboard left open, press the [L] button. To turn the power off, long-press the [L] button. * Never disconnect the power cord while the screen indicates “Don’t disconnect the power.” Bottom Panel Connect headphones and USB flash drive. page 7 Headphone Hook Front Panel Whenever you are not using the headphones, you can hang them on the headphone hook.
° Connecting Your Equipment Input Jack By connecting an audio player or other audio playback device here, you can play back the sound of the audio playback device via this piano. Use the Input Volume (p. 24) to adjust the volume of the device that’s connected to the Input jack. USB Memory Port You can do the following things using a USB flash drive. 55 WAVE files or MIDI files (SMF) data copied from your computer can be played back by this piano.
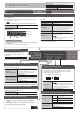
° Basic operations Operation Guide Select a setting item Edit the value of an item Use the [K] [J] buttons. Use the [–] [+] buttons. Restore the default value Press the [–] [+] buttons simultaneously. Selecting a Tone In addition to piano sounds, this piano lets you enjoy performing with many other sounds. These sounds are called “Tones.” There are five groups of tones; each tone button selects a group. MEMO For more about the tones, refer to “Tone List” at the end of this manual.
Operation Guide Dividing the Keyboard for Two People (Twin Piano) Creating Your Own Piano Tone (Piano Designer) You can divide the keyboard into left and right areas so that two people can play the same range of pitches. Turning Twin Piano on Turn the [Twin Piano] button on. Changing the Twin 1. Press a tone button. Piano tone 2. Use the [–] [+] buttons. Notes played in the right area are louder in the right speaker; notes played in the left area are louder in the left speaker.
Operation Guide Selecting an Item/Editing a Value Display This shows information such as the tone name, song name, tempo, and time signature. The “K” “J,” and “-,” “+” indications shown in the screen indicate the buttons used to operate the various functions. Time signature Bluetooth connection Tempo Measure status Select a setting item Use the [K] [J] buttons. Edit the value of an item Use the [–] [+] buttons. Change a value consecutively Hold down the [–] button or [+] button.
Operation Guide Selecting a Song Category list You can select songs in the Song screen. 1. Press the [Song] button to access the Song screen. Category USB Memory Internal Memory Listening Category Masterpieces Tempo Time signature Measure Song name Easy Piano 2. Use the [K] [J] buttons to select a category. 3. Use the [–] [+] buttons to select a song. 4. Press the [s] button to play the song. Scales MEMO To select a song from a folder on a USB flash drive, proceed as follows.
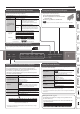
° Advanced Operation ˙ Recording Your Performance You can play back a recorded performance to check your playing, or play along with a recorded performance. 2. Press the [s] button. Recording stops, and your performance is automatically saved. MEMO Recording 55 You can delete the song that you recorded (p. 13). 55 You can rename the song that you recorded (p. 14). Recording a New Song SMF recording * If you want to record with Twin Piano turned on, set SMF Play Mode (p. 25) to “External.
Advanced Operation Recording Audio to USB Flash Drive Audio recording If you want to record your piano performance and listen to it on your computer or audio player, or to create a CD, you can record it as audio to a USB flash drive. Listening to the recorded performance After you record, the newly recorded song is selected. 1. Press the [s] button. Playback starts from the beginning of your recorded performance.
Advanced Operation 7. Use the cursor [J] (right) button to select “Yes,” and then press the [s] (Enter) button. Renaming a Song (Rename Song) The deletion is executed. Here’s how to rename a previously-saved song. NOTE Never turn off the power or disconnect the USB flash drive while the screen indicates “Executing...” 8. Simultaneously press the [Ambience] button and [Brilliance] button to exit Function mode. 1. Press the [Ambience] button and [Brilliance] button simultaneously. 2.
Advanced Operation ˙ Personalizing Your Piano Sound (Piano Designer) Items What is Piano Designer? This piano allows you to personalize your piano sound by adjusting various factors that affect the sound, such as the piano’s strings, the resonance produced using the pedals, and the sound of the hammers striking the strings. This function is called “Piano Designer.
Advanced Operation ˙ Saving Your Performance Settings (Registration) Tone settings and settings such as Dual Play or Split Play can be saved and recalled easily. Such settings are called a “registration.” You can save a total of 25 registrations, five each in buttons [1]–[5]. These 25 registrations are collectively called a “registration set.” Recalling a Registration 1. Press the [Registration] button. 2. Press a number button ([1] to [5]) to choose the location where the desired registration is saved.
Advanced Operation Saving a Registration Set (Registration Export) You can save all registrations held in registration memory into a registration set on a USB flash drive. 1. Connect your USB flash drive to the USB Memory port (p. 7). 2. Press the [Ambience] button and [Brilliance] button simultaneously. 3. Use the [K] [J] buttons to select “Registration Export,” and then press the [s] (Enter) button. The Registration Export screen appears.
Advanced Operation ˙ Loading/Saving Piano Setups The piano settings that you make can be used on another GP609 unit if you save your settings on a USB flash drive and then load them into the other GP609. * Only piano settings that were created on an GP609 can be loaded. 1. Connect your USB flash drive to the USB Memory port (p. 7). 2. Press the [Ambience] button and [Brilliance] button simultaneously.
Advanced Operation ˙ Convenient Functions Initializing the Memory (Format Media) Restoring the Factory Settings (Factory Reset) Here’s how to erase all of the files that you saved in internal memory or on a USB flash drive (sold separately). Here’s how to restore all registrations and internally saved settings to the factory-set condition. This function is called “Factory Reset.
Advanced Operation ˙ Using the Bluetooth® Functionality Provision of Bluetooth functionality Please be aware that depending on the country in which you purchased the piano, Bluetooth functionality might not be included. If Bluetooth functionality is included The Bluetooth logo appears when you turn on the power.
Advanced Operation Listening to Music Through the Piano’s Speakers Here’s how to make settings so that music data saved on your mobile device can be wirelessly played back through the piano’s speakers. * If your mobile device is already paired with the piano, there is no need to perform pairing again. Refer to “Connecting an Already-Paired Mobile Device” (p. 21). Making Initial Settings (Pairing) As an example, we explain how to make settings for an iPad.
Advanced Operation Using the Piano with an App 6. Use the [–] [+] buttons to select “MIDI.” Here’s how to make settings so that you can use the piano with an app that’s installed on your mobile device. Example Apps That Can Be Used with the Piano App name Supported OS Explanation iOS Android You can view musical scores of the internal songs, automatically add an accompaniment by detecting chords when you play the keyboard, or play note-guessing games to train your ear.
Advanced Operation Using the Pedals to Turn Pages on a Music Score App On the mobile device, tap “Pair.” Here’s how to use the piano’s pedals to turn the pages of a music score shown on your mobile device (e.g., in a music score viewing app such as “piaScore”). Making Initial Settings (Pairing) As an example, we explain how to make settings for an iPad. If you’re using an Android device, refer to the owner’s manual of the mobile device you’re using. 1.
° Various Settings ˙ Various Settings (Function Mode) Basic Operations in Function Mode 1. Simultaneously press the [Ambience] button and [Brilliance] button. This piano is in Function mode. 2. Use the [K] [J] buttons to select the item that you want to set. MEMO Depending on the item that you select, another screen may appear, allowing you to select additional items. 3. Use the [–] [+] buttons to edit the value of the setting. 4.
Various Settings Indication Value Explanation Specifying the Keyboard’s Tone When Playing Back a Song (SMF Play Mode) This setting specifies the tone that you play on the keyboard while an internal song or external data is playing back. Normally you will use the “Auto Select” setting. This determines whether the setting that is most suitable for the internal song or most suitable for external data is selected when you play back a song whose file format is SMF.
Various Settings Indication Value Explanation Volume Limit You can specify a maximum volume value. This prevents an unnecessarily high volume from sounding even if you inadvertently operate the [Volume] buttons. 20, 40, 60, 80, 100 Specifying a Maximum Volume (Volume Limit) Preventing Doubled Notes When Connected to a Sequencer (Local Control) Local Control When you have a MIDI sequencer connected via USB, set this parameter to Local Off.
° Troubleshooting Problem Items to check Action Page Even though you’re using headphones to mute the sound, a thumping sound is heard when you play the keyboard The keyboard of this piano is designed to simulate the mechanism of an acoustic piano. Even on an acoustic piano, a thumping sound is actually being produced when you press a key. Such sounds do not indicate a malfunction.
Troubleshooting Troubles with Bluetooth functionality Problem Items to check/Action Page Could the Bluetooth function be turned “Off”? Turn the Bluetooth function “On.
Error Messages ° Error Messages Indication Meaning Error 2 An error occurred during writing. The external media may be corrupted. Insert other external media and try again. Alternatively, you can initialize the external media (p. 19). The internal memory might be damaged. Format the internal memory (p. 19). Error 10 Error 11 Error 14 No external media is inserted. Insert the external media and try again. The internal memory might be damaged. Format the internal memory (p. 19).
° USING THE UNIT SAFELY WARNING Concerning the Auto Off function The power to this unit will be turned off automatically after a predetermined amount of time has passed since it was last used for playing music, or its buttons or controls were operated (Auto Off function). If you do not want the power to be turned off automatically, disengage the Auto Off function (p. 26). Lock the casters When installing the piano, be sure to fasten the casters using the supplied caster cups.
° Tone List Piano No. 1 2 3 4 Other Tone Name Concert Piano Ballad Piano Mellow Piano Bright Piano MEMO Piano Designer can be used to customize the sound only for tones of the [Piano] button. E. Piano No. 1 2 3 4 5 6 7 8 9 10 Tone Name Tremolo EP Pop EP Vintage EP FM E.Piano EP Belle ‘60s EP Clav. Stage Phaser ‘70s EP E.Grand Organ No. 1 2 3 4 5 6 7 8 9 10 11 12 Tone Name Pipe Organ Nason flt 8’ Combo Jz.
° Internal Song List No. Song Title Listening 1 Widmung S.566 R.253 2 3 Étude, op.10-12 Floral Pursuits * The Nutcracker “Waltz of the Flowers” (Jazz Arrangement) * The Marriage of Figaro “Overture” (Piano Arrangement) 4 5 6 Barcarolle 7 Zhavoronok 8 9 10 11 12 13 Sonate für Klavier Nr.23 1 Sonate für Klavier Nr.23 2 Sonate für Klavier Nr.23 3 Valse, op.34-1 Polonaise op.53 Nocturne No.