
User`s manual


4-1 Practicing Cutting Using the Test-use Material
Chapter 4: Performing Cutting
42
Step 3: Optimizing the Cutting Quality for the Material
To obtain high-quality cutting results, then before you perform the actual cutting, carry out a cutting test to check the
cutting quality for the material.
Performing a Cutting Test
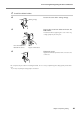
➊
Make sure the [PEN FORCE] slider is centered
(at "0" on the scale).
➋
Hold down for one second or longer.
The test pattern is cut.
➌
Press to feed the material toward the
front, then use the included tweezers to peel off
the cut shapes and check the cutting quality.
➍
Peel off circle 1.
Circle 1 peels off alone.
Proceed to
➎
.
Rectangle 2 also peels off.
Refer to "Changing the Blade Force" on the
following page and increase the blade force.
➎
Peel off rectangle 2.
The blade leaves faint traces on the material's backing paper.
The blade force is correct. Go on to "Step 4: Set the Origin Point."
☞
p 45 "Step 4: Set the Origin Point"
The blade trace is indistinct.
Refer to "Changing the Blade Force" on the following page and increase the blade force.
The blade trace is too deep and cuts into the backing paper.
Refer to "Changing the Blade Force" on the following page and reduce the blade force.
Tweezers
Circle 1
Rectangle 2