Owner’s Manual 取扱説明書 Bedienungsanleitung Mode d’emploi Manuale dell'utente Manual del usuario Manual do Proprietário Gebruikershandleiding
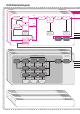
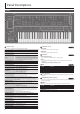
JD-XA Structure Diagram Analog Part 04 Analog Part 03 Analog Part 02 Analog Part 01 Default MIDI Channel 4 Default MIDI Channel 3 Default MIDI Channel 2 Default MIDI Channel 1 LEVEL Cross Mod Ring Mod Analog OSC 1 OSC Sync Analog OSC 2 Drive Analog Filter HPF AMP LPF1 LPF2 LPF3 / HPF / BPF LEVEL Pitch ENV 1/2 LFO 1/2 Mod LFO Filter ENV LFO 1/2 Mod LFO AMP ENV LFO 1/2 Mod LFO Mod Source Sw LEVEL MFX Part EQ AUX White Noise Pink Noise Digital Part Mic Digital Part 04 Digital Part 03 Defau
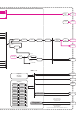
Master Master AnalogAnalog Dry Dry Mute Mute Out Out Click Reverb Reverb OFF ON TFX 1 TFX 1 TFX 2 TFX 2 Delay Delay Master Master EQ EQ Master Master VolumeVolume Click Out Click Out Click Master Master Main Out Mute Mute Main Out OFF Vocoder Vocoder Send ON Sw Send Sw PhonesPhones Out Out Vocoder Vocoder Vocoder Vocoder Mic Modulation Mic Modulation Mic Input Mic Input NS NS Mic Reverb Mic Reverb Bypass USB Audio USB Audio Bypass To AUXTo Mic AUX Mic MIDI ch MIDI 1–16 ch 1–16 Keyboard
Owner’s Manual Contents Panel Descriptions . . . . . . . . . . . . . . . . . . . . . . . . . . . . . . . . . . . . . Top Panel . . . . . . . . . . . . . . . . . . . . . . . . . . . . . . . . . . . . . . . . . . . . Rear Panel . . . . . . . . . . . . . . . . . . . . . . . . . . . . . . . . . . . . . . . . . . . Introduction . . . . . . . . . . . . . . . . . . . . . . . . . . . . . . . . . . . . . . . . . . . Turning On/Off the Power . . . . . . . . . . . . . . . . . . . . . . . . . . . . . . .
Panel Descriptions Top Panel 2 4 3 5 6 7 1 3 1 Common section 2 Synthesizer section Here you can make the following settings for the JD-XA. Controller MASTER [Mute] button MASTER [Volume] knob Display Cursor [K] [J] buttons [-] [+] buttons [MIDI CTRL] button [Menu] button [Write] button [Shift] button [Exit] button [Enter] (Manual) button PROGRAM No.
Panel Descriptions Rear Panel Amplified Speakers Microphone ** This instrument is equipped with balanced (XLR/TRS) type jacks. Wiring diagrams for these jacks are shown below. Make connections after first checking the wiring diagrams of other equipment you intend to connect. A B Here you can connect an analog synthesizer that is equipped with a CV/ GATE input jack. For connecting MIDI device.
Introduction Turning On/Off the Power Selecting a Part ** Once everything is properly connected (p. 3), be sure to follow the procedure below to turn on their power. If you turn on equipment in the wrong order, you risk causing malfunction or equipment failure. ** Before turning the unit on/off, always be sure to turn the volume down. Even with the volume turned down, you might hear some sound when switching the unit on/off. However, this is normal and does not indicate a malfunction.
Editing a Sound (Program) A-OSC2 Editing an Analog Part Controller Explanation Wave knob Selects the oscillator waveform. T (Sawtooth wave), U (Square wave), V (Asymmetrical square wave), S (Triangle wave), R (Sine wave), ANALOG PART AUX DRY OUT A-OSC1 DRIVE A-Filter HPF [PWM] slider AMP [PW] slider A-OSC2 MFX Pitch ENV 1/2 Filter ENV AMP ENV LFO 1/2 & For details of the overall structure, refer to the “JD-XA Structure Diagram” inside the front cover.
Editing a Sound (Program) Editing a Digital Part DIGITAL PART (SuperNATURAL Synth) Partial 3 Partial 2 MFX Partial 1 WG Pitch ENV TVF Filter ENV TVA AMP ENV Controller Explanation [Cross Mod] knob Not used with digital parts. [Ring Mod] button Produces a more complex waveform by multiplying Partial 1’s OSC by Partial 2’s OSC. [Mod Source] button Not used with digital parts.
Editing a Sound (Program) Initializing a Sound (Init) Here’s how to initialize the settings of a program, part, partial, or pattern. 1. Hold down the [Shift] button and press the [Program Select/Init] button. The INIT screen appears. 2. Use the cursor [K] [J] buttons and the [-] [+] buttons to specify what you want to initialize.
Recording (Pattern Sequencer) The pattern sequencer lets you record keyboard performance and knob operations, and play them back repeatedly. When you record, the currently selected part is recorded. Erasing Only a Portion of a Phrase 1. During playback or recording, press the [Erase] button (Erase Mode). The button is lit, allowing you to erase notes. The Erase screen appears. 2. Use the [-] [+] buttons to choose what you want to erase, and then press the [Enter] button.
Playing an Arpeggio Playing Patterns Pattern Utility 1. Press the [Play] button. You can perform the following operations during playback. Function Operation Explanation Part Mute [Shift] + each part’s Select [01]–[04] buttons Mutes the selected part during pattern playback (multiple parts can be selected). Realtime Erase 1. Press the [Erase] button. 2. Turn on the part that you want to erase. 3. Use [-] [+] to select what will be erased. 4. Data is erased while you hold down the [Enter] button.
Using the Microphone Using the Vocoder A “vocoder” is an effect that is typically applied to a human voice. By sending a human voice through a vocoder, you can give it an unexpressive robotlike character. The pitch is controlled by playing the keyboard. ** Acoustic feedback could be produced depending on the location of microphones relative to speakers. This can be remedied by: 55 Changing the orientation of the microphone(s). 55 Relocating microphone(s) at a greater distance from speakers.
Connecting External Devices Using the JD-XA as a MIDI Controller Connecting a Computer via USB The JD-XA’s panel operations can be transmitted as MIDI messages from its MIDI OUT connector or from USB MIDI OUT. 1. Press the [MIDI CTRL] button. Keyboard performance and panel operations transmit MIDI messages on eight channels (channels 9–16 by default) that are separate from those used by the analog parts and digital parts.
Overall Settings for the JD-XA Accessing the Menu Screens Menu 1. Press the [Menu] button. 2. Use the Cursor [K] [J] buttons to select the item that you want to edit, and [Shift]+ Cursor [K] [J] Parameter Value Cursor [K] [J] [-] [+] REAL press the [Enter] button. Velocity The corresponding edit screen appears. 1–127 3. Use the Cursor [K] [J] buttons to select the parameter that you want to edit, and then use the [-] [+] buttons to edit the setting of that parameter. 4.
Overall Settings for the JD-XA Menu [Shift]+ Cursor [K] [J] Parameter Value Cursor [K] [J] [-] [+] Local Switch 5.00–300.00 OFF Enables/disables the connection between the controller section (keyboard, pitch bend/modulation lever, wheels, panel knobs and buttons, pedals, etc.) and the internal sound engine. Normally you should leave this “ON.” Choose the “OFF” setting if you want operations on the JD-XA to control only an external sound module.
Overall Settings for the JD-XA Menu [Shift]+ Cursor [K] [J] MIC REVERB MASTER EQ Parameter Value Cursor [K] [J] [-] [+] Switch OFF, ON Switches the reverb on/off. Type ROOM1, ROOM2, STAGE1, STAGE2, HALL1, HALL2, DELAY, PAN-DLY Type of reverb Time 0–127 Time length of reverberation Level 0–127 Volume of the reverb sound Switch OFF, ON Switches the master EQ on/off. Input Gain -15 dB–+15 dB Adjusts the input gain of the master EQ. Low Freq 16 Hz–800 Hz Frequency of the low range.
Overall Settings for the JD-XA Restoring Backup Data from a USB Flash Drive Use a USB flash drive sold by Roland. We cannot guarantee operation if any other product is used. Backing Up Data (BACKUP) 1. Press the [Menu] button. 2. Use the Cursor [K] [J] buttons to select “UTILITY,” and then press the [Enter] button. UTILITY BACKUP [Ent] 3. Use the Cursor [K] [J] buttons to select “BACKUP,” and then press the [Enter] button. The name input screen appears. BACKUP NAME[Ent] JDXA_BKUP .
List of Shortcut Keys ** “[A]+[B]” indicates the operation of “holding down the [A] button and pressing the [B] button.
Error Messages If an incorrect operation is performed, or if processing could not be performed as you specified, an error message appears. Refer to the explanation for the error message that appears, and take the appropriate action. Message Meaning Action Incorrect File! The SMF being imported cannot be loaded into the JD-XA. SMF data containing time signature data other than 4/4 cannot be loaded into the JD-XA. Correct the time signature data of the SMF. Set the SMF being imported to Format 0.
USING THE UNIT SAFELY WARNING WARNING CAUTION To completely turn off power to the unit, pull out the plug from the outlet Precautions regarding placement of this unit on a stand Even with the power switch turned off, this unit is not completely separated from its main source of power. When the power needs to be completely turned off, turn off the power switch on the unit, then pull out the plug from the outlet.
For the U.K. IMPORTANT: THE WIRES IN THIS MAINS LEAD ARE COLOURED IN ACCORDANCE WITH THE FOLLOWING CODE. BLUE: NEUTRAL BROWN: LIVE As the colours of the wires in the mains lead of this apparatus may not correspond with the coloured markings identifying the terminals in your plug, proceed as follows: The wire which is coloured BLUE must be connected to the terminal which is marked with the letter N or coloured BLACK.
For EU Countries UK DE FR IT ES PT NL DK NO SE FI HU PL CZ SK EE LT LV SI GR
For the USA Model Name : Type of Equipment : Responsible Party : Address : Telephone : DECLARATION OF CONFORMITY Compliance Information Statement JD-XA SYNTHESIZER KEYBOARD Roland Corporation U.S. 5100 S.
* 5 1 0 0 0 4 5 4 9 1 - 0 1 *