
User Manual


11
Connecting External Devices
Using the JD-XA as a MIDI Controller
The JD-XA’s panel operations can be transmitted as MIDI messages from its MIDI
OUT connector or from USB MIDI OUT.
1.
Press the [MIDI CTRL] button.
Keyboard performance and panel operations transmit MIDI messages on eight
channels (channels 9–16 by default) that are separate from those used by the
analog parts and digital parts.
When MIDI CTRL is o, the messages are transmitted on the channel settings for the
analog parts and digital parts.
When you press the [MIDI CTRL] button, panel operations will be transmitted using
the channel settings of MIDI CONTROL PART 01–08 (pattern sequencer messages
are always transmitted on channels 1–16).
You can specify the messages transmitted by each knob and slider, and the channel
settings for the MIDI control parts.
&
For details of the overall structure, refer to the “JD-XA Structure Diagram”
inside the front cover.
Transmitting MIDI Messages Assigned to Buttons (Trigger Mode)
You can assign MIDI messages to the [01]–[16] buttons so that the assigned MIDI
message is transmitted from the MIDI OUT connector or USB MIDI OUT when you
press the corresponding button. These messages are not transmitted to the internal
sound engine or to the sequencer.
1.
Hold down the [Shift] button and press the [MIDI CTRL] button.
The Program No. display changes to “
TrG
,” trigger mode turns on, and the trigger
mode parameters appear.
2.
When you press the [01]–[16] buttons, the assigned MIDI messages are
transmitted.
They are transmitted on the channel of the currently selected part.
* To turn trigger mode o, hold down the [Shift] button and press the [MIDI CTRL] button once
again.
Changing the trigger mode settings
1.
When trigger mode is on, hold down the [Exit] button and press one of the
[01]–[16] buttons.
The parameters transmitted in trigger mode are shown.
2.
Use the cursor [K] [J] buttons to select the parameter and use the [-] [+]
buttons to change the setting.
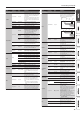
Button
[01]–[16]
Parameter
Cursor [
K
] [
J
]
Value
[-] [+]
Explanation
[01]–[16]
Assign
When you change the value, you’ll be able to edit any related values.
NOTE
Number: Note number
Velocity: Velocity
CC
Number: Controller number
On Value: Value when button is turned on
O Value: Value when button is turned o
BEND-DOWN
Outputs a pitch bend message.
BEND-UP
AFT
Outputs a channel pressure
message.
PC+BS
MSB: Bank select MSB
LSB: Bank select LSB
PC: Program change
Type (*)
LATCH
Alternates on/o each time you press the
button.
MOMENTARY
Remains on while you hold down the button.
Turns o when you release the button.
* Available if Assign is NOTE, CC, BEND-DOWN,BEND-UP, or AFT.
3.
Press the [Exit] button several times to return to the program select screen.
The trigger mode setting is saved in the program.
&
“Saving a Program (Write)” (p. 7)
Connecting an Analog Synthesizer via the CV/GATE Output
You can connect an analog synthesizer equipped with CV/GATE input jacks, and
control its note on/o or pitch.
Jack Explanation
GATE OUT 1 jack
GATE OUT 2 jack
These jacks output note on/o.
Outputs +5 V.
CV OUT 1 jack
CV OUT 2 jack
These jacks output pitch.
If you’ve made transpose or octave shift settings, this voltage changes
accordingly.
These jacks support OCT/V (it does not support Hz/V).
&
For details on these settings, refer to “CV/GATE1/2 OUT” (p. 13).
Connecting a Computer via USB
Here’s how to specify the USB driver that will be used when the JD-XA is connected
to your computer via the USB COMPUTER port.
Download the Driver
In order to use the JD-XA with the “VENDOR” setting, you must download the
driver from the following URL and install it on your computer.
For details on installation, refer to the following URL.
&
http://www.roland.com/downloads/
NOTE
Do not connect the JD-XA to your computer until you have nished
installing the driver.
If you have already connected the JD-XA, disconnect it, and then reconnect
it after driver installation is completed.
1.
Press the [Menu] button.
2.
Use the Cursor [K] [J] buttons to select “SYSTEM,” and then press the [Enter]
button.
The setting screen appears.
3.
Use the Cursor [K] [J] buttons to select “USB Drv” and use the [-] [+] buttons
to change the setting.
Normally you should use the VENDOR setting (MIDI and audio).
If you use the GENERIC setting, only MIDI is available.
Menu
[Shift]+ Cursor [
K
] [
J
]
Parameter
Cursor [
K
] [
J
]
Value
[-] [+]
GENERAL USB Drv
VENDOR:
Choose this if you want to use a USB
driver downloaded from the Roland
website.
GENERIC:
Choose this if you want to use the
generic USB driver provided by your
computer’s operating system.
This system takes eect when the JD-XA is powered-on following System Write.
4.
Press the [Exit] button several times to return to the program select screen.
5.
Save the system settings.
&
“Saving the System Settings” (p. 14)
6.
Turn the power of the JD-XA o, then on again.
After changing the “USB Drv” setting and saving it, you must turn the power o,
then on again in order to get the system to operate correctly.