
User Manual


2
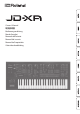
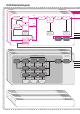
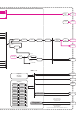
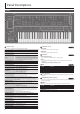
Panel Descriptions
Top Panel
1
2
3
4
5 6 7
3
1
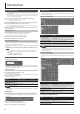
Common section
Here you can make the following settings for the JD-XA.
Controller Explanation
MASTER [Mute] button
Mutes the sound from the OUTPUT L/MONO and R jacks and the
ANALOG DRY jack.
MASTER [Volume] knob
Adjusts the volume of the sound that’s output from the OUTPUT L/
MONO and R jacks and the PHONES jack.
Display
Shows various information for the operation.
* The explanations in this manual include illustrations that depict
what should typically be shown by the display. Note, however, that
your unit may incorporate a newer, enhanced version of the system
(e.g., includes newer sounds), so what you actually see in the display
may not always match what appears in the manual.
Cursor [
K
] [
J
] buttons Move the cursor left/right.
[-] [+] buttons Change the value at the cursor position.
[MIDI CTRL] button
Lets you use the JD-XA’s controllers to control an external MIDI device.
&
“Using the JD-XA as a MIDI Controller” (p. 11)
[Menu] button
Accesses the Menu screen.
&
“Accessing the Menu Screens” (p. 12)
[Write] button
Saves the edited data.
&
“Saving a Program (Write)” (p. 7)
[Shift] button
When used in conjunction with other buttons or knobs, lets you view
parameters or edit dierent parameters.
&
“List of Shortcut Keys” (p. 16)
[Exit] button
Returns you to the previous screen.
In some screens, this cancels the operation currently being executed.
When used in conjunction with a knob, lets you view the current
parameter without changing its value.
[Enter] (Manual) button
Press this to conrm a value or execute an operation.
If you press this button while holding down the [Shift] button, the
positions of all knobs and sliders are applied to the sound you’re
editing (Manual).
PROGRAM No. display
Displays the currently selected program number (
A01.
–
P16.
).
If the program or pattern has been edited, the decimal point is lit.
[Program Select] (Init)
button
Lets you use the [01]–[16] buttons to select programs.
If you hold down the [Shift] button and press this button, the Init
Menu screen appears.
&
“Initializing a Sound (Init)” (p. 7)
[Bank] (Copy) button
Press this button to make it blink, and then use the [01] (A)–[16]
(P) buttons to select the program bank. When you’ve selected the
program bank, the button goes dark, returning to its previous state.
If you hold down the [Shift] button and press this button, the Copy
Menu screen appears.
&
“Copying a Sound or Pattern (Copy)” (p. 7)
[USB Memory] button Lets you use programs that are stored on a USB ash drive.
[Favorite] button
Lets you register and recall frequently-used program numbers as
favorites (Favorite)
[Transpose] button
Turns the transpose function on/o.
Hold down the [Transpose] button and use the OCTAVE [Down] [Up]
buttons to specify the amount of transposition.
OCTAVE [Down] [Up]
buttons
Switch the octave of the keyboard.
[Key Hold] button Holds the notes that are currently pressed on the keyboard.
[Arpeggio] button
Turns the arpeggio function on/o.
&
“Playing an Arpeggio” (p. 9)
[Mono] button Switches the part’s mono/poly setting (only for a digital part).
[Portamento Time] knob Species the portamento time.
[Portamento On] button Turns portamento on/o.
2
Synthesizer section
ANALOG PART
Here you can select and edit an analog part.
DIGITAL PART
Here you can select and edit a digital part.
3
Controllers
Pitch bend/modulation lever
You can use this to modify the pitch or to apply vibrato.
Wheel 1/2
You can assign MIDI messages of your choice to these wheels and use them as
controllers.
&
“Making System Settings (SYSTEM)” (p. 12)
4
MIC
Controller Explanation
[Level] knob Species the volume of the microphone.
[Vocoder] button The microphone is used as a vocoder.
[Mod] button The microphone is used for modulation.
[Bypass] button The sound of the microphone is output without change.
5
[01]–[16] buttons
Use these buttons to select programs or banks, or when recording on the pattern
sequencer.
6
PATTERN SEQ (pattern sequencer)
Here you can record your keyboard performance and knob operations, and play
them back repeatedly.
7
TEMPO
Here you can specify the tempo of the arpeggio or the pattern sequencer.
Controller Explanation
TEMPO display Displays the tempo value.
[Tap] button
You can change the tempo by pressing the [Tap] button three times or
more at quarter-note intervals of the desired tempo.
[TEMPO] knob Species the tempo.
page
5
page
10
page
10
page
8