
User Manual
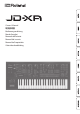


3
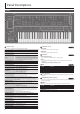
Panel Descriptions
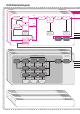
Rear Panel
* To prevent malfunction and equipment failure, always turn down the volume, and turn o all the units before making any connections.
*
This instrument is equipped
with balanced (XLR/TRS)
type jacks. Wiring diagrams
for these jacks are shown
below. Make connections
after rst checking the
wiring diagrams of other
equipment you intend to
connect.
A B C D E F G H I
Amplied Speakers
Microphone
Pedal switch
(DP-2; sold separately)
Expression pedal (EV-5; sold
separately)
Here you can
connect an analog
synthesizer that is
equipped with a CV/
GATE input jack.
page
11
For connecting MIDI
device.
page
11
Computer USB ash drive
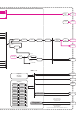
*
Place the AC adaptor so the side with the indicator (see illustration) faces
upwards and the side with textual information faces downwards. The
indicator will light when you plug the AC adaptor into an AC outlet.
AC adaptor
Indicator
Power Cord
AC Outlet
page
14
page
11
page
10
Headphones
A
OUTPUT jacks
Jack Explanation
PHONES jack You can connect a set of headphones here.
L/MONO, R jacks
Connect these jacks to your amplied speakers.
Use the L/MONO jack if you’re outputting in monaural.
ANALOG DRY jack Outputs the dry sound (without eects) of the analog parts.
CLICK jack Outputs the metronome click sound.
B
MIC INPUT
Controller/jack Explanation
[LEVEL] knob Adjusts the input level of the MIC INPUT jack.
MIC INPUT jack
Connect a microphone here.
The MIC INPUT jack supports both XLR type and TRS type plugs. The
XLR type connection supports 48 V phantom power, allowing you
to connect a condenser microphone that supports phantom power
(phantom power: DC 48 V, 10 mA max.).
C
FOOT PEDAL jacks
Jack Explanation
HOLD jack
You can connect a pedal switch (such as the DP-2; sold separately)
here and use it as a hold pedal.
CTRL 1/2 jacks
You can connect an expression pedal (EV-5; sold separately) or pedal
switch (such as the DP-2; sold separately) here and use it to control
various parameters or operations.
* Use only the specied expression pedal (EV-5; sold separately). By connecting any other
expression pedals, you risk causing malfunction and/or damage to the unit.
D
CV/GATE jacks
Jack Explanation
GATE OUT 1/2 jacks
These jacks output note-on/o.
They output +5 V.
CV OUT 1/2 jacks
These jacks output pitch.
If you’ve specied a transpose or octave shift setting, the voltage
changes according to the setting.
These jacks support OCT/V (Hz/V is not supported).
E
MIDI connectors (IN/OUT)
These connectors can be connected to other MIDI devices to receive and transmit
MIDI messages.
F
USB port
Port Explanation
USB COMPUTER port
If the JD-XA is connected to your computer via a commercially
available USB 2.0 cable, you can synchronize it with a DAW on your
computer via USB MIDI, and record the sound of the JD-XA into your
DAW via USB audio.
&
“Connecting a Computer via USB” (p. 11)
USB MEMORY port
You can connect a USB ash drive here.
You can use a USB ash drive to save programs and back up data.
&
“Restoring Backup Data from a USB Flash Drive” (p. 15)
* Use a USB ash drive sold by Roland. We cannot guarantee
operation if other products are used.
G
DC IN jack
Connect the included AC adaptor here.
* To prevent the inadvertent disruption of power to your unit (should the plug be pulled out
accidentally), and to avoid applying undue stress to the jack, anchor the power cord using the
cord hook, as shown in the illustration.
H
[POWER] switch
This turns the power on/o.
&
“Turning On/O the Power” (p. 4)
I
Ground terminal
Depending on the circumstances of a particular setup, you may experience a
discomforting sensation, or perceive that the surface feels gritty to the touch
when you touch this device, microphones connected to it, or the metal portions
of other objects, such as guitars. This is due to an innitesimal electrical charge,
which is absolutely harmless. However, if you are concerned about this, connect the
ground terminal (see gure) with an external ground. When the unit is grounded, a
slight hum may occur, depending on the particulars of your installation. If you are
unsure of the connection method, contact the nearest Roland Service Center, or an
authorized Roland distributor, as listed on the “Information” page.
Unsuitable places for connection
5
Water pipes (may result in shock or electrocution)
5
Gas pipes (may result in re or explosion)
5
Telephone-line ground or lightning rod (may be dangerous in the event of lightning)
page
10
page
10
page
11
page
11