
User Manual
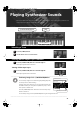
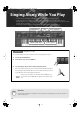
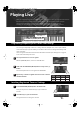
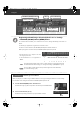
Table Of Contents
- USING THE UNIT SAFELY
- IMPORTANT NOTES
- Main Features
- Contents
- Introduction
- Panel Descriptions
- Getting Ready
- Connecting the AC Adaptor
- Installing Batteries (Sold Separately)
- Connecting the External Equipment
- Turning On/Off the Power
- Adjusting the Volume Level ([VOLUME] Knob)
- Adjusting the Display Contrast ([LCD CONTRAST] Knob)
- Turning the Display Backlight On/Off
- Using the Included USB Memory Protector
- Listening to the Demo Songs
- Application Guide
- Reference
- Overview
- Detailed Tone Settings
- Detailed Settings for Performance Functions
- Song Player Settings
- Other Settings
- Connecting an External MIDI Device
- Appendices

47
Playing Live
After you have assigned the tones that you want to use in Favorites, you can set the pedal so you can
use it to switch the Favorites. This way, you can switch between Favorites without taking your hands
from the keyboard.
For further information about connecting the pedal (sold separately), see “Connecting Pedal” (p. 19).
Press the [MENU] button.
The menu screen is displayed.
Use the [
] [ ] buttons to select “SYSTEM”, and press the
[ENTER] button.
The system setting screen (p. 75) is displayed.
Use the cursor [
] [ ] buttons to select “HOLD PEDAL”
at the top of the screen.
This is the pedal settings screen.
Use the dial to select “FAV-UP” (Favorite Up).
You have now set the pedal so the Favorites will switch each time
you press the pedal.
Press the [EXIT] button.
This saves the setting.
Using your computer, copy onto your USB memory key the audio data from the supplied CD-ROM
that you’ll be using in your performance.
From the “Audio Files” folder of the supplied CD-ROM, copy
the audio data “JUNO-Di_Song_Backing.wav” to your USB
memory device.
Assigning Functions to the Pedal
Saving Audio Data to a USB Memory Device
Memo
1
2
3
4
5
USB Memory
JUNO-Di_Song_
Backing.wav
1
JUNO-Di_e.book 47 ページ 2009年2月17日 火曜日 午後1時46分