M-480 Remote Owner's Manual The M-480 Remote, iPad application is the dedicated remote control software for the Roland V-Mixer M-480. You can remotely control various functions of the M-480 using this software. This document describes the functions of this software. * This software supports system version 1.6 or later of the M-480. Check that the system software of your M-480 is later than 1.6. * For the functions added from version 1.6, refer to “Functionality Added in M-480 Ver. 1.6”.
Contents About This Software..........................................................................................................3 Overview of This Software............................................................................................................................................. 3 Important notes...............................................................................................................................................................
About This Software Overview of This Software M-480 Remote is an application for remotely controlling the Roland M-480 V-Mixer live mixing console. This application makes it possible to adjust mixing parameters from a variety of listening points on stage or around the room, away from the M-480 positioned at a fixed location. Combined with the easy operation afforded by the iPad’s large screen and Multi-Touch interface, this application makes it easy to remotely view and adjust settings.
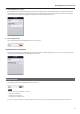
Booting/Quitting and Connection Booting and Quitting the M-480 Remote Booting Turn on the iPad installed with the M-480 Remote and tap the icon below. fig.remote-icon.eps Quitting Press the home button of your iPad to quit M-480 Remote. Connecting with the M-480 Connect with the M-480 using the steps below. Connect the wireless USB adaptor (separately sold WNA1100-RL) to the M-480 and enable the wireless LAN function.
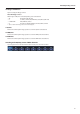
Booting/Quitting and Connection 3. Select the M-480 unit to connect If this software finds any available M-480 unit(s), the display changes like below. If you have multiple M-480 units, change the wireless ID on each M-480 unit. If you change IDs, the device name display on this software will also be changed. Tap the device name to select the target unit for connection. For details of changing the wireless ID, refer to “Functionality Added in Ver. 1.6”. fig.select-M480.eps 4.
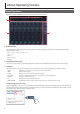
About Operating Screens Channel Strip Screen Right after starting the M-480 Remote, you can see the Channel Strip screen as below. fig.channel-strip.eps 1 2 3 1 Overview Section This section displays level meters of in/out channels and mute on/of statuses. Tapping a group of meters will switch the display of the Channel Parameter section.
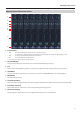
About Operating Screens About the Channel Parameter Section fig.channel-parameter.eps 1 2 3 4 5 6 7 8 1 Preamp Control • GAIN Move the knob with up/down drag operation to control the preamp gain. The indicator on the knob lights in green when input signal is sensed and lights up in orange when signal clipping is sensed. • +48V The indicator lights up when the phantom power is turned on. • PAD The indicator lights up when PAD is turned on.
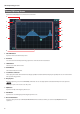
About Operating Screens Channel EQ Setup Screen Tap the channel EQ display area to switch to the screen below. fig.ch-EQ-setup.eps 1 7 2 8 3 4 9 10 11 5 12 13 6 1 CH STRIP Button Tap this to return to the Channel Strip screen. 2 ATT Knob You can move the knob with up/down drag operation to control the amount of attenuation. 3 SOLO Button This turns solo of the channel on/off. 4 MUTE Button This mutes/unmutes the channel. 5 Level Meters and Fader These display level of the channel.
About Operating Screens 10 EQ Type Switch Button Tap this to display the EQ type selector. About the EQ Type Selector Different types of EQ can be selected depending on the selected band. • HPF HPF 6dB, HPF 12dB, HPF 18dB • LO LO SHELF, LO SHELF 2, PEAK, BAND PASS, NOTCH, HPF 6dB, HPF 12dB • LO-MID/HI-MID PEAK, BAND PASS, NOTCH • HI LPF 6dB, LPF 12dB, PEAK, BAND PASS, NOTCH, HI SHELF, HI SHELF 2 * Tap area outside of the EQ type selector to make it disappear.
About Operating Screens GEQ Setup Screen Tap the GEQ button on the side panel to switch to the GEQ setup screen as shown below. fig.GEQ-setup.eps 8 1 9 10 2 3 4 11 5 6 7 1 CH STRIP button Tap this to return to the Channel Strip screen. 2 ATT Knob Move the knob with up/down drag operation to control the amount of attenuation. 3 SOLO Button This turns solo on/off of the GEQ assigned channel. 4 MUTE Button This mutes/unmutes the GEQ assigned channel.
About Operating Screens 9 LINK Button This turns on/off the link of GEQ A/B (only while the GEQ is assigned to FX 1 – 6). You can also turn the stereo link on/off of GEQ even/odd numbers. 10 BYPASS Button Tap this to bypass the GEQ. While bypassing, this lights up. 11 Display Area This part displays the settings of each frequency bands. The bands accessible in the GEQ fader area are surrounded by a border. You can drag the border left/right to change the bands to adjust.
About Operating Screens PEQ Setup Screen Using a function in the GEQ setup screen, you can switch to the PEQ setup screen. Tap the FUNCTION button at first to call up the functions. fig.GEQ-function.eps Tap [8-Band PEQ] next. A confirmation message of change EQ mode appears. Tap [Change] to switch from 31-band GEQ to 8-band PEQ. fig.switch-8band-PEQ.eps If you tap [Change] and switch, the GEQ settings will be lost. Use the copy/paste function (p. 17) to copy the settings to another GEQ to save it. fig.
About Operating Screens Scene List Popup Tap the SCENE button on the side panel to call up the Scene List Popup. The current scene name is displayed with a check mark. fig.scene-list.eps Save the Scene Tap to select the target scene number and then tap the STORE button. The scene name editing screen opens. ig.scene-name-edit.eps Edit the scene name and tap [Done] on the software keyboard to save the scene. You can use single-byte alphanumeric characters only.
About Operating Screens About Sends on Fader Mode Tap the SENDS ON FADER button to turn the Sends on Fader function on. The color of faders will change according to the label of the target bus. The target bus number is displayed above the SENDS ON FADER button. fig.sends-on-fader-mode.eps Tap the target bus number to call up the list of target buses. You can selet the target bus from the list. fig.sends-on-fader.eps Tap the SENDS ON FADER button again to turn the function off.
About the FUNCTION Button Functions of Channel Strip Screen Tap the FUNCTION button on the channel strip screen to call up the functions below. fig.ch-strip-function.eps Long Fader Mode Slide the [Long Faders] button to the right to make the fader longer. Tap the FUNCTION button again and slide the button to left to return fader to the shorter length. fig.long-fader-mode.eps Peak Clear The peak indications of the level meters in the overview section will be cleared.
About the FUNCTION Button Functions of Channel EQ Setup Screen Tap the FUNCTION button on the channel EQ setup screen to call up the functions below. fig.ch-EQ-function.eps Flat Return the EQ curve to flat. Copy/Paste Copy and paste the EQ setting to other channels. Copy and paste using the steps below. • Make EQ settings • Tap FUNCTION button and tap [Copy EQ]. • Open EQ setup screen of another channel. • Tap FUNCTION button and tap [Paste EQ].
About the FUNCTION Button Functions of GEQ Setup Screen Tap the FUNCTION button on the GEQ setup screen to call up the functions shown below. fig.GEQ-function.eps Switching of 31-band GEQ and 8-band PEQ You can switch between 31-band GEQ and 8-band PEQ. A confirmation message of “Change EQ MODE” appears when this is tapped. Tap [Change] to switch the mode. If you tap [Change] and switch, the GEQ settings will be lost. Use the copy/paste function to copy the settings to another GEQ to save it. 0.