
Owner`s manual


8
About Operating Screens
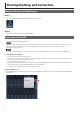
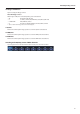
Channel EQ Setup Screen
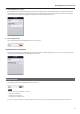
Tap the channel EQ display area to switch to the screen below.
g.ch-EQ-setup.eps
1
2
3
4
5
6
7
8
9
10
11
12
13
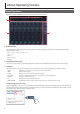
1 CH STRIP Button
Tap this to return to the Channel Strip screen.
2 ATT Knob
You can move the knob with up/down drag operation to control the amount of attenuation.
3 SOLO Button
This turns solo of the channel on/o.
4 MUTE Button
This mutes/unmutes the channel.
5 Level Meters and Fader
These display level of the channel. The IN meter displays pre EQ level and the OUT meter displays the post EQ level. You can move the fader
with up/down drag operation.
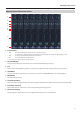
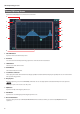
6 Display Area
With drag operations, you can move GAIN/FREQ of the bands. You can also adjust Q of the selected band with pinch in/out operations.
Double tap the point to make it return to the 0 dB position.
7 EQ Button
Tap this to turn EQ on/o. It lights up when it is on.
8 HPF Button
Tap this to turn on/o the high pass lter. It lights up when it is on.
9 Band Switch Button
Tap this to display the selector of HPF/LO/LO-MID/HI-MID/HI. This should be used when you control the Q/FREQ/GAIN with knob
operations.