Owner’s Manual Owner’s Manual (this document) Read this first. It explains the basic things you need to know in order to use the MC-707. PDF Manual (download from the Web) 55Reference Manual This explains all parameters of the MC-707. To obtain the PDF manual 1. Enter the following URL in your computer. http://www.roland.com/manuals/ I 2. Choose “MC-707” as the product name.
Before using this unit, carefully read “USING THE UNIT SAFELY” and “IMPORTANT NOTES” (the leaflet “USING THE UNIT SAFELY” and the Owner’s Manual (p. 2)). After reading, keep the document(s) where it will be available for immediate reference. © 2019 Roland Corporation USING THE UNIT SAFELY WARNING CAUTION Use only the supplied AC adaptor and the correct voltage Keep small items out of the reach of children Be sure to use only the AC adaptor supplied with the unit.
Contents USING THE UNIT SAFELY . . . . . . . . . . . . . . . . . . . . . 2 IMPORTANT NOTES . . . . . . . . . . . . . . . . . . . . . . . . . . 2 Performing and Producing . . . . . . . . . . . . . . . . . . . 10 :: Loading and Playing a Project . . . . . . . . . . . . . . . . . . 10 Switching Clips (CLIP Mode) . . . . . . . . . . . . . . . . . . . . . . . . 10 Main Specifications . . . . . . . . . . . . . . . . . . . . . . . . . . 3 :: Selecting a Tone or Drum Kit . . . . . . . . . . . . . . .
Panel Descriptions Top Panel 1 2 4 Playback position indicators 5 3 Measure display indicators 1 Common Section 1 [VOLUME] knob Adjusts the volume of the MIX OUT jacks. [PHONES] knob Adjusts the volume of the PHONES jack. [SHIFT] button When you hold down the [SHIFT] button and press a button that’s labeled with a function name (such as ), that function is executed.
Panel Descriptions 3 Pad Section Step [1]–[16] buttons Use these buttons to select the step that you want to edit. Their operation and indications change depending on the pad mode and the settings. Pads (16 pads) The operation of the pads depends on the pad mode that's selected. PAD MODE [MUTE] button Switches the pads to MUTE mode. In MUTE mode, you can use the pads to mute tracks or stop clips. If you hold down the [SHIFT] button and press the PAD MODE [MUTE] button, the pads switch to CUE mode.
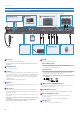
Panel Descriptions Rear Panel (Connecting Your Equipment) * To prevent malfunction and equipment failure, always turn down the volume, and turn off all the units before making any connections. B [POWER] switch & “Turning the MC-707 On” (p. 7) C USB port Cord hook H ASSIGNABLE OUT jacks I MIX OUT jacks Computer A E SD card D MIDI port Connect MIDI devices. AC Adaptor F EXT IN jacks G SEND jacks RETURN jacks Connect a mic or audio device. A DC IN jack Connect the included AC adaptor here.
Introduction Turning the MC-707 On * Before turning the unit on/off, always be sure to turn the volume down. Even with the volume turned down, you might hear some sound when switching the unit on/off. However, this is normal and does not indicate a malfunction. 1. Power-on your equipment in the order of MC-707 0 connected equipment. 2. Power-on the connected equipment, and raise the volume to an appropriate level. Turning Off the Power 1.
An Overview of the MC-707 The MC-707 can simultaneously play back up to eight independent tracks. You can assign up to 16 clips to each track, and switch between these clips during playback.
An Overview of the MC-707 What Is a Track? There are three types of track. Tone: Drum: Looper: A track that mainly handles clips that have pitch. A track that handles drum and percussion clips. A track that handles audio loops. You can import audio data from an SD card, or record sound that’s input from the EXT IN jacks or from a track. Time stretch is also supported. What Is a Clip? A “clip” is a collection of data to be played back by a track.
Performing and Producing Loading and Playing a Project Selecting a Tone or Drum Kit On the MC-707, data for one song is handled as a unit called a “project.” Projects are saved on the SD card. 1 3 1 4 1. Press the PAD MODE [CLIP] button. The pads are now in CLIP mode. 1. Press the [PROJECT] button. 2. Select “LOAD.” 3. Load the project. 4. Press the [START/STOP] button. 2. Press a pad to select the clip whose tone or drum kit you want to change. Now you can edit the selected clip. 3.
Performing and Producing Performing with the Pads Recording to a Looper Track (NOTE Mode / CHORD Mode) By using the NOTE mode or CHORD mode of the pads, you can perform using the illuminated pads. You can record the input from EXT IN or the MC-707’s master or track audio, and use it as a clip for a looper track. 1 3 5 1 2 3 1. Press the [SEL] button of the tracks that you want to play. 2. Press the PAD MODE [NOTE] button. The pads are now in NOTE mode, and you can perform by pressing the pads. 3.
Making Various Settings Editing Settings Using a New SD Card Here’s how to edit the settings of this unit. If you’re using a new SD card, you must first format it on the MC-707. 1. Hold down the [SHIFT] button and press the [KNOB ASSIGN] button. 1 The UTILITY screen appears. 2. Note what is shown in the screen, and then execute. & For details, refer to “Reference Manual” (PDF).