
User`s manual


32
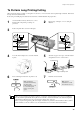
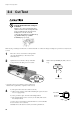
Chapter 2 - Basic Operation
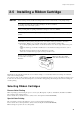
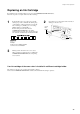
Installing Ribbon Cartridge
1
When installing a new ribbon cartridge, remove the
stopper.
2
Take up slack in the in ribbon as shown in the
figure.
Side B
Turn with a
pencil or the
like
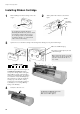
3
The FRONT COVER LED flashes if the
front cover is not shut securely.
Make sure the LED is lighted.
5
6
1
4
3
Make sure that the cartridge is securely
held in place by the tabs on the left and
right sides, and that the ink ribbon is
free of slack.
The cartridge is held in place by the tabs
on the left and right.
Make sure side B is facing up.
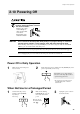
From left to right, as shown in the figure, the
CARTRIDGE HOLDER LED numbers
correspond to cartridge holders 1 through 6,
and the LEDs for holders where ink-ribbon
cartridges are installed light up. If a cartridge
is not installed correctly, the LED lights up
and a warning beep sounds. (To disable the
warning beep, on the machine, set Beep
(warning beep for the ink-ribbon cartridges)
to [Disable] (see "3-2 Settings (Making
Settings on the PC-600).")
2
Gently close the front cover.
4
Open the front cover and fit the cartridge in the cartridge holder. Gently press into place with the fingers.
- Do not attempt to rewind the ink ribbon.
Rewinding the ink ribbon may cause it to break.
- A used ribbon cartridge cannot be reused.
Do not attempt to turn over and reinstall a
used ribbon cartridge, or to rewind the ink
ribbon and reuse the cartridge.