PK-9_multi.
PK-9_multi.book Page 2 Monday, April 23, 2012 3:03 PM WARNING – To reduce the risk of fire or electric shock, do not expose this device to rain or moisture. ForEU EUCountries countries For This product complies with the requirements of EMCD 2004/108/EC and LVD 2006/95/EC. Dieses Produkt erfüllt die Anforderungen von EMCD 2004/108/EC und LVD 2006/95/EC. Ce produit est conforme aux exigences de EMCD 2004/108/EC et LVD 2006/95/EC. Questo prodotto è conforme alle esigenze di EMCD 2004/108/EC e LVD 2006/95/EC.
PK-9_multi.book Page 3 Monday, April 23, 2012 3:03 PM Features Copyright © 2012 ROLAND EUROPE. All rights reserved. No part of this publication may be reproduced in any form without the written permission of Roland Europe S.p.a. Roland and GS are either registered trademarks or trademarks of Roland Corporation in the United States and/or other countries. ENGLISH Before using this instrument, carefully read “Using the unit safely” on p. 4 and “Important notes” on p. 6.
PK-9_multi.book Page 4 Monday, April 23, 2012 3:03 PM MIDI Pedalboard PK-9 Using the unit safely Used for instructions intended to alert the user to the risk of death or severe injury should the unit be used improperly. Used for instructions intended to alert the user to the risk of injury or material damage should the unit be used improperly. * Material damage refers other adverse effects respect to the home furnishings, as well animals or pets.
PK-9_multi.book Page 5 Monday, April 23, 2012 3:03 PM MIDI Pedalboard PK-9 r Using the unit safely • When using the unit in locations where children are present, be careful so no mishandling of the unit can take place. An adult should always be on hand to provide supervision and guidance. .................................................................................................
PK-9_multi.book Page 6 Monday, April 23, 2012 3:03 PM MIDI Pedalboard PK-9 Important notes 1. Important notes In addition to the items listed under “Using the unit safely” on p. 4, please read and observe the following: Power supply • Do not connect this unit to same electrical outlet that is being used by an electrical appliance that is controlled by an inverter or a motor (such as a refrigerator, washing machine, microwave oven, or air conditioner).
PK-9_multi.book Page 7 Monday, April 23, 2012 3:03 PM MIDI Pedalboard PK-9 r Important notes Contents ENGLISH 1. Important notes . . . . . . . . . . . . . . . . . . . . . . . . . . . . . . . . . . . . . . . . . . . . . . . . . . . . . . . . . . . . . . . . . . . .6 2. Panel description . . . . . . . . . . . . . . . . . . . . . . . . . . . . . . . . . . . . . . . . . . . . . . . . . . . . . . . . . . . . . . . . . . .8 Front panel . . . . . . . . . . . . . . . . . . . . . . . . . . . . . . . . . . . . . .
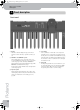
PK-9_multi.book Page 8 Monday, April 23, 2012 3:03 PM MIDI Pedalboard PK-9 Panel description 2. Panel description Front panel D A C D B E D Footswitches This three-character display keeps you informed about the current function, or parameter value you set. B CONTROL 1 and CONTROL 2 pedals These pedals allow you to control the device connected via MIDI. Their functions can be set in Parameter mode (page 14).
PK-9_multi.book Page 9 Monday, April 23, 2012 3:03 PM MIDI Pedalboard PK-9 r Rear panel Rear panel ENGLISH A B C D E ENGLISH Allows you to connect the supplied AC adaptor (page 11). E POWER switch This turns the power on/off (page 12). With the factory settings, the PK-9’s power will automatically be switched off 240 minutes (4 hours) after you stop playing or operating the PK-9. If the PK-9’s power has been turned off automatically, you can use the [POWER] switch to turn it back on again.
PK-9_multi.book Page 10 Monday, April 23, 2012 3:03 PM MIDI Pedalboard PK-9 Preparations before using the PK-9 3. Preparations before using the PK-9 Attaching the expression pedal The PK-9 is shipped with the expression pedal detached. Before connecting the PK-9 to an external device, please attach the expression pedal. NOTE When attaching or detaching the expression pedal, be careful not to step on a knob bolt.
PK-9_multi.book Page 11 Monday, April 23, 2012 3:03 PM MIDI Pedalboard PK-9 r Connecting the PK-9 to an external instrument with its PK cable NOTE Use the PK cable that is supplied with the PK-9 to connect the external instrument and PK-9. This connection system will allow the external instrument to power the PK-9 (so that you don’t need the supplied AC adaptor). Connecting the supplied AC adaptor The PK-9 can be powered with the supplied PSB-1U adapter.
PK-9_multi.book Page 12 Monday, April 23, 2012 3:03 PM MIDI Pedalboard PK-9 Preparations before using the PK-9 NOTE Connecting the PK-9 to an external MIDI device This unit is equipped with a protection circuit. A brief interval (a few seconds) after turning the unit on is requested before it will operate normally. You can use your PK-9 as a MIDI controller for a MIDI tone generator. 1. Make sure that the external MIDI device is turned off and its volume is minimized.
PK-9_multi.book Page 13 Monday, April 23, 2012 3:03 PM MIDI Pedalboard PK-9 r Connecting an optional external pedal or footswitch to PK-9 The PK-9 provides an EXTERNAL PEDAL socket to which you can connect an optional footswitch (Roland DPseries or BOSS FS-5U) or an additional expression pedal (Roland EV-series).
PK-9_multi.book Page 14 Monday, April 23, 2012 3:03 PM MIDI Pedalboard PK-9 Parameter mode 4. Parameter mode Parameter mode lets you make various settings for this unit. Basic operation in Parameter mode Saving the settings (Save function) Here’s the basic procedure for making settings in Parameter mode. When the PK-9’s power is turned off, it will return to its default settings. However, if desired, you can save the following settings so that they will be remembered even after the power is off. 1.
PK-9_multi.book Page 15 Monday, April 23, 2012 3:03 PM MIDI Pedalboard PK-9 r Parameter settings Parameter settings ● Transpose Display trn Value Default –5~6 0 ● Octave Display Default 0~8 2 ● CONTROL 2 Assign Display This parameter allows you to transpose the note pitches of the pedals in octave steps.
PK-9_multi.book Page 16 Monday, April 23, 2012 3:03 PM MIDI Pedalboard PK-9 Parameter mode ● Foot Switch Right Assign Display S r NOTE Value Default C18, C19, Por C19 ● Portamento Time Display This parameter allows you to assign a function to the footswitch on the right side of the expression pedal. See “Foot Switch Left Assign” for an explanation of the available settings.
PK-9_multi.book Page 17 Monday, April 23, 2012 3:03 PM MIDI Pedalboard PK-9 r Restoring the settings to the factory condition (Factory Reset) ● MIDI Dump Refer to “Archiving and restoring your settings (MIDI Dump)” on p. 17. dmp SAv Restoring the settings to the factory condition (Factory Reset) You can archive and restore your settings using a computer (with a MIDI interface, commercially available) or an external sequencer. Getting ready to archive/restore 1.
PK-9_multi.book Page 18 Monday, April 23, 2012 3:03 PM MIDI Pedalboard PK-9 Parameter mode 5. Stop recording on the external sequencer and save the data. Transmitting your settings back to the PK-9 1. Start the playback of the data you saved (and loaded). r All of the PK-9’s indicators light and the display shows “dMP” (Dump). When the data dump has been received, the display briefly indicates “ok”.
PK-9_multi.book Page 19 Monday, April 23, 2012 3:03 PM MIDI Pedalboard PK-9 r Appendix 5. Appendix ■ The PK-9 suddenly went off When 240 minutes have elapsed since you last played or operated this unit, the power will turn off automatically. (This is the factory setting). If you don’t need the power to turn off automatically, turn the “Auto Off” setting “Off.” Refer to page 16.
PK-9_multi.
PK-9_multi.book Page 21 Monday, April 23, 2012 3:03 PM DEUTSCH Bedienungsanleitung DEUTSCH r Vielen Dank für Ihre Entscheidung zu einer MIDI-Pedaleinheit PK-9. Außer den Pedalen, die Ihr Orgelspiel noch interessanter gestalten, bietet das PK-9 ein Schwellpedal für expressive Lautstärkevariationen, zwei Fußtaster für die Steuerung bestimmter Orgelfunktionen und ein Pedal zum Halten der gespielten Noten. Copyright © 2012 ROLAND EUROPE. Alle Rechte vorbehalten.
PK-9_multi.book Page 22 Monday, April 23, 2012 3:03 PM MIDI-Pedaleinheit PK-9 Hinweise für eine sichere Handhabung HINWEISE FÜR EINE SICHERE HANDHABUNG MASSNAHMEN FÜR DIE VERMEIDUNG VON BRÄNDEN, STROMSCHLÄGEN UND VERLETZUNGEN Über die WARNUNG und WARNUNG VORSICHT Hinweise Dieses Symbol signalisiert Dinge, welche den Anwender bei unsachgemäßer Behandlung auf die Gefahr schwerer Verletzungen (eventuell mit Todesfolge) hinweisen.
PK-9_multi.book Page 23 Monday, April 23, 2012 3:03 PM MIDI-Pedaleinheit PK-9 r Hinweise für eine sichere Handhabung WARNUNG • Wenn sich das Instrument an einem Ort befindet, wo Kinder spielen, müssen Sie darauf achten, dass sie nicht unbeaufsichtigt das Instrument zu verwenden versuchen. Kinder dürfen das Instrument nur unter Aufsicht eines Erwachsenen bedienen. ................................................................................................. Umsichtig behandeln ......................
PK-9_multi.book Page 24 Monday, April 23, 2012 3:03 PM MIDI-Pedaleinheit PK-9 Wichtige Hinweise 1. Wichtige Hinweise Bitte lesen Sie sich außer “Hinweise für eine sichere Handhabung” auf S. 22 auch folgende Punkte durch: Stromversorgung • Schließen Sie das Instrument niemals an eine Steckdose an, die auch Geräte speist, die mit einem Wechselrichter arbeiten (z.B. Kühlschrank, Waschmaschine, Mikrowellenherd oder Klimaanlage) oder einen Motor enthalten.
PK-9_multi.book Page 25 Monday, April 23, 2012 3:03 PM MIDI-Pedaleinheit PK-9 r Wichtige Hinweise Inhaltsübersicht DEUTSCH 1. Wichtige Hinweise . . . . . . . . . . . . . . . . . . . . . . . . . . . . . . . . . . . . . . . . . . . . . . . . . . . . . . . . . . . . . . . . .24 2. Beschreibung der Bedienelemente. . . . . . . . . . . . . . . . . . . . . . . . . . . . . . . . . . . . . . . . . . . . . . . . . . . .26 Bedienfeld. . . . . . . . . . . . . . . . . . . . . . . . . . . . . . . . . . . . . . . . . .
PK-9_multi.book Page 26 Monday, April 23, 2012 3:03 PM MIDI-Pedaleinheit PK-9 Beschreibung der Bedienelemente 2. Beschreibung der Bedienelemente Bedienfeld D A C D B E D Fußtaster Dieses dreistellige Display informiert Sie über die gewählte Funktion oder den eingestellten Parameterwert. B CONTROL 1- und CONTROL 2-Pedal Diese Pedale senden MIDI-Befehle. Ihre Funktion kann im Parametermodus gewählt werden (S. 32).
PK-9_multi.book Page 27 Monday, April 23, 2012 3:03 PM MIDI-Pedaleinheit PK-9 r Rückseite Rückseite DEUTSCH A B C D E Schließen Sie hier das beiliegende Netzteil an (S. 29). E POWER-Taster Hiermit schalten Sie das Instrument ein und aus (S. 30). Laut Vorgabe schaltet sich das PK-9 automatisch aus, wenn Sie es länger als 240 Minuten (4 Stunden) nicht bedienen. Wenn das PK-9 automatisch ausgeschaltet wurde, können Sie es mit dem [POWER]-Taster wieder einschalten.
PK-9_multi.book Page 28 Monday, April 23, 2012 3:03 PM MIDI-Pedaleinheit PK-9 Vor dem Einsatz des PK-9 3. Vor dem Einsatz des PK-9 Anbringen des Schwellpedals Das Schwellpedal ist ab Werk nicht auf dem PK-9 installiert. Installieren Sie das Schwellpedal, bevor Sie das PK-9 mit einem externen Gerät verbinden. Anm. Seien Sie beim Anbringen/Entfernen des Schwellpedals vorsichtig, dass Sie nicht auf die Handschrauben treten.
PK-9_multi.book Page 29 Monday, April 23, 2012 3:03 PM MIDI-Pedaleinheit PK-9 r Anschließen des PK-9 mit dem PK-Kabel Anm. Verbinden Sie das PK-9 über das beiliegende PK-Kabel mit dem externen Instrument. Bei Herstellen dieser Verbindung wird das PK-9 vom externen Gerät gespeist (Sie benötigen also kein optionales Netzteil). Anschließen des beiliegenden Netzteils Das PK-9 kann auch mit dem beiliegenden PSB-1U Netzteil betrieben werden. Anm.
PK-9_multi.book Page 30 Monday, April 23, 2012 3:03 PM MIDI-Pedaleinheit PK-9 Vor dem Einsatz des PK-9 Anm. Anschließen eines externen MIDIGeräts an das PK-9 Dieses Produkt ist mit einer Schutzschaltung versehen. Daher dauert es nach dem Einschalten ein paar Sekunden, bevor Sie etwas hören. Das PK-9 kann auch als MIDI-Steuerquelle für externe Geräte verwendet werden. 1. Schalten Sie das externe Instrument aus und stellen Sie seine Lautstärke auf den Mindestwert. Anm.
PK-9_multi.book Page 31 Monday, April 23, 2012 3:03 PM MIDI-Pedaleinheit PK-9 r Anschließen eines optionalen Schwellpedals oder Fußtasters An die EXTERNAL PEDAL-Buchse des PK-9 kann ein optionaler Fußtaster (DP-Serie von Roland oder BOSS FS-5U) bzw. ein weiteres Expression-Pedal (EV-Serie von Roland) angeschlossen werden.
PK-9_multi.book Page 32 Monday, April 23, 2012 3:03 PM MIDI-Pedaleinheit PK-9 Parametermodus 4. Parametermodus Im Parametermodus haben Sie Zugriff auf zahlreiche praktische Funktionen. Arbeitsweise im Parametermodus Speichern der Einstellungen (Save) Die Einstellungen des Parametermodus’ können folgendermaßen geändert werden. Alle Änderungen, die Sie vornehmen, werden beim Ausschalten des PK-9 wieder gelöscht.
PK-9_multi.book Page 33 Monday, April 23, 2012 3:03 PM MIDI-Pedaleinheit PK-9 r ‘Parameter’-Einstellungen ‘Parameter’-Einstellungen ● Transpose Display Vorgabe –5~6 0 Mit dieser Funktion kann die Tonhöhe der Pedale in Halbtonschritten geändert werden. ● Octave Display Vorgabe 0~8 2 Mon (Mono): Hiermit kann der Mono-Modus einund ausgeschaltet werden. In diesem Modus ist das PK-9 monophon. Das bedeutet, dass nur jeweils ein Notenbefehl gesendet wird.
PK-9_multi.book Page 34 Monday, April 23, 2012 3:03 PM MIDI-Pedaleinheit PK-9 Parametermodus ● Touch (Anschlagkurve) ● Funktion des rechten Fußtasters Display S r Wert Vorgabe C18, C19, Por C19 Mit diesem Parameter können Sie dem Fußtaster rechts neben dem Schwellpedal eine Funktion zuordnen. Unter “Funktion des linken Fußtasters” finden Sie eine Übersicht der Möglichkeiten. Anm.
PK-9_multi.book Page 35 Monday, April 23, 2012 3:03 PM MIDI-Pedaleinheit PK-9 r Laden der Werksvorgaben (Factory Reset) ● Pedal Assign Display Vorgabe ● Auto Off Aof 0ff, 10, 30, 240 Bei Bedarf können Sie die Einstellungen auf Ihrem Computer (hierfür benötigen Sie eine MIDI-Schnittstelle) oder mit einem externen Sequenzer archivieren. Vorbereitung für die Datenarchivierung 1. Verbinden Sie die MIDI IN-Buchse des externen Sequenzers mit der MIDI OUT-Buchse des PK-9. 2.
PK-9_multi.book Page 36 Monday, April 23, 2012 3:03 PM MIDI-Pedaleinheit PK-9 Parametermodus 4. Warten Sie, bis der eventuell vorhandene Einzähler des Sequenzers beendet ist und drücken Sie dann das Haltepedal, um die Datenübertragung zu starten. Sobald die Datenübertragung beendet ist, zeigt das Display “ok” an und das PK-9 verlässt automatisch den Parameter-Modus. 5. Halten Sie die Aufnahme des Sequenzers/ Computers an und speichern Sie die Daten. Rückübertragung der Daten zum PK-9 1.
PK-9_multi.book Page 37 Monday, April 23, 2012 3:03 PM MIDI-Pedaleinheit PK-9 r Anhang 5. Anhang ■ Das PK-9 ist plötzlich ausgegangen Wenn Sie das Instrument länger als 240 Minuten nicht verwenden, schaltet es sich automatisch aus. (Dies ist die Werksvorgabe.) Um zu verhindern, dass sich das Instrument automatisch ausschaltet, müssen Sie “Auto Off” auf “Off” stellen. Siehe Seite 35.
PK-9_multi.
PK-9_multi.book Page 39 Monday, April 23, 2012 3:03 PM Caractéristiques Copyright © 2012 ROLAND EUROPE. Tous droits réservés. Toute reproduction intégrale ou partielle de cette publication est interdite sous quelque forme que ce soit sans l’autorisation écrite de Roland Europe S.p.a. Roland et GS sont des marques déposées ou des marques commerciales de Roland Corporation aux Etats-Unis et/ou dans d’autres pays.
PK-9_multi.book Page 40 Monday, April 23, 2012 3:03 PM Pédalier MIDI PK-9 Consignes de sécurité CONSIGNES DE SECURITÉ INSTRUCTIONS POUR LA PREVENTION D'INCENDIE, CHOC ÉLECTRIQUE OU BLESSURE A propos des symboles Avertissement et Précaution Sert aux instructions destin es alerter l’utilisateur d’un risque mortel ou de AVERTISSEMENT blessure grave en cas d’utilisation incorrecte de l’unit .
PK-9_multi.book Page 41 Monday, April 23, 2012 3:03 PM Pédalier MIDI PK-9 r Consignes de sécurité AVERTISSEMENT • Lorsque vous placez l’instrument dans des endroits accessibles à des enfants, veillez à ce que l’instrument ne soit pas malmené. La présence d’un adulte est impérative pour veiller à une utilisation correcte du produit. ................................................................................................. Ni chute ni heurts violents ..............................................
PK-9_multi.book Page 42 Monday, April 23, 2012 3:03 PM Pédalier MIDI PK-9 Remarques importantes 1. Remarques importantes En plus des informations de la section “Consignes de sécurité” à la p. 40, veuillez lire et suivre les conseils suivants: Alimentation Réparations et données • Ne branchez jamais ce produit à une prise faisant partie d’un circuit auquel vous avez branché un appareil contenant un inverseur (frigo, machine à lessiver, four à micro-ondes ou climatisation), voire un moteur.
PK-9_multi.book Page 43 Monday, April 23, 2012 3:03 PM Pédalier MIDI PK-9 r Remarques importantes Sommaire FRANÇAIS 1. Remarques importantes . . . . . . . . . . . . . . . . . . . . . . . . . . . . . . . . . . . . . . . . . . . . . . . . . . . . . . . . . . . .42 2. Description . . . . . . . . . . . . . . . . . . . . . . . . . . . . . . . . . . . . . . . . . . . . . . . . . . . . . . . . . . . . . . . . . . . . . . .44 Panneau avant. . . . . . . . . . . . . . . . . . . . . . . . . . . . . . . . . . . . .
PK-9_multi.book Page 44 Monday, April 23, 2012 3:03 PM Pédalier MIDI PK-9 Description 2. Description Panneau avant D A C D B E D Commutateurs au pied Cet écran à trois caractères indique la fonction en vigueur ou le réglage du paramètre choisi. B Pédales CONTROL 1 et CONTROL 2 Ces pédales transmettent des commandes MIDI. Leurs fonctions peuvent être choisies en mode paramètre (page 50).
PK-9_multi.book Page 45 Monday, April 23, 2012 3:03 PM Pédalier MIDI PK-9 r Panneau arrière Panneau arrière FRANÇAIS A B C D E C’est ici que vous pouvez brancher l’adaptateur secteur fourni (page 47). E Commutateur POWER Met le produit sous/hors tension (page 48). Avec les réglages d’usine, l’alimentation du PK-9 est automatiquement coupée après 240 minutes (4 heures) d’inactivité.
PK-9_multi.book Page 46 Monday, April 23, 2012 3:03 PM Pédalier MIDI PK-9 Préparatifs avant l’utilisation du PK-9 3. Préparatifs avant l’utilisation du PK-9 Installation de la pédale d’expression A la livraison, la pédale d’expression n’est pas encore installée sur le PK-9. Il convient d’installer cette pédale avant de brancher le PK-9 à d’autres appareils. Pendant l’installation ou la dépose de la pédale d’expression, ne marchez pas sur les vis à bouton.
PK-9_multi.book Page 47 Monday, April 23, 2012 3:03 PM Pédalier MIDI PK-9 r Connexion du PK-9 avec un câble PK Branchez le PK-9 avec le câble PK à un instrument externe. Cette connexion permet d’alimenter le PK-9 à partir d’un appareil externe (vous n’avez donc pas besoin de l’adaptateur). Connexion de l’adaptateur secteur fourni Le PK-9 peut aussi être alimenté par l’adaptateur PSB-1U fourni. AT-350C (Autres instruments compatibles: Roland AT-900C, C-200 etc.
PK-9_multi.book Page 48 Monday, April 23, 2012 3:03 PM Pédalier MIDI PK-9 Préparatifs avant l’utilisation du PK-9 Connexion d’un appareil MIDI externe au PK-9 Cet appareil est doté d’un circuit de protection. Il faut attendre un bref laps de temps (quelques secondes) après la mise sous tension pour qu’il fonctionne normalement. Le PK-9 convient aussi comme contrôleur MIDI pour piloter un instrument externe. 1.
PK-9_multi.book Page 49 Monday, April 23, 2012 3:03 PM Pédalier MIDI PK-9 r Connexion d’une pédale d’expression/d’un commutateur au pied en option au PK- 9 Le PK-9 est doté d’une prise EXTERNAL PEDAL permettant de brancher un commutateur au pied en option (série Roland DP ou BOSS FS-5U) ou une pédale d’expression (série Roland EV).
PK-9_multi.book Page 50 Monday, April 23, 2012 3:03 PM Pédalier MIDI PK-9 Mode paramètre 4. Mode paramètre Le mode paramètre vous donne accès à divers réglages. Opérations élémentaires en mode paramètre Cette section décrit la procédure de base pour effectuer des réglages en mode paramètre. 1. Sauvegarder les réglages (‘Save’) A la mise hors tension du PK-9, toutes vos modifications sont effacées.
PK-9_multi.book Page 51 Monday, April 23, 2012 3:03 PM Pédalier MIDI PK-9 r Paramètres disponibles Paramètres disponibles ● Transpose Ecran Par défaut –5~6 0 Cette fonction vous permet de transposer la hauteur des pédales par demi-tons. ● Octave Ecran Par défaut 0~8 2 Ecran Cette fonction vous permet de transposer la hauteur des pédales par octaves.
PK-9_multi.book Page 52 Monday, April 23, 2012 3:03 PM Pédalier MIDI PK-9 Mode paramètre ● Fonction du commutateur au pied droit Ecran S r Valeur Par défaut C18, C19, Por C19 ● Portamento Time Ecran Ce paramètre permet d’assigner la fonction voulue au commutateur au pied à droite de la pédale d’expression. Voyez “Fonction du commutateur au pied gauche” pour les réglages disponibles.
PK-9_multi.book Page 53 Monday, April 23, 2012 3:03 PM Pédalier MIDI PK-9 r Rétablissement des réglages d’usine (Factory Reset) ● Auto Off 240 Vous pouvez archiver vos réglages sur ordinateur (moyennant une interface MIDI disponible dans le commerce) ou sur séquenceur externe. ● MIDI Dump Voyez “Archiver vos réglages (MIDI Dump)” à la p. 53. dmp Remarque: Votre ordinateur doit peut-être être branché à une interface MIDI. Dans ce cas, le PK-9 doit être branché à l’interface MIDI.
PK-9_multi.book Page 54 Monday, April 23, 2012 3:03 PM Pédalier MIDI PK-9 Mode paramètre Quand le transfert MIDI est terminé, l’écran affiche “ok” et le PK-9 quitte automatiquement le mode Parameter. 5. Arrêtez l’enregistrement sur le séquenceur externe et sauvegardez les données. Renvoi des données archivées au PK-9 1. Lancez la reproduction des données sauvegardées (et chargées). r Tous les témoins du PK-9 s’allument et l’écran affiche “dMP” (Dump).
PK-9_multi.book Page 55 Monday, April 23, 2012 3:03 PM Pédalier MIDI PK-9 r Appendice 5. Appendice ■ Le PK-9 s’est éteint tout seul L’alimentation de l’instrument est automatiquement coupée après 240 minutes d’inactivité. (C’est le réglage par défaut.) Pour désactiver la coupure automatique de l’alimentation, réglez “Auto Off” sur “Off”. Voyez page 53.
PK-9_multi.
PK-9_multi.book Page 57 Monday, April 23, 2012 3:03 PM Caratteristiche Copyright © 2012 ROLAND EUROPE. Tutti i diritti sono riservati. Nessuna parte di questa pubblicazione può essere riprodotta in qualsiasi forma senza autorizzazione scritta di Roland Europe S.p.a. Roland e GS sono marchi di fabbrica o marchi registrati di Roland Corporation negli Stati Uniti e/o in altri paesi. ITALIANO Prima di usare questo strumento, leggete attentamente “Usare lo strumento in sicurezza” a p.
PK-9_multi.book Page 58 Monday, April 23, 2012 3:03 PM Pedaliera MIDI PK-9 Usare lo strumento in sicurezza Viene usato per istruzioni che avvisano l'utente del rischio di morte o ferite gravi nel caso in cui l'unità venisse utilizzata impropriamente. Viene usato per istruzioni che avvisano l'utente del rischio di ferite o danni a materiali nel caso in cui l'unità venisse usata impropriamente.
PK-9_multi.book Page 59 Monday, April 23, 2012 3:03 PM Pedaliera MIDI PK-9 r Usare lo strumento in sicurezza • Quando usate lo strumento in presenza di bambini, fate attenzione a che lo strumento non venga maltrattato. Un adulto dovrebbe sempre essere presente per sorvegliare. Non fatelo cadere né fategli subire forti impatti. ................................................................................................. Non condividete la stessa presa di corrente con troppe apparecchiature ........
PK-9_multi.book Page 60 Monday, April 23, 2012 3:03 PM Pedaliera MIDI PK-9 Note importanti 1. Note importanti Oltre a quanto esposto nella sezione “Usare lo strumento in sicurezza” a p. 58, leggete e osservate le seguenti precauzioni: Alimentazione Manutenzione • Non collegate questo strumento alla stessa presa di corrente utilizzata da altri apparecchi controllati da un inverter (per es. un frigorifero, una lavatrice, un forno a microonde o un condizionatore) o che contengano un motore.
PK-9_multi.book Page 61 Monday, April 23, 2012 3:03 PM Pedaliera MIDI PK-9 r Note importanti Indice ITALIANO 1. Note importanti . . . . . . . . . . . . . . . . . . . . . . . . . . . . . . . . . . . . . . . . . . . . . . . . . . . . . . . . . . . . . . . . . . .60 2. Descrizione dei pannelli . . . . . . . . . . . . . . . . . . . . . . . . . . . . . . . . . . . . . . . . . . . . . . . . . . . . . . . . . . . .62 Pannello frontale. . . . . . . . . . . . . . . . . . . . . . . . . . . . . . . . . . . . . . .
PK-9_multi.book Page 62 Monday, April 23, 2012 3:03 PM Pedaliera MIDI PK-9 Descrizione dei pannelli 2. Descrizione dei pannelli Pannello frontale D A C D B E D Interruttori del Pedale Questo schermo a tre caratteri vi tiene informati sulle funzioni e i valori dei parametri attuali che avete impostato. B Pedali CONTROL 1 e CONTROL 2. Questi pedali vi permettono di controllare il dispositivo collegato via MIDI. La loro funzione può essere impostata nel modo Parameter (pagina 68).
PK-9_multi.book Page 63 Monday, April 23, 2012 3:03 PM Pedaliera MIDI PK-9 r Pannello posteriore Pannello posteriore ITALIANO A B C D E Vi permette di collegare l’alimentatore fornito in dotazione (pagina 65). E Interruttore POWER Accende e spegne lo strumento (pagina 66). Con le impostazioni di fabbrica, la PK-9 si spegne automaticamente 240 minuti (4 ore) dopo aver smesso di suonarla o di usarla. Se la PK-9 si è spenta automaticamente, potete riaccenderla con l’interruttore [POWER].
PK-9_multi.book Page 64 Monday, April 23, 2012 3:03 PM Pedaliera MIDI PK-9 Preparativi prima di usare la PK-9 3. Preparativi prima di usare la PK-9 Montare il pedale di espressione La PK-9 viene fornita con il pedale di espressione smontato. Prima di collegare la PK-9 ad un dispositivo esterno, vi preghiamo di montare il pedale di espressione. Nota Quando montate o smontate il pedale di espressione, fate attenzione a non pestare le viti a pomello.
PK-9_multi.book Page 65 Monday, April 23, 2012 3:03 PM Pedaliera MIDI PK-9 r Collegare la PK-9 ad uno strumento esterno con il suo cavo PK Nota Con il cavo PK, fornito con la PK-9, collegate lo strumento esterno e la PK-9. Questo sistema di connessione consente di alimentare la PK-9 dallo strumento esterno (così non avete bisogno dell’alimentatore fornito in dotazione). Collegare l’alimentatore fornito in dotazione La PK-9 può anche essere alimentata dall’alimentatore PSB-1U fornito in dotazione.
PK-9_multi.book Page 66 Monday, April 23, 2012 3:03 PM Pedaliera MIDI PK-9 Preparativi prima di usare la PK-9 Se lo strumento esterno suona le note, il collegamento è completo. Collegare la PK-9 ad uno strumento MIDI esterno Nota Potete usare la vostra PK-9 come controllo MIDI per un generatore sonoro MIDI. 1. Assicuratevi che lo strumento MIDI esterno sia spento ed il suo volume abbassato.
PK-9_multi.book Page 67 Monday, April 23, 2012 3:03 PM Pedaliera MIDI PK-9 r Collegare alla PK-9 un pedale esterno o un interruttore a pedale opzionali Nota La PK-9 dispone di un connettore EXTERNAL PEDAL al quale potete collegare un interruttore a pedale opzionale (Roland serie DP o BOSS FS-5U) oppure un pedale di espressione aggiuntivo (Roland serie EV).
PK-9_multi.book Page 68 Monday, April 23, 2012 3:03 PM Pedaliera MIDI PK-9 Modo Parameter 4. Modo Parameter Il modo Parameter vi permette di eseguire varie impostazioni della pedaliera. Operazioni basilari nel modo Parameter Salvare le impostazioni (funzione ‘Save’) Ecco la procedura di base per eseguire le impostazioni nel modo Parameter. Quando la PK-9 viene spenta, le impostazioni tornano ai loro valori di default.
PK-9_multi.book Page 69 Monday, April 23, 2012 3:03 PM Pedaliera MIDI PK-9 r Impostazioni Parameter Impostazioni Parameter ● Transpose Schermo Default –5~6 0 Questo parametro vi permette di trasporre l’intonazione delle note dei pedali ad intervalli di semitono. ● Octave Schermo Default 0~8 2 ● CONTROL 2 Assign Schermo Questo parametro vi permette di trasporre l’intonazione delle note dei pedali ad intervalli di ottava.
PK-9_multi.book Page 70 Monday, April 23, 2012 3:03 PM Pedaliera MIDI PK-9 Modo Parameter ● Assegnazione Interruttore Destro del Pedale Schermo S r Nota Valore Default C18, C19, Por C19 ● Portamento Time Schermo Questo parametro vi permette di assegnare una funzione all’interruttore che si trova sul lato destro del pedale di espressione. Per la spiegazione delle impostazioni disponibili vedi “Assegnazione Interruttore Sinistro del Pedale”.
PK-9_multi.book Page 71 Monday, April 23, 2012 3:03 PM Pedaliera MIDI PK-9 r Ripristinare le impostazioni alle condizioni di fabbrica (Factory Reset) FAC ● MIDI Dump Consultate “Archiviare e ripristinare le vostre impostazioni (MIDI Dump)” a p. 71. dmp SAv Preparativi per l’archiviazione/ripristino 1. Usate un cavo MIDI (acquistabile in negozio) per collegare il connettore MIDI IN del sequencer esterno al connettore MIDI OUT della PK-9. 2.
PK-9_multi.book Page 72 Monday, April 23, 2012 3:03 PM Pedaliera MIDI PK-9 Modo Parameter Quando il MIDI Dump è stato completato, lo schermo visualizza “ok” e la PK-9 esce dal modo Parameter. 5. Interrompete la registrazione sul sequencer esterno e salvate i dati. Ritrasmettere le vostre impostazioni alla PK-9 1. Fate partire la riproduzione dei dati che avete salvato (e caricato). r Tutti gli indicatori della PK-9 si illuminano e lo schermo visualizza “dMP” (Dump).
PK-9_multi.book Page 73 Monday, April 23, 2012 3:03 PM Pedaliera MIDI PK-9 r Appendice 5. Appendice ■ La PK-9 si è spenta improvvisamente ■ Non c’è alimentazione Il canale MIDI dello strumento esterno corrisponde al canale MIDI della PK-9? → Quando collegate uno strumento MIDI esterno, dovete far corrispondere il canale MIDI della PK-9 con il canale MIDI impostato per lo strumento collegato. Per come impostare il canale di trasmissione della PK-9 consultate “MIDI Transmit Channel” a p. 69.
PK-9_multi.
PK-9_multi.book Page 75 Monday, April 23, 2012 3:03 PM Características Copyright © 2012 ROLAND EUROPE. Todos los derechos reservados. Ninguna parte de esta publicación podrá reproducirse de ninguna forma sin el permiso escrito de Roland Europe S.p.a.. Roland y GS son marcas comerciales registradas o marcas comerciales de Roland Corporation en los Estados Unidos y/o en otros países.
PK-9_multi.book Page 76 Monday, April 23, 2012 3:03 PM Pedal MIDI dinámico PK-6 Utilizar el equipo de forma segura ATENCIÓN No desmonte ni modifique el equipo usted mismo • No abra (ni modifique de ningún modo) el equipo o el adaptador de CA. .................................................................................................
PK-9_multi.book Page 77 Monday, April 23, 2012 3:03 PM Pedal MIDI dinámico PK-6 r Utilizar el equipo de forma segura • Si utiliza el equipo en lugares donde suela haber niños, asegúrese de que no puedan hacer un mal uso del equipo. Debería haber siempre un adulto para supervisar el uso y ayudar. ................................................................................................. • Evite que el equipo sufra golpes fuertes. (¡No lo deje caer!) ................................................
PK-9_multi.book Page 78 Monday, April 23, 2012 3:03 PM Pedal MIDI dinámico PK-6 Notas importantes 1. Notas importantes Además de los puntos indicados en la sección “Utilizar el equipo de forma segura” en la pág.
PK-9_multi.book Page 79 Monday, April 23, 2012 3:03 PM Pedal MIDI dinámico PK-6 r Notas importantes Contenido ESPAÑOL 1. Notas importantes . . . . . . . . . . . . . . . . . . . . . . . . . . . . . . . . . . . . . . . . . . . . . . . . . . . . . . . . . . . . . . . . .78 2. Descripciones del panel. . . . . . . . . . . . . . . . . . . . . . . . . . . . . . . . . . . . . . . . . . . . . . . . . . . . . . . . . . . . .80 Panel frontal . . . . . . . . . . . . . . . . . . . . . . . . . . . . . . . . . . . . .
PK-9_multi.book Page 80 Monday, April 23, 2012 3:03 PM Pedal MIDI dinámico PK-6 Descripciones del panel 2. Descripciones del panel Panel frontal D A C D B E D Conmutadores de pedal Esta pantalla de tres caracteres le mantiene informado sobre la función actual, o el valor del parámetro que ha ajustado. B Pedales CONTROL 1 y CONTROL 2 Estos pedales le permiten controlar el dispositivo conectado a través de MIDI. Sus funciones se pueden ajustar en el modo Parameter (página 86).
PK-9_multi.book Page 81 Monday, April 23, 2012 3:03 PM Pedal MIDI dinámico PK-6 r Panel posterior Panel posterior ESPAÑOL A B C D E Permite conectar el adaptador de CA incluido (página 83). E Conmutador POWER Activa y desactiva el equipo (página 84). Con los ajustes originales, el PK-9 se desactivará automáticamente si pasan 240 minutos (4 horas) sin que toque ni utilice el PK-9. Si el PK-9 se ha desactivado automáticamente, puede utilizar el conmutador [POWER] para volver a activarlo.
PK-9_multi.book Page 82 Monday, April 23, 2012 3:03 PM Pedal MIDI dinámico PK-6 Pasos previos al uso del PK-9 3. Pasos previos al uso del PK-9 Instalar el pedal de expresión El PK-9 se entrega con el pedal de expresión extraído. Antes de conectar el PK-9 a un dispositivo externo, instale el pedal de expresión. Nota Al instalar o extraer el pedal de expresión, procure no pisar ningún tornillo con pomo.
PK-9_multi.book Page 83 Monday, April 23, 2012 3:03 PM Pedal MIDI dinámico PK-6 r Conectar el PK-9 a un instrumento externo con el cable PK Nota Para evitar funcionamientos incorrectos y fallos de los equipos, baje siempre el volumen y desactive todas las unidades antes de realizar cualquier conexión. Utilice el cable PK suministrado con el PK-9 para conectar el instrumento externo y el PK-9.
PK-9_multi.book Page 84 Monday, April 23, 2012 3:03 PM Pedal MIDI dinámico PK-6 Pasos previos al uso del PK-9 3. Conecte el cable de alimentación a una toma de corriente. Conectar el PK-9 a un dispositivo MIDI externo 7. 8. Si el instrumento externo reproduce las notas, las conexiones se han completado correctamente. Puede utilizar el PK-9 como un controlador MIDI para un generador de tonos MIDI. 1. Nota 2. Nota Este equipo incorpora un circuito de protección.
PK-9_multi.book Page 85 Monday, April 23, 2012 3:03 PM Pedal MIDI dinámico PK-6 r Conectar un pedal externo o un conmutador de pedal opcional al PK-9 ESPAÑOL En este caso, los mensajes que recibe el PK-9 a través del zócalo MIDI IN se mezclan (“fusionan”) con los mensajes MIDI del PK-9 y se transmiten a través del zócalo MIDI OUT a un módulo MIDI externo (función “Soft Thru”).
PK-9_multi.book Page 86 Monday, April 23, 2012 3:03 PM Pedal MIDI dinámico PK-6 Modo Parameter 4. Modo Parameter El modo Parameter permite definir varios ajustes para este equipo. Operaciones básicas en el modo Parameter Éste es el procedimiento básico para definir ajustes en el modo Parameter. 1. Guardar los ajustes (función Save) Cuando desactive el PK-9, volverá a los ajustes predeterminados.
PK-9_multi.book Page 87 Monday, April 23, 2012 3:03 PM Pedal MIDI dinámico PK-6 r Ajustes ‘Parameter’ Ajustes ‘Parameter’ ● Transpose Pantalla Por defecto –5~6 0 Este parámetro permite transponer la afinación de las notas de los pedales en intervalos de semitono. ● Octave Pantalla Por defecto 0~8 2 Este parámetro permite transponer la afinación de las notas de los pedales en intervalos de una octava.
PK-9_multi.book Page 88 Monday, April 23, 2012 3:03 PM Pedal MIDI dinámico PK-6 Modo Parameter para especificar la velocidad a la que se realizan dichos deslizamientos. Cuanto mayor sea el valor, más lentas serán las transiciones. ● Foot Switch Right Assign Pantalla S r Valor Por defecto C18, C19, Por C19 Este parámetro permite asignar una función al conmutador de pedal del lado derecho del pedal de expresión.
PK-9_multi.book Page 89 Monday, April 23, 2012 3:03 PM Pedal MIDI dinámico PK-6 r Restaurar los ajustes originales (Factory Reset) ● Pedal Assign Pantalla Por defecto Puede archivar y restaurar sus ajustes utilizando un ordenador (con un interface MIDI comercial) o un secuenciador externo. Prepararse para archivar/restaurar 1. Utilice un cable MIDI (comercial) para conectar el zócalo MIDI IN del secuenciador externo al zócalo MIDI OUT del PK-9. 2.
PK-9_multi.book Page 90 Monday, April 23, 2012 3:03 PM Pedal MIDI dinámico PK-6 Modo Parameter 5. Detenga la grabación en el secuenciador externo y guarde los datos. Volver a transmitir los ajustes al PK-9 1. Inicie la reproducción de los datos que ha guardado (y cargado). r Todos los indicadores del PK-9 se iluminan y la pantalla muestra “dMP” (Dump). Una vez recibido el volcado de datos, la pantalla indica brevemente “ok”.
PK-9_multi.book Page 91 Monday, April 23, 2012 3:03 PM Pedal MIDI dinámico PK-6 r Apéndice 5. Apéndice ■ El PK-9 se ha desactivado repentinamente ■ No se activa ESPAÑOL Si el PK-9 debe activarse mediante el zócalo PK OUT ¿Ha conectado el cable PK incluido al conector PK IN del instrumento externo y al zócalo PK OUT del PK-9? → Consulte la sección “Conectar el PK-9 a un instrumento externo con el cable PK” en la pág. 83. ¿Ha activado el instrumento externo? → Active el instrumento externo.
PK-9_multi.
PK-9_multi.book Page 93 Monday, April 23, 2012 3:03 PM Functies Copyright © 2012 ROLAND EUROPE. Alle rechten voorbehouden. Het kopiëren, verveelvoudigen of openbaar maken van dit document, hetzij gedeeltelijk, hetzij in z’n geheel, is zonder de schriftelijke toestemming van Roland Europe S.p.a. verboden. Roland en GS zijn in de VS en andere landen geregistreerde handelsmerken of handelsmerken van Roland Corporation.
PK-9_multi.book Page 94 Monday, April 23, 2012 3:03 PM MIDI-pedaaleinheid PK-9 Veilig gebruik van dit product VEILIG GEBRUIK VAN DIT APPARAAT INSTRUCTIES VOOR HET VOORKOMEN VAN BRAND, ELEKTRISCHE SCHOKKEN EN VERWONDINGEN Over de WAARSCHUWING en LET OP labels Over de symbolen Wijst de gebruiker op het risico op dodelijke ongevallen of zware verWAARSCHUWING wondingen als gevolg van een fout gebruik van dit apparaat. Het foute gebruik van dit apparaat kan leiden tot verwondingen en of materi le schade.
PK-9_multi.book Page 95 Monday, April 23, 2012 3:03 PM MIDI-pedaaleinheid PK-9 r Veilig gebruik van dit product WAARSCHUWING • Als het instrument zich op een plaats bevindt waar vaak kinderen spelen, moet u erop letten dat ze niet proberen het instrument te bedienen, wanneer u er niet bent. Kinderen mogen het instrument alleen onder toezicht van een volwassene bedienen. .................................................................................................
PK-9_multi.book Page 96 Monday, April 23, 2012 3:03 PM MIDI-pedaaleinheid PK-9 Belangrijke opmerkingen 1. Belangrijke opmerkingen Lees, naast “Veilig gebruik van dit product” op blz. 94, ook de volgende punten even door: Voeding Herstellingen en uw data • Sluit dit instrument nooit aan op een stopcontact waarmee u al een apparaat met invertor (koelkast, wasmachine, magnetron of air conditioning) of motor hebt aangesloten.
PK-9_multi.book Page 97 Monday, April 23, 2012 3:03 PM MIDI-pedaaleinheid PK-9 r Belangrijke opmerkingen 1. Belangrijke opmerkingen . . . . . . . . . . . . . . . . . . . . . . . . . . . . . . . . . . . . . . . . . . . . . . . . . . . . . . . . . . .96 2. Voorzieningen op de panelen. . . . . . . . . . . . . . . . . . . . . . . . . . . . . . . . . . . . . . . . . . . . . . . . . . . . . . . .98 NEDERLANDS Inhoud Frontpaneel . . . . . . . . . . . . . . . . . . . . . . . . . . . . . . . . . . . . . . . . .
PK-9_multi.book Page 98 Monday, April 23, 2012 3:03 PM MIDI-pedaaleinheid PK-9 Voorzieningen op de panelen 2. Voorzieningen op de panelen Frontpaneel D A C D B E D Voetschakelaars Dit display met drie posities houdt u op de hoogte van de gekozen functie of parameterinstelling. B CONTROL 1- en CONTROL 2-pedaal Deze pedalen zenden MIDI-commando’s. Hun functie kan in de parametermode worden gekozen (blz. 104).
PK-9_multi.book Page 99 Monday, April 23, 2012 3:03 PM MIDI-pedaaleinheid PK-9 r Achterpaneel A B C NEDERLANDS Achterpaneel D E C MIDI-connectors Hiermee kunt u de PK-9 op een extern MIDI-apparaat aansluiten (blz. 102). NEDERLANDS Sluit hier de bijgeleverde adapter aan (blz. 101). E POWER-schakelaar Hiermee schakelt u het instrument in/uit (blz. 102). Bij levering staat de PK-9 zo ingesteld dat hij automatisch wordt uitgeschakeld, wanneer u hem meer dan 240 minuten (4 uur) niet gebruikt.
PK-9_multi.book Page 100 Monday, April 23, 2012 3:03 PM MIDI-pedaaleinheid PK-9 Voorbereiding van de PK-9 3. Voorbereiding van de PK-9 Installeren van het zwelpedaal Bij levering is het zwelpedaal niet op de PK-9 geïnstalleerd. Installeer het zwelpedaal alvorens de PK-9 op een ander apparaat aan te sluiten. Wees tijdens de installatie/het verwijderen van het zwelpedaal voorzichtig dat u niet op de knopschroeven trapt.
PK-9_multi.book Page 101 Monday, April 23, 2012 3:03 PM MIDI-pedaaleinheid PK-9 r Aansluiten van de PK-9 via de PK-kabel Sluit de PK-9 met behulp van de bijgeleverde PK-kabel aan op het externe instrument. Bij het maken van deze verbinding wordt de PK-9 gevoed door het externe apparaat (u hebt de bijgeleverde adapter dus niet nodig). Aansluiten van de bijgeleverde adapter De PK-9 kan ook met de bijgeleverde PSB-1U adapter worden gevoed.
PK-9_multi.book Page 102 Monday, April 23, 2012 3:03 PM MIDI-pedaaleinheid PK-9 Voorbereiding van de PK-9 Extern MIDI-instrument op de PK-9 aansluiten Dit instrument is met een beschermingscircuit uitgerust. Na het inschakelen duurt het een paar seconden voordat het operationeel is. De PK-9 kan ook als MIDI-stuurbron voor een extern instrument worden gebruikt. 1. Schakel het externe MIDI-instrument uit en zet zijn volume op de minimumwaarde.
PK-9_multi.book Page 103 Monday, April 23, 2012 3:03 PM MIDI-pedaaleinheid PK-9 r Aansluiten van een optioneel extern expressiepedaal of een voetschakelaar Op de EXTERNAL PEDAL-connector van de PK-9 kan een optionele voetschakelaar (DP-serie van Roland of BOSS FS-5U) c.q. een bijkomend expressiepedaal (EV-serie van Roland) worden aangesloten.
PK-9_multi.book Page 104 Monday, April 23, 2012 3:03 PM MIDI-pedaaleinheid PK-9 Parametermode 4. Parametermode In de parametermode hebt u toegang tot talrijke handige functies. Basisbediening in de parametermode De instellingen van de parametermode kunt u als volgt wijzigen. 1. Opslaan van uw instellingen (Save) Alle wijzigingen, die u doorvoert, worden tijdens het uitschakelen van de PK-9 gewist. U kunt ze echter opslaan om ervoor te zorgen dat ze bij het volgende gebruik opnieuw geladen worden.
PK-9_multi.book Page 105 Monday, April 23, 2012 3:03 PM MIDI-pedaaleinheid PK-9 r ‘Parameter’-instellingen Hieronder vindt u een lijst van de parameters, die u op de PK-9 kunt instellen. ● Transpose Display Fabrieksinstelling –5~6 0 Met deze functie kunt u de toonhoogte van de pedalen in stappen van een halve toon wijzigen. ● Octave Display Fabrieksinstelling 0~8 2 Mon (Mono): Het pedaal dient voor het in-/uitschakelen van de Mono-mode. In deze mode is de PK-9 monofoon.
PK-9_multi.book Page 106 Monday, April 23, 2012 3:03 PM MIDI-pedaaleinheid PK-9 Parametermode meter (blz. 106) om de snelheid te kiezen waarmee de noten naar elkaar toeglijden. Hoe groter de ingestelde waarde, hoe trager de overgang. ● Functie van de rechter voetschakelaar Display S r Waarde Fabrieksinstelling C18, C19, Por C19 Met deze parameter kunt u een andere functie aan de voetschakelaar rechts van het expressiepedaal toewijzen.
PK-9_multi.book Page 107 Monday, April 23, 2012 3:03 PM MIDI-pedaaleinheid PK-9 r Laden van de fabrieksinstellingen (Factory Reset) ● Pedal Assign Ped Waarde Fabrieksinstelling ● Auto Off Aof 0ff, 10, 30, 240 240 Indien nodig, kunt u uw instellingen naar uw computer (hiervoor hebt u een MIDI-interface nodig) of een externe sequencer doorseinen. Voorbereiding voor het archiveren 1. Verbind de MIDI IN-connector van de externe sequencer met de MIDI OUT-connector van de PK-9. 2.
PK-9_multi.book Page 108 Monday, April 23, 2012 3:03 PM MIDI-pedaaleinheid PK-9 Parametermode 4. Wacht tot de eventueel geactiveerde aftel van de sequencer (indien van toepassing) voorbij is en trap vervolgens het Holdpedaal in om de dataoverdracht te starten. Zodra de data doorgeseind zijn, beeldt het display “ok” af en verlaat de PK-9 automatisch de Parametermode. 5. Stop de opname van de externe sequencer en sla de data op. Terugzenden van de instellingen naar de PK-9 1.
PK-9_multi.book Page 109 Monday, April 23, 2012 3:03 PM MIDI-pedaaleinheid PK-9 r Appendix Verhelpen van storingen ■ De PK-9 is plots uitgegaan ■ Geen stroom NEDERLANDS Wanneer de PK-9 via zijn PK OUT-connector wordt gevoed Verbind de PK OUT-connector van de PK-9 met de PK IN-connector op het externe instrument. → Zie “Aansluiten van de PK-9 via de PK-kabel” op blz. 101. Hebt u het externe instrument ingeschakeld? → Schakel het externe instrument in.
PK-9_multi.
PK-9_multi.book Page 111 Monday, April 23, 2012 3:03 PM MIDI Pedalboard PK-9 r MIDI Implementation 6. MIDI Implementation Model: PK-9 MIDI Pedalboard Date: January, 2012 Version: 1.00 Recognized Receive Data Transmitted Data ■ System Realtime Messages ■ Channel Voice Messages ● Status FEH * By receiving an Active Sensing message, the PK-9 enters the mode timing the interval between incoming MIDI messages.
PK-9_multi.book Page 112 Monday, April 23, 2012 3:03 PM MIDI Pedalboard PK-9 MIDI Implementation ❍ General Purpose (Controller number 18) Status BnH 2nd byte 12H 3rd byte vvH n= MIDI channel number: vv= Control value: 0H~FH (Ch.1~16) 00H~7FH (0~127) ❍ General Purpose (Controller number 19) Status BnH 2nd byte 13H 3rd byte vvH n= MIDI channel number: vv= Control value: 0H~FH (Ch.
PK-9_multi.book Page 113 Monday, April 23, 2012 3:03 PM MIDI Pedalboard PK-9 r MIDI Implementation Chart MIDI Implementation Chart [MIDI Pedalboard] Model: PK-9 Date: January 2012 Version: 1.00 Function...
PK-9_multi.book Page 114 Monday, April 23, 2012 3:03 PM MIDI Pedalboard PK-9 r Information 114 When you need repair service, call your nearest Roland Service Center or authorized Roland distributor in your country as shown below.
PK-9_multi.
PK-9_multi.book Page 116 Monday, April 23, 2012 3:03 PM r 602.00.