Owner’s Manual
Checking the package contents The R-09HR comes with the following items. After opening the package, please check all items. If any items are missing, please contact the retailer from whom this product was purchased. * In the interest of product improvement, the appearance of this unit and/or the supplied accessories are subject to change without prior notice. AC adaptor R-09HR This AC adaptor is specifically designed for the R-09HR. Please use only the included AC adaptor.
USING THE UNIT SAFELY The symbol alerts the user to important instructions or warnings.The specific meaning of the symbol is determined by the design contained within the triangle. In the case of the symbol at left, it is used for general cautions, warnings, or alerts to danger. Used for instructions intended to alert the user to the risk of death or severe injury should the unit be used improperly.
015 • Do not force the unit’s power-supply cord to share an outlet with an unreasonable number of other devices. Be especially careful when using extension cords—the total power used by all devices you have connected to the extension cord’s outlet must never exceed the power rating (watts/ amperes) for the extension cord. Excessive loads can cause the insulation on the cord to heat up and eventually melt through. .............................................................................................
IMPORTANT NOTES Power Supply 301 • Do not connect this unit to same electrical outlet that is being used by an electrical appliance that is controlled by an inverter (such as a refrigerator, washing machine, microwave oven, or air conditioner), or that contains a motor. Depending on the way in which the electrical appliance is used, power supply noise may cause this unit to malfunction or may produce audible noise.
555 • A small amount of noise may be heard from the display during normal operation. 556 • When connecting / disconnecting all cables, grasp the connector itself—never pull on the cable. This way you will avoid causing shorts, or damage to the cable’s internal elements. 558a • To avoid disturbing your neighbors, try to keep the unit’s volume at reasonable levels. You may prefer to use headphones, so you do not need to be concerned about those around you (especially when it is late at night).
Contents USING THE UNIT SAFELY 3 IMPORTANT NOTES 5 Names of things and what they do 8 Copying (Copy)................................................79 Repair files (Repair)...........................................80 Creating folders (Make Folder) ...........................81 R-09HR configuration settings R-09HR screens and basic operations 16 Using the R-09HR 20 Turning power on/off ........................................20 Installing batteries in the remote control ...............
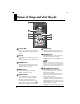
Names of things and what they do fig.names1.eps_60 1 2 4 5 3 8 6 7 9 10 1 Internal MIC These stereo microphones are built into the R-09HR. ➜“Using the internal microphones” (p. 37) 2 Display The display shows information about the R09HR. ➜“Information shown in the display” (p. 17) 3 FINDER button Shows a song list and allows names to be edited and songs to be deleted or copied. ➜“Basic operations” (p. 18) 4 MENU button Performs the settings for the R-09HR. ➜“Basic operations” (p.
Names of things and what they do 9 PLAY/PAUSE button ( ) The PLAY/PAUSE button starts playback. It can also pause playback or recording. It is also used to move the cursor up in the display or to change the value of a selected item. ➜“Basic operations” (p.
Names of things and what they do ig.names1-1.eps_60 14 13 12 12 STOP button ( ) The STOP button stops playback or recording. It is also used to move the cursor down in the display or to change the value of a selected item. ➜“Basic operations” (p.
Names of things and what they do ig.names2.eps_60 15 16 17 15 (+) and (-) INPUT LEVEL buttons The INPUT LEVEL buttons adjust the level of the sound from the [Internal MIC 1 ], [MIC Input Jack ], and [LINE IN Jack 17 ]. Pressing the (+) input level button increases the input sound level. Pressing the (-) input level button decreases the input sound level. ➜“Adjusting recording levels” (p. 45) 16 16 MIC INPUT jack The MIC input jack is used to connect an external microphone.
Names of things and what they do 22 18 19 20 18 AC ADAPTOR jack This is the power jack. Connect the included AC adaptor to this jack. ➜“Using the AC adaptor” (p. 20) Be sure to turn the R-09HR off before unplugging the AC adapter. 19 POWER switch Holding down the POWER switch turns power on or off. ➜“Turning power on/off” (p. 20) Never switch off the power during playback/ recording, while connected to the PC via USB, or while “Now Processing!” appears in the display.
Names of things and what they do 27 LIMITER/AGC (Auto Gain Control) switch This switch turns the LIMITER or AUTO GAIN CONTROL on or off. Ordinarily, it can be set to off. Switching between LIMITER and AUTO GAIN CONTROL is performed on the
Names of things and what they do Remote Control 34 35 36 37 38 39 40 41 32 31 33 31 Bottom cover 34 (+) and (-) INPUT Level buttons When the cover is opened, the [USB Terminal 32 ] and [Memory Card Slot are visible. 33 ] ➜“Preparing the memory card” (p. 25) Forcing the cover open may damage the unit. The INPUT level buttons adjust the level of the sound from the [Internal MIC 1 ], [MIC Input Jack 16 ], and [LINE IN Jack 17 ].
Names of things and what they do 37 NEXT button ( 41 REC button ( ) The NEXT button selects the next song. If it is held down, the song fast forwards while the button is pressed. It can be used during playback or while stopped. It also functions as the right arrow for the cursor (moves the cursor to the right) and changes the value of a selected item. ) The REC button is used to enter recordingstandby mode or to start recording. It is also used to enter selected items. ➜“Basic operations” (p.
R-09HR screens and basic operations The R-09HR screen The is shown when power to the R-09HR is turned on. The and
R-09HR screens and basic operations Information shown in the display This section describes the main icons and information shown in the . fig.joho-e.
R-09HR screens and basic operations Basic operations Recording and playback fig.sousa-1-e.eps_70 Playback/Pause Rewind/Previous song (start of song) Fast Forward/ Next song Stop Record/ Recording Standby Selecting and entering fig.sousa-1-e.
R-09HR screens and basic operations fig.sousa-3-e.
Using the R-09HR Turning power on/off Using the AC adaptor Be sure to use the AC adaptor when connecting to a PC. If the batteries become exhausted while copying a song, the song may be corrupted. 1. Check that power is turned off. If the power is on, turn it off. Press and hold the [POWER switch] on the R-09HR to turn power on or off. fig.ac-eps_80 2. Plug the DC plug of the AC adaptor into the [AC Adapter Jack] on the R-09HR. lamp Place the AC adaptor so that its lamp light is on the top side.
Using the R-09HR Using batteries Be sure to use the AC adaptor when connecting to a PC. If the batteries become exhausted while copying a song, the song may be corrupted. Batteries that can be used • • AA alkaline batteries (LR6) AA nickel metal hydride batteries (HR15/51) The R-09HR cannot recharge nickel metal hydride batteries. Please use a separately purchased battery charger. 1. Check that the power is turned off. If the power is on, turn it off.
Using the R-09HR fig.power-onoff-e.eps_80 5. Turn power on. Press and hold down the [POWER switch] to turn on the power. 6. Set the battery type. Hold down Select the battery type (alkaline batteries or nickel metal hydride batteries) on the
Using the R-09HR Installing batteries in the remote control Install a coin-type lithium battery (included) in the remote control. fig.remote01-e.eps Press here in the direction of the arrow while you pull out the holder. 1 2 Batteries to use: Lithium battery (CR2025) Back side of the remote control Battery holder 1. Pull out the battery holder. 2. Insert a lithium battery (CR2025) as shown in the illustration. 3. Replace the battery holder. Push it inward until it clicks into place.
Using the R-09HR Using the remote control Point the remote control toward the R-09HR’s sensor, and operate it within the specified operating range. fig.remote02-e.eps Remote sensor Remote control operating range Transmitter Distance: 4 meters Angle: 30 degrees or less to the left and right of the receiver. Precautions concerning use of the remote control • The Remote Control cannot perform operations from two buttons at the same tie.
Using the R-09HR Preparing the memory card The R-09HR uses an SD memory card. Inserting Insert the supplied SD memory card. ■ Inserting 1. Check that the power is turned off. If the power is on, turn it off. Press and hold the [POWER switch] on the R-09HR to turn power on or off. 2. Open the [Bottom Cover] of the unit. fig.sdin-2.eps_60 Fold the [Bottom Cover] down using your finger to catch on the depression. * Forcing the cover open may damage the unit. fig.sdin-3-e.eps_60 3.
Using the R-09HR fig.power-onoff-e.eps_80 5. Turn power on. Press and hold down the [POWER switch] to turn on the power. Hold down When using a memory card with the R-09HR for the first time, the memory card must be formatted. Please format the memory card following the procedure in “Formatting” (p. 27). “SD Unformatted” is shown when an unformatted memory card is inserted into the R-09HR. ■ Removing 1. Turn off power to the R-09HR. 2. Open the [Bottom Cover]. 3.
Using the R-09HR Formatting A memory card must be formatted when using it with the R-09HR for the first time. • Be sure to format the memory card on the R-09HR. Cards formatted on devices other than the R-09HR may not operate properly on the R-09HR. • The demo songs will be deleted if the SD Memory Card is formatted. You may want to create a backup of the demo songs on a PC. See “Downloading songs to a PC” (p. 67) for details on making a backup.
Using the R-09HR fig.format-sure-e.eps_80 5. Select “Yes.” A confirmation screen is shown. Use the [PREV button ] and [NEXT button “Yes,” then press the [REC Button]. ] to select Move cursor to the left or right Enter fig.process.eps_80 Do not remove the memory card during formatting. The storage area on the memory card may become damaged. fig.completed.eps_80 When “Completed!” is shown, formatting has completed. fig.open-basic2-e.eps_80 6. Return to .
Using the R-09HR Setting time and date When turning on power, please follow the procedure below to set the internal clock. The time and date set here are used as information (time stamp) for the recorded songs. fig.open-main-e.eps_80 1. Show the
Using the R-09HR 3. Edit the time and date. fig.edit-datetime-e.eps_80 1. Move the cursor. Use the [PREV button ] and [NEXT button the cursor to the right or left. ] to move Move cursor to the left or right fig.edit-datetime-2-e.eps_80 2. Edit the date and time. Move the cursor over the character to change, use the [PLAY Button ] and [STOP Button ] to change the date and time, then press the [REC Button] to enter the changes. Change the value Enter fig.open-main-e.eps_80 4.
Using the R-09HR Recording Recording with the [Internal MIC]. When using the [Internal MIC], do not connect anything to the [MIC Input Jack] or [LINE IN Jack]. If a microphone or cable is connected to the [MIC Input Jack] or [LINE IN Jack], input from these jacks take precedence, and input from the [Internal MIC] is disabled. 1. Adjust the input level. fig.rec-st-e.eps_80 1. Enter the recording-standby mode. Press the [REC Button] while the is showing. The [REC Indicator] blinks.
Using the R-09HR Playing back Listen to the recorded voice with the preview monitor. fig.play-start-e.eps_80 1. Press the [PLAY/PAUSE Button begin playback. Play ] to When the [PLAY/PAUSE Button ] is pressed, the song shown in the display begins to play. When “No Song” is shown in the display, there is no song that the R-09HR can play. “Manipulating songs and folders” (p. 72) “Playing sound from the preview monitor (Preview Monitor)” (p. 90) fig.outputlevel-e.eps_80 2. Adjust the volume.
Using the R-09HR Deleting Delete the recorded voice. fig.open-finder-e.eps_80 1. Show Show the . Press and hold down the [FINDER Button] to show the . fig.song-select-e.eps_80 2. Select the song. Use the [PLAY Button ] and [STOP Button ] to select the song to delete, then press the [REC Button]. Move the cursor up or down Enter Move the cursor up or down Enter fig.delete-e.eps_80 3. Select “Delete.
Recording Configuring recording You can set the sound quality to use when recording. Improving the sound quality increases the song size and decreases the recording time. When making a final recording of a performance, it is best to use WAV 16 bit or 24 bit to give priority to sound quality. When making an audio CD, set the sampling frequency to 44.1 kHz and the recording mode to WAV 16 bit. Test recordings and records of meetings do not usually require sound quality as good as that.
Recording Recording mode Recording mode MP3 64 kbps MP3 96 kbps MP3 128 kbps MP3 160 kbps MP3 192 kbps MP3 224 kbps MP3 320 kbps WAV 16 bit WAV 24 bit ■ WAV versus MP3 WAV songs (*.WAV) store all sound information without compression; MP3 songs (*.MP3) store songs using compression. Consequently, WAV songs have a better sound quality recording than MP3 songs. On the other hand, MP3 reduce data volume by removing frequencies that are hard for the human ear to hear.
Recording Estimated recording times The approximate recording time for memory cards is shown below. Recording time (estimate) Unit: minutes (24bit/96kHz) (24bit/88.2kHz) (24bit/48kHz) (24bit/44.1kHz) (16bit/96kHz) (16bit/88.2kHz) 512MB 13 15 27 29 20 22 1GB 27 30 54 59 40 44 Memory card size 2GB 55 60 110 120 80 88 WAVE (16bit/48kHz) WAVE (16bit/44.
Recording Recording instruments and voice Using the internal microphones fig.mic-LR.eps_80 The internal microphone is a stereo microphone. The sound picked up by the microphone on the right side of the R-09HR is recorded on the right channel (R), while the sound that the microphone on the left captures is recorded on the left channel (L). L R • To prevent feedback when recording with a microphone, do not connect speakers.
Recording 2. Set the sampling frequency. “Configuring recording” (p. 34) fig.open-set-e.eps_80 1. Show the
Recording 3. Set the recording mode. “Configuring recording” (p. 34) fig.recmode-e.eps_80 1. Select “Rec Mode.” Use the [PLAY Button ] and [STOP Button the cursor to the Rec Mode line. ] to move Move the cursor up or down fig.setrecmode-e.eps_80 2. Select the recording mode. Use the [PREV button the Rec Mode value.
Recording fig.rec-start-e.eps_80 6. Press the [REC Button] to begin recording. Press the [REC Button] in recording-standby mode (while the [REC Indicator] is blinking). The [REC Indicator] lights up, and recording begins. Starts recording • Recording can also be started by pressing the [PLAY/PAUSE Button ]. • If you slide the HOLD switch to the ON position after starting a recording, the recording will not stop nor will the recording level change even if a button is accidentally pressed.
Recording Using external microphones The R-09HR can use a dynamic microphone or a condenser microphone, such as the type that are connected to the microphone jack of a PC. fig.conmic-LR-e.eps_80 L R Stereo microphone • If a cable is connected to the [LINE IN Jack], then the input from the [MIC Input Jack] is ignored. Do not connect anything to the [LINE IN Jack]. • To prevent feedback when recording with a microphone, do not use speakers.
Recording fig.setsamplingrate-e.eps_80 3. Select the sampling frequency (Sample Rate). Use the [PREV button ] and [NEXT button the Sample Rate value. Sampling frequency values 3. ] to change 44.1 kHz 48 kHz 88.2 kHz 96 kHz Changes the value Set the recording mode. “Configuring recording” (p. 34) fig.recmode-e.eps_80 1. Select “Rec Mode.” Use the [PLAY Button ] and [STOP Button the cursor to the Rec Mode line. ] to move Move the cursor up or down fig.setrecmode-e.eps_80 2.
Recording 5. Set the type of microphone being used. Dynamic microphone Condenser microphone powered by self-contained battery Plug-in powered condenser microphone Switch OFF the [PLUG-IN POWER Switch] on the back. Switch ON the [PLUG-IN POWER Switch] on the back. Set the [PLUG-IN POWER Switch] to the type of microphone connected to the [MIC Input Jack]. • When connecting a dynamic microphone or a battery-powered microphone, be sure to use the [PLUG-IN POWER Switch] to set to off.
Recording fig.rec-start-e.eps_80 8. Press the [REC Button]. Press the [REC Button] while in recording-standby mode (while the [REC Indicator] is blinking). The [REC Indicator] lights up, and recording begins. Starts recording • Recording can also be started by pressing the [PLAY/PAUSE Button ]. • If you slide the HOLD switch to the ON position after starting a recording, the recording will not stop nor will the recording level change even if a button is accidentally pressed.
Recording Adjusting recording levels The R-09HR is designed to record a wide variety of sounds, but it can also make high-quality recordings when a recording level (volume) appropriate for the sound to be recorded is set. Level settings should be the highest input level (volume) that has no distortion. This principle is the same for both the [Internal Microphone] and external microphones. 1. Point the microphone used for recording. Point the R-09HR microphone toward the target for recording. fig.
Recording The level meter indicates when louder sounds are being recorded by growing toward the right. Adjust by pressing [Input Level Button] to allow for the loudest recording. However, the input volume is too loud when the [PEAK Indicator] lights up. When the [PEAK Indicator] is lit, the input volume has reached the maximum input volume that R09HR can record (clipping status), and any louder sounds cannot be recorded with the current volume setting. The resulting recording will be severely distorted.
Recording 3. Play the sound to record into the microphone. fig.inputlevel-e.eps_80 4. Adjust the volume. Volume Adjust the input volume gradually by pressing the [Input Level Buttons] on the remote while the sound is playing. High Low The further to the right the level meter moves, the greater the volume of the audio that’s being recorded. Adjust by pressing the [Input Level Buttons] to allow for the loudest recording.
Recording Recording from cassettes or CDs The R-09HR can be used for recording instrumental performances and taking voice memos, but it can also be used to record cassettes or CDs using the [LINE IN Jack]. If a device or cable is connected to the [LINE IN Jack], input from the microphones is disabled. Therefore, it is not possible to mix microphone and line input during recording. If there is sound input via both the [LINE IN Jack] and the [MIC Input Jack], only the sound from the line input is recorded.
Recording 3. Set the recording mode. “Configuring recording” (p. 34) fig.recmode-e.eps_80 1. Select “Rec Mode.” Use the [PLAY Button ] and [STOP Button the cursor to the Rec Mode line. ] to move Move the cursor up or down fig.setrecmode-e.eps_80 2. Select the recording mode. Use the [PREV button the Rec Mode value. ] and [NEXT button ] to change Change the value fig.open-basic2-e.eps_80 3. Press the [FINDER Button] twice to return to the . Show Press twice fig.
Recording fig.rec-start-e.eps_80 6. Press the [REC Button] to begin recording. Press the [REC Button] while in recording-standby mode (the [REC Indicator] blinks). The [REC Indicator] lights up, and recording begins. Starts recording Recording can also be started by pressing the [PLAY/PAUSE Button]. If the [Input Level Button] is used during recording, the input level will change. Be careful to not mistakenly use the [Input Level Button]. 7. Press the play button on the CD player.
Recording Splitting Files while Recording (Split) A file can be split during recording. When a file is split, playback can start from the split location. When carrying out long recordings, you may find it convenient to split the file at places that will need to be located later. fig.rec-start-e.eps_80 1. Start recording. 2. Press the [SPLIT Button]. The file is split at the location where the button is pressed. Starts recording or fig.rec-stop-e.eps_80 3. Finish the recording.
Playing back Playing back songs Use the [PREV button [Play Button ] and [NEXT button ] to select a song to play, then press the ] to start playback. Sound is played from the monitor speaker. “Song types that can be played” (p. 66) fig.play_eps 1 3 2 fig.open-main-e.eps_80 1. Show the . Show If the is not showing, press the [FINDER Button] until the appears.
Playing back fig.play-start-e.eps_80 3. Play back the song. When the [PLAY Button the display begins to play. Play ] is pressed, the song shown in fig.outputlevel-e.eps_80 4. Use the [(+) and (-) OUTPUT VOLUME buttons] to set the volume to a comfortable loudness. Volume High Low • The order of songs The songs are shown in the order described below. They are not shown in the order in which they were recorded. (Space) ! # $ % & ' ( ) + , - .
Playing back Connecting headphones and speakers Connect headphones or speakers to listen to playback. fig.basic-e.eps_80 Headphones Analog speakers • No sound is played from the R-09HR’s preview monitor when headphones or speakers are connected to the [Headphone Jack]. • You may still hear some sound when the power is switched on, but this is normal, and does not indicate a malfunction.
Playing back Rewinding and fast forwarding The song rewinds while the [PREV Button ] is pressed during playback; the song fast forwards while the [NEXT Button ] is pressed during playback. Once these buttons are released, playback starts again. If the buttons are held down continuously, the rewind or fast forward speed increases. fig.rwdfwd-e.
Playing back Repeated playback of a selected section Play back a specific section in a song repeatedly. A section can be played repeatedly to check the recording. fig.repeat.eps 2, 3 1 fig.play-start-e.eps_80 1. Play Play back. When the [PLAY Button ] is pressed, the song shown in the display begins to play. fig.repeat-1-e.eps_80 2. Set the start position (marker A). A Song Press the [AB REPEAT Button] once during playback.
Playing back fig.repeat-ab-e.eps The section set in steps 1 and 2 (A-B) is played back repeatedly. To cancel repeat playback, press the [AB REPEAT Button] again. Song A B Cautions during setting • If marker B is not set after setting marker A and playback continues to the end of the song, the section between marker A and the end of the song is repeated. • The repeat settings are cancelled if the [PREV button used to move within a song.
Playing back Repeating a song Repeats a selected song. fig.single.eps 1, 6 2, 4 7 3, 5 fig.open-set-e.eps_80 1. Show the
Playing back fig.setsingle-e.eps_80 3. Select “SINGLE.” Use the [PREV button ] and [NEXT button the Play Mode value, and select “SINGLE.” ] to change Change the value fig.repeat-sin-e.eps_80 4. Select “Repeat.” Use the [PLAY Button ] and [STOP Button the cursor to the “Repeat” line. ] to move Move the cursor up or down fig.repeat-set-e.eps_80 5. Select “ON.” Use the [PREV button ] and [NEXT button the Repeat value, and select “ON.” ] to change Change the value fig.open-basic2-e.eps_80 6.
Playing back Shuffle play Automatically change the song order and play back. fig.open-set-e.eps_80 1. Show the
Playing back fig.repeat-set-shu-e.eps_80 5. Set repeat playback. Use the [PREV button the Repeat value. ] and [NEXT button ] to change Change the value • If “Repeat” is set to OFF, playback automatically stops once all the songs in the selected folder have been played with the shuffle feature. • If “Repeat” is set to ON, songs are repeated in the same order once all the songs in the selected folder have been played with the shuffle feature. fig.open-basic2-e.eps_80 6. Return to .
Playing back Playing back in order The recorded songs are played back in order of their song number. “The order of songs” (p. 53) fig.open-set-e.eps_80 1. Show the
Playing back fig.repeat-set-seq-e.eps_80 5. Set repeat playback. Use the [PREV button the Repeat value. ] and [NEXT button ] to change • If “Repeat” is set to OFF, playback automatically stops once all the songs in the selected folder have been played in song order. • If “Repeat” is set to ON, songs are repeated in the same order once all the songs in the selected folder have been played in song order. Change the value fig.open-basic2-e.eps_80 6. Return to .
Playing back Changing the playback speed (Speed) The R-09HR can change the playback speed of the song. 1. Press the [SPEED button]. The speed cannot change when the sampling frequency of 88.2 kHz or 96 kHz. Selecting the playback speed 1. Press the [SPEED Button] for a number of seconds. Show Playback speed Hold down 2. Set the playback speed. Press the [PREV button ] and [NEXT button ] while the playback speed is displayed to change the speed value.
Playing back Applying reverb effects during playback The R-09HR can apply reverb effects to the song being played. Such reverberation simulates the experience of being in a hall or on stage. REVERB is an effect that can be used to, for example, make it seem as if the sound were being played in a large hall. • Sounds with applied reverb cannot be recorded. Reverb cannot be applied while monitoring recordings. • The reverb effect cannot be applied to the playback of songs with a sampling frequency of 88.
Playing back Song types that can be played The R-09HR can play back the following songs. WAV Playback MP3 Playback Sampling frequency (kHz) 32, 44.1, 48, 88.2, 96 Sampling frequency (kHz) 32, 44.1, 48 Sample size (bits) 16, 24 Bit rate (kbps) 32–320 kbps, VBR VBR Variable Bit Rate. Bit rates are decreased for low sound density situations. Bit rates are increased for high sound density situations.
Downloading songs to a PC By connecting a PC to the R-09HR via a USB cable, songs from the R-09HR’s memory card can be downloaded to the PC and used by music software. Also, songs on the PC can be sent to the R-09HR for playback. Supports USB 2.0 (HI-SPEED USB). When connected to a PC supporting USB 2.0, high-speed transfer is possible. Be sure to use the AC adaptor when connecting to a PC. If the batteries become exhausted while copying a song, the song may be corrupted. Connecting to the PC 1. 2.
Downloading songs to a PC Loading songs Windows fig.win-1-e.eps_34 1. Open My Computer. A name such as “Removable Disk” is displayed for the R-09HR’s memory card. 2. Double click on the removable disk. fig.win-3-e.eps_53 3. Copy the songs. Select the songs to copy from the removable disk to the PC, and then drag them to an appropriate location. • It is advisable to create a new folder to copy into. • Software such as Windows Media Player cannot play back 24 bit WAV files.
Downloading songs to a PC Macintosh fig.mac-1-e.eps_50 1. “NO NAME” or “Untitled” is displayed on the desktop. The R-09HR appears on the desktop as “NO NAME” (for OS X). fig.mac-3-e.eps_47 2. Double click on “NO NAME.” 3. Copy the songs. Select the songs to copy from “NO NAME,” then drag them to an appropriate location. • It is advisable to create a new folder to copy into. • This section uses screens from Mac OS 10.4. • The actual display may differ depending on the environment.
Downloading songs to a PC Disconnecting the PC Disconnect the PC and R-09HR. Follow the procedure below to disconnect and unplug the USB cable. Do not turn off power to the R-09HR or remove the USB cable or memory card while the PC and R-09HR are connected. Windows 1. Display the “Safe to remove hardware” dialogue box. Double click on the safely remove hardware icon in the Windows task tray. fig.winr-3-e.eps_38 2. Select the memory card. Select the R-09HR from the displayed list of hardware devices.
Downloading songs to a PC Macintosh fig.macr-1-e.eps_50 1. Disconnect the R-09HR. Disconnect the R-09HR connection shown on the desktop. • With Mac OS X, drag the “NO NAME” icon to the Dock. When dragging to the garbage can on the right side of the Dock, the garbage can changes to connection can be terminated. and the • This section uses screens from Mac OS 10.4. • The actual display may differ depending on the environment. 2. Disconnect.
Manipulating songs and folders The R-09HR saves songs to the memory card. The lists these songs, and the songs can be deleted or copied from this screen. Also, folders can be created, so songs can be moved to and managed in folders. Operation List Menu Selection Song Folder Song Folder Song Effect Selects a song and moves to the . Selects a folder and moves to the . Shows information about the song. Or protects it.
Manipulating songs and folders Selecting (Select) This operation is used to select and play back a song from the list of recorded songs. If a folder is selected, the current directory changes to the selected folder and the songs in the folder can be selected from the . fig.song-select-e.eps_80 1. Select a song or folder from the . Use the [PLAY Button ] and [STOP Button a song or folder, then press the [REC Button].
Manipulating songs and folders Displaying song or folder information (Information) fig.song-select-e.eps_80 1. Select a song or folder from the . Use the [PLAY Button ] and [STOP Button a song or folder, then press the [REC Button]. ] to select To select a subfolder, select the folder then press the [NEXT button ]. To move up a level, press the [PREV button ]. Move the cursor up or down Enter Move the cursor up or down Enter fig.filee-information-e.eps_80 2. Select “Information.
Manipulating songs and folders Deleting (Delete) fig.song-select-e.eps_80 1. Select a song or folder from the . Use the [PLAY Button ] and [STOP Button a song or folder, then press the [REC Button]. ] to select To select a subfolder, select the folder then press the [NEXT button ]. To move up a level, press the [PREV button ]. Move the cursor up or down Enter Move the cursor up or down Enter fig.delete-e.eps_80 2. Select “Delete.
Manipulating songs and folders Changing the name (Rename) fig.song-select-e.eps_80 1. Select a song or folder from the . Use the [PLAY Button ] and [STOP Button a song or folder, then press the [REC Button]. ] to select To select a subfolder, select the folder then press the [NEXT button ]. To move up a level, press the [PREV button Move the cursor up or down Enter Move the cursor up or down Enter ]. fig.rename-e.eps_80 2. Select “Rename.
Manipulating songs and folders Moving songs (Move) fig.song-select-e.eps_80 1. Select a song from the . Use the [PLAY Button ] and [STOP Button a song, then press the [REC Button]. ] to select To select a subfolder, select the folder then press the [NEXT button ]. To move up a level, press the [PREV button ]. Move the cursor up or down Enter Move the cursor up or down Enter Move the cursor up or down Enter fig.move-e.eps_80 2. Select “Move.
Manipulating songs and folders R-09HR memory card structure The song and folder structure for the R-09HR memory card is shown below. fig.root-e.eps Root Song ➝ Folder ➝ ➝ R-09HR top level R09_0001.WAV R09_0002.WAV R09_0003.WAV R09_0004.MP3 R09_0005.MP3 Folder1 R09_0006.WAV R09_0007.WAV R09_0008.WAV Use the [PLAY Button ] and [STOP Button ] to change the selected file Use the [FWD Button ] to enter a folder Use the [RWD Button ] to exit a folder Folder2 R09_0009.MP3 R09_0010.
Manipulating songs and folders Copying (Copy) fig.song-select-e.eps_80 1. Select a song from the . Use the [PLAY Button ] and [STOP Button a song, then press the [REC Button]. ] to select To select a subfolder, select the folder then press the [NEXT button ]. To move up a level, press the [PREV button ]. Move the cursor up or down Enter Move the cursor up or down Enter Move the cursor up or down Enter fig.copy-e.eps_80 2. Select “Copy.
Manipulating songs and folders Repair files (Repair) This feature allows you to repair files that cannot be played because an accident occurred during recording; for example, an adaptor was mistakenly disconnected or a card was removed. When the R-09HR detects a damaged file, the “Repair” Menu is shown in the Finder. elect-e.eps_80 1. Select a song from the . Use the [PLAY Button ] and [STOP Button a song, then press the [REC Button].
Manipulating songs and folders Creating folders (Make Folder) 1. Select where to create a folder from the . fig.root-select-e.eps_80 ■ Selecting Root 1. Use the [PLAY Button ] and [STOP Button to select Root, then press the [REC Button]. ] Move the cursor up or down Enter Move the cursor up or down Enter Move the cursor up or down Enter Move the cursor up or down Enter fig.folder-select-e.eps_80 ■ Selecting a folder 1.
Manipulating songs and folders fig.makefolder-e.eps_80 2. Select “Make Folder.” Use the [PLAY Button ] and [STOP Button “Make Folder,” then press the [REC Button]. ] to select Move the cursor up or down Enter fig.makefokder3-e.eps_80 3. Press the [REC Button] to enter. A confirmation screen is shown. Press the [REC Button] to enter. A “New Folder” is created. To cancel, press the [FINDER Button] before pressing the [REC Button]. Enter fig.process-mak.
R-09HR configuration settings Various R-09HR settings, such as recording and playback settings and date and time settings, are done from the
R-09HR configuration settings Category SD Card Factory Reset Menu/Effect Value (Default value in bold) Procedure — p. 106 — p. 27 — p. 107 Information Shows information about the SD memory card. Format Formats the SD memory card. Initializes the R-09HR. Displaying the
R-09HR configuration settings Setting the recording mode (Rec Mode) Please make the sampling frequency according to whether sound quality or recording time has precedence. “Configuring recording” (p. 34) fig.recoedersetting-e.eps_80 1. Select “Recorder Setup” from the
R-09HR configuration settings Setting how file names are assigned (File Name) This feature sets how file names are assigned to recorded and generated files. File names can be created from the date or from serial numbers. fig.recoedersetting-e.eps_80 1. Select “Recorder Setup” from the
R-09HR configuration settings Setting the maximum file size (Max File Size) This feature sets a limit on the file size of the file generated during recording. Use this feature to prevent long MP3 recordings from becoming too large to be read by some software, after the data has been converted to WAV. When the song being recording reaches the set size limit, the R-09HR closes that file and continues the recording in a new file. fig.recoedersetting-e.eps_80 1.
R-09HR configuration settings Setting the song playback mode (Play Mode) Here’s how to set the playback method for songs. In addition to playing songs back in order from the beginning, one song can be repeated or songs can automatically be reordered for playback. fig.plaersetting-e.eps_80 1. Select “Player Setup” from the
R-09HR configuration settings Setting whether to use repeat playback or not (Repeat) When set to repeat playback, the song is repeated according to the playback mode (p. 88) setting. fig.plaersetting-e.eps_80 1. Select “Player Setup” from the
R-09HR configuration settings Playing sound from the preview monitor (Preview Monitor) Whether sound is played from the R-09HR’s monitor speaker during playback can be set. fig.plaersetting-e.eps_80 1. Select “Player Setup” from the
R-09HR configuration settings Changing the playback speed (Speed) Sets the playback speed when the [SPEED Button] is pressed to change the playback speed. fig.plaersetting-e.eps_80 1. Select “Player Setup” from the
R-09HR configuration settings Setting the reverb type (Rev Type) Selects the reverb type. fig.plaersetting-e.eps_80 1. Select “Player Setup” from the
R-09HR configuration settings Setting the reverb depth (Rev Depth) Sets the depth for the reverb when applying reverb to playback. fig.plaersetting-e.eps_80 1. Select “Player Setup” from the [Menu Screen]. Use the [PLAY Button ] and [STOP Button ] to select “Player Setup,” and then press the [REC Button]. Move the cursor up or down Enter fig.revtype-e.eps_80 2. Select “Rev Depth.” Use the [PLAY Button ] and [STOP Button the cursor to the Rev Depth line. ] to move Move the cursor up or down fig.
R-09HR configuration settings Adjusting the display brightness (Brightness) Here’s how to adjust the brightness of the R-09HR’s display. Power consumption is reduced when the display’s brightness is decreased. fig.displaysetting-e.eps_80 1. Select “Display Setup” from the
R-09HR configuration settings Setting peak hold for the level meter (Peak Hold) This feature sets peak hold for the Level Meter. When peak hold is ON, the largest value for the input signal is held and displayed for a set time. fig.displaysetting-e.eps_80 1. Select “Display Setup” from the
R-09HR configuration settings Setting the time until the screen is darkened when no operations are performed for a set period of time (Display Timer) To reduce power consumption, this feature automatically turns off the display when no operations are performed within a set period of time. fig.displaysetting-e.eps_80 1. Select “Display Setup” from the
R-09HR configuration settings Turning off indicators when the display goes dark (Rec/Peak LED) The [REC Indicator] and [PEAK Indicator] can be linked to the Display Timer settings. When the display goes dark, the [REC Indicator] and [PEAK Indicator] also turn off. fig.displaysetting-e.eps_80 1. Select “Display Setup” from the
R-09HR configuration settings Setting the time until the power turns off when no operations are performed for a set amount of time (Auto Power Off) This feature automatically turns off power when no operations are performed for a set amount of time to reduce power consumption. During recording and playback or while connected via USB, the power does not turn off even if no operations are performed within the set period of time. fig.powermanagement-e.eps_80 1. Select “Power Manage” from the
R-09HR configuration settings Setting the battery type (Battery) When using batteries with the R-09HR, set Battery according to the type of battery being used. If the wrong type is set, the remaining battery power will not be shown correctly. fig.powermanagement-e.eps_80 1. Select “Power Manage” from the
R-09HR configuration settings Setting whether to monitor sound while recording (Rec Monitor Sw) Sets whether to monitor the input sound through headphones while recording. fig.inputsetting-e.eps_80 1. Select “Input Setup” from the
R-09HR configuration settings Setting the external microphone type (EXT Mic Type) This is set when an external microphone is used. Stereo or monaural can be selected to match the type of microphone being used. fig.inputsetting-e.eps_80 1. Select “Input Setup” from the
R-09HR configuration settings Setting the LIMITER/AGC switch function (Limiter/AGC) Sets whether LIMITER or AGC (Auto Gain Control) is turned on/off with the LIMITER/ AGC switch on the back. The limiter is a feature that controls distortion by compressing input levels to an appropriate level when the input sound is too loud. AGC (Auto Gain Control) keeps the overall sound level even during recording by increasing levels when input sound is low and attenuating them when input is high.
R-09HR configuration settings Setting the low cut frequency (Low Cut Freq) This sets the frequency to apply Low Cut when the [Low Cut Switch] is on. fig.inputsetting-e.eps_80 1. Select “Input Setup” from the [Menu Screen]. Use the [PLAY Button ] and [STOP Button ] to select “Input Setup,” and then press the [REC Button]. Move the cursor up or down Enter fig.limiterAGC-e.eps_80 2. Select “Low Cut Freq.” Use the [PLAY Button ] and [STOP Button the cursor to the Low Cut Freq line.
R-09HR configuration settings Setting whether to accept remote control operations (Remote Control) Sets whether the R-09HR will receive the infrared data when the remote control is used. fig.inputsetting-e.eps_80 1. Select “Remote Control” from the
R-09HR configuration settings Setting the date and time (Date & Time) Set the internal clock. The time and date set here is used as data for the recorded songs. “Displaying song or folder information (Information)” (p. 74) When the power is on, the internal clock draws power from the AC adaptor or the batteries.
R-09HR configuration settings Displaying SD memory card information (Information) The memory card usage and protect setting can be checked. fig.sdutl-e.eps_80 1. Select “SD Card” from the
R-09HR configuration settings Formatting SD memory cards (Format) See “Formatting” (p. 27) for information about formatting memory cards. Initializing the R-09HR (Factory Reset) You can restore all the settings that the R-09HR originally had when it left the factory by carrying out the procedure below. This operation does not delete songs on the memory card. fig.systeminitialize-e.eps_80 1. Select “Factory Reset” from the
Message list This section describes the main messages shown on the display. Message Problem Clock Initialized The internal clock was initialized because no power was available. Battery Low The remaining power of the internal battery is low. The battery must be replaced. The AC adaptor may also be used. Improper Song The song is in a file format that cannot be used with the R-09HR. Already Exists There is a song or folder of the same name. Create the song or folder using a different name.
Message list Message Problem SD Card Full The memory card does not have sufficient space available. Copy the song to the PC and check the memory card capacity. SD Card Slow The write to the memory card was too slow. Use a memory card that was tested for the R-09HR. The performance of the memory card may have decreased because of improper song organization on the memory card, which was caused by repeated saving and deleting. In this case, re-format the memory card. SD Card Locked The memory card is locked.
Troubleshooting This section provides tips on solving problems that may occur. Problems during recording The recording only plays on the L channel (left) • If using an external microphone, check whether the microphone is set to stereo or monaural. If the microphone is a monaural one, only the L channel (left) is recorded. To record both channels using a monaural microphone, set the microphone type to “MONO.” “Setting the external microphone type (EXT Mic Type)” (p.
Troubleshooting Recorded files cannot be played back. • If an adaptor is mistakenly unplugged or a card is removed during recording, files can get damaged, making it impossible to play them back. The file repair feature can be used to repair such files. “Repair files (Repair)” (p. 80) Can’t record • Recording is not possible if there is insufficient remaining time. The remaining recording time is shown in the display in recording-standby mode. There is no remaining time if 00:00:00 is shown.
Troubleshooting Problems during playback There’s no sound • The sound may not be heard if the output volume is too low. Increase the output volume gradually. “(+) and (-) VOLUME buttons” (p. 12) • Check if the headphones or speakers are connected properly. “Connecting headphones and speakers” (p. 54) Can’t play songs • Check if the song name is correct. Songs beginning with a “.” (period) cannot be used on the R-09HR. • The R-09HR can only play songs with the.MP3 or .WAV extensions.
Troubleshooting Miscellaneous problems The power won’t turn on • Check if the AC adaptor is properly connected. If using batteries, make sure the batteries are inserted correctly in the correct orientation. The batteries may also be low, so have new batteries on hand. “Turning power on/off” (p. 20) • If the R-09HR still does not turn on even though there is no problem with the AC adaptor or batteries, the unit may be damaged.
Troubleshooting Malfunction • Malfunctions can be avoided by setting the Remote Control to “Disable.” The settings disappear • If all the settings in the
Index Symbols (+) and (-) VOLUME buttons ......................................... 94–97 .............................................. 96 Dynamic microphone ................................ 11, 43 Display Setup ..................... 11, 14 ......................... 12, 14 (+) and (-) INPUT LEVEL buttons A Display Timer E ................................. 8 AC adaptor ................................................. 20 AC ADAPTOR jack ........................................ 12 AGC ................
Index I .......................................................... 17 Improper Song ........................................... 108 Indicator ..................................................... 97 Icon Information Folder ............................................. 72, 74 ........................................ 84, 106 Song .............................................. 72, 74 Initializing the R-09 (Factory Reset) ................... 107 Input Setup ....................................
Index Player Setup ..................................... 83, 88–93 ............................. 11, 13 PLUG-IN POWER switch Power AC ADAPTOR jack ............................. 12, 20 ....................................... 83 Power saving feature ................................ 22 POWER switch .................................. 12, 20 Turning power on/off ............................... 20 Power Manage ........................................ 98–99 PREV button ..........................................
Index Stereo ........................................................ 11 ........................................... 10, 15 STOP button T Time Setting .......................................... 29, 105 .......................................... 110 Troubleshooting U ................................. 14 USB cable ................................................... 67 USB screen ............................................ 16, 67 USB terminal ................................................ 14 USB 2.
Specifications WAV/MP3 RECORDER: R-09HR Recorder Part ● Tracks 2 (stereo) ● Signal Processing AD/DA conversion: 24 bits, 44.1/48 kHz ● Data Type * Stereo only Format Sampling Rate Bit Rates MP3 (MPEG-1 audio layer 3) 44.1/48 kHz 64/96/128/160/192/224/320 kbps Format Sampling Rate Bit Depth WAV 44.1/48/88.2/96 kHz 16/24 bits Format Sampling Rate Bit Rates MP3 (MPEG-1 audio layer 3) 32/44.
Specifications Input/Output ● Audio Inputs Internal Stereo Microphone Mic input (Stereo miniature phone type, plug-in powered mic) Line input (Stereo miniature phone type) * The Internal/External MIC and the LINE IN can’t be used at the same time; only the LINE IN is effective. ● Audio Outputs Phones (Stereo miniature phone type) Effects (Playback only. Excludes playback in 88.2 kHz or 96 kHz.
For the USA DECLARATION OF CONFORMITY Compliance Information Statement Model Name : Type of Equipment : Responsible Party : Address : Telephone : R-09HR WAVE/MP3 RECORDER Roland Corporation U.S. 5100 S. Eastern Avenue, Los Angeles, CA 90040-2938 (323) 890 3700 For the U.K. IMPORTANT: THE WIRES IN THIS MAINS LEAD ARE COLOURED IN ACCORDANCE WITH THE FOLLOWING CODE.
For EU Countries CAUTION Danger of explosion if battery is incorrectly replaced. Replace only with the same or equivalent type recommended by the manufacturer. Discard used batteries according to the manufacturer’s instructions. Apparatus containing Lithium batteries ADVARSEL! VARNING Lithiumbatteri - Eksplosionsfare ved fejlagtig håndtering. Udskiftning må kun ske med batteri af samme fabrikat og type. Levér det brugte batteri tilbage til leverandøren. Explosionsfara vid felaktigt batteribyte.
Information EUROPE EDIROL (Europe) Ltd. Studio 3.4 114 Power Road London W4 5PY U. K. TEL: +44 (0)20 8747 5949 FAX:+44 (0)20 8747 5948 http://www.edirol.com/europe Deutschland TEL: 0700 33 47 65 20 Italia TEL: 02 93778329 NORTH AMERICA CANADA Roland Canada Ltd. (Head Office) 5480 Parkwood Way Richmond B. C., V6V 2M4 CANADA TEL: (604) 270 6626 Roland Canada Ltd. (Toronto Office) 170 Admiral Boulevard Mississauga On L5T 2N6 CANADA TEL: (905) 362 9707 U. S. A. Roland Corporation U.S. 5100 S.