
User's Manual


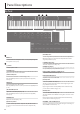

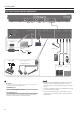
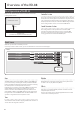

Table Of Contents
- Introduction
- Panel Descriptions
- Overview of the RD-88
- Performance
- Listening to the Demo (DEMO PLAY)
- Piano Performances
- Performing with a Variety of Scenes
- Playing Multiple Tones with the Keyboard
- Adjusting the Volume Level for Individual Zones
- Changing the Key Touch
- Transposing the Key of the Keyboard (TRANSPOSE)
- Adding Reverberation to the Sound (REVERB)
- Adding Breadth to the Sound (CHORUS/DELAY)
- Modifying the Sound in Real Time (WHEEL1/2)
- Adding Liveliness to the Sound (COMPRESSOR)
- Adjusting the Character of the Sound (TONE COLOR)
- Applying Various Effects to the Sound (MFX)
- Adjusting the Levels of Each Frequency Range (EQUALIZER)
- Disabling the Buttons (Panel Lock)
- Using the Convenient Functions in Performances
- Making Detailed Settings for Tones
- Other Functions
- USING THE UNIT SAFELY
- IMPORTANT NOTES
- Main Specifications

6
Panel Descriptions
6
DC IN jack
Connect the included AC adaptor here.
USB MEMORY port
You can connect a USB ash drive here.
USB COMPUTER port
You can connect this to your computer so that it can exchange
performance data and audio signal with the RD-88.
MEMO
5 The RD-88 supports USB MIDI and USB Audio. In order to use
USB Audio, the dedicated USB driver must be installed on
your computer. You can download the driver from the Roland
website.
5 For details on USB driver settings and USB MIDI/Audio settings,
refer to “Parameter Guide” (PDF).
5 You can use a dedicated plugin to control software on your
computer in more sophisticated ways. For details, refer to the
Roland website.
Rear Panel (Connecting Your Equipment)
Power Cord
AC Outlet
6 7 8
USB ash drive
Pedal unit (RPU-3) Expression pedal (EV Series)
or
Pedal switch (DP Series)
Mixer etc.
Monitor speakers
(powered)
Mic
Audio player
headphones
External MIDI Device
* To prevent malfunction and equipment failure, always turn down the volume, and turn o all the units before making any connections.
AC Adaptor