EM-15orGB_F_Ar.book Page 1 Wednesday, July 25, 2001 6:34 PM r EM-15 OR Oriental Creative Keyboard English/Français/Arabic ( ) Thank you for choosing a Roland EM-15 OR Oriental Creative Keyboard, the perfect arranger instrument for countless hours of pure, unadulterated fun. To get the most out of the EM-15 OR and to ensure many years of trouble-free service, we urge you to read through this Owner’s Manual thoroughly.
EM-15orGB_F_Ar.book Page 2 Wednesday, July 25, 2001 6:34 PM r EM-15 OR Features Style Morphing and Orchestrator functions Style Morphing allows you to “create” new Music Styles (accompaniments) on the fly by replacing selected accompaniment parts of one Style with the parts from another Style. The Orchestrator function, on the other hand, allows you to simplify, add, or leave out accompaniment parts of the selected Music Style.
EM-15orGB_F_Ar.book Page 3 Wednesday, July 25, 2001 6:34 PM EM-15 OR 64 Music Styles The EM-15 OR contains 64 Music Styles that will supply a perfect accompaniment for your solo playing. Each Music Style includes several “Divisions” that allow you to vary the accompaniment. Coupled with the Style Morphing and Orchestrator functions, the total number of accompaniment patterns adds up to far more than 64. Four modes For enhanced operation, the EM-15 OR provides an M.
EM-15orGB_F_Ar.book Page 4 Wednesday, July 25, 2001 6:34 PM r EM-15 OR Contents Features . . . . . . . . . . . . . . . . . . . . . . . . . . . . . . . . . . . . . . . .2 1. Important notes . . . . . . . . . . . . . . . . . . . . . . . . . . . . . . .5 2. Panel descriptions . . . . . . . . . . . . . . . . . . . . . . . . . . . . . .7 3. Setting up . . . . . . . . . . . . . . . . . . . . . . . . . . . . . . . . . . .12 4. Demo songs . . . . . . . . . . . . . . . . . . . . . . . . . . . . . . . . . .12 5.
EM-15orGB_F_Ar.book Page 5 Wednesday, July 25, 2001 6:34 PM EM-15 OR 1. Important notes In addition to the items listed under “Important Safety Instructions”, please read and observe the following: 1.
EM-15orGB_F_Ar.book Page 6 Wednesday, July 25, 2001 6:34 PM r EM-15 OR Additional precautions Précautions supplémentaires • Please be aware that the memory contents can be irretrievably lost as a result of a malfunction, or the improper operation of the instrument. • Use a reasonable amount of care when using the instrument’s buttons, other controls, and jacks/connectors. Rough handling can lead to malfunctions. • Never strike or apply strong pressure to the display.
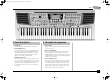
EM-15orGB_F_Ar.book Page 7 Wednesday, July 25, 2001 6:34 PM EM-15 OR 2. Panel descriptions A POWER button Press this button to switch the EM-15 OR on and off. B SCALE MEMORY buttons These three buttons allow you to save and recall the tuning settings carried out with the ORIENTAL SCALE buttons. When the EM-15 OR is shipped, these memories already contain useful settings (that will be recalled whenever you initialize your EM-15 OR).
EM-15orGB_F_Ar.book Page 8 Wednesday, July 25, 2001 6:34 PM r EM-15 OR D VOLUME √ ® buttons Use these buttons to set the global volume of your EM-15 OR. E DEMO button Press this button whenever you want to listen to the EM-15 OR’s demo songs (see p. 12). F BALANCE [√ACCOMP] [KEYBOARD ®] buttons Use the BALANCE buttons to change the volume of the corresponding section (accompaniment/song, or the parts you play on the keyboard).
EM-15orGB_F_Ar.book Page 9 Wednesday, July 25, 2001 6:34 PM EM-15 OR N SONG button This button allows you to select the EM-15 OR’s Song mode, and to specify that the [INTRO], [ORIGINAL], etc., buttons should be used to operate the on-board Recorder. O STYLE button Press this button if you want to select Music Styles. By activating this button, you also specify that the [INTRO], [ORIGINAL], etc.
EM-15orGB_F_Ar.book Page 10 Wednesday, July 25, 2001 6:34 PM r EM-15 OR U TEMPO –/+, DATA, YES/NO buttons Use these buttons to lower or increase the Arranger or Recorder tempo, to set the desired value (after pressing [FUNCTION]), or to cancel (NO) or confirm (YES) a question or command. V M.
EM-15orGB_F_Ar.book Page 11 Wednesday, July 25, 2001 6:34 PM EM-15 OR Y Y MIDI OUT/IN sockets Connect the MIDI OUT socket to the MIDI IN jack of your computer (or MIDI instrument) to transfer MIDI data from the EM-15 OR to the computer or external MIDI instrument. Connect the MIDI IN socket of the EM-15 OR to the computer’s MIDI OUT jack to receive data from the computer.
EM-15orGB_F_Ar.book Page 12 Wednesday, July 25, 2001 6:34 PM r EM-15 OR Demo All 1 12 120 001 3. Setting up 3. Branchements The first thing you need to do is connect the adapter to a suitable wall outlet. (1) Unpack the EM-15 OR and place it on a stable surface. (2) Connect the small end of the adapter cable to the EM-15 OR’s DC IN jack, and the other end to a suitable wall outlet. (3) Press the [POWER] button to switch on the EM-15 OR.
EM-15orGB_F_Ar.book Page 13 Wednesday, July 25, 2001 6:34 PM EM-15 OR Playback of a Tone demo song: • Press the [DEMO] button. This is only necessary if you haven’t already done so. • Press the [TONE] button. • Press a numeric button [1]~[8]. Each button selects a different Tone demo song. • Press the [START/STOP] button to start playback of the selected song. Press it again to stop playback. Reproduiction d’une démo de sons: • Appuyez sur le bouton [DEMO]. Si c’est déjà fait, passez à l’étape suivante.
EM-15orGB_F_Ar.book Page 14 Wednesday, July 25, 2001 6:34 PM r EM-15 OR GuessTne 1 120 001 Setting the volume Réglage du volume • If necessary, adjust the EM-15 OR’s volume with its VOLUME √ ® buttons. Press VOLUME [√ DOWN] to decrease the volume. Press VOLUME [UP ®] to increase it. (The setting range is 0~127. This value is briefly displayed.) • Si nécessaire, réglez le volume de l’EM-15 OR avec ses boutons VOLUME √ ®. Appuyez sur VOLUME [√ DOWN] pour diminuer le volume.
EM-15orGB_F_Ar.book Page 15 Wednesday, July 25, 2001 6:34 PM EM-15 OR Beginner Advanced Expert (2) Press [MUSICAL GAME] again to select the desired game (“GuessTne”, “GuessStl” or “ChordFnd”). You can also press ORCHESTRATOR [DRUM & BASS] or [COMBO] to select the game. The arrow next to “MUSICAL GAME” stops flashing. (3) Use the STYLE MORPHING [DRUM], [BASS], and [ACCOMP] buttons to select the level (only for “Guess Tone” and “Guess Style”).
EM-15orGB_F_Ar.book Page 16 Wednesday, July 25, 2001 6:34 PM r EM-15 OR Oboe Piano 16 Guess Tone Guess Tone (deviner le son) After pressing OK (see step (4) above), the EM-15 OR plays a sound, while the display shows “Listen”. Next, a Tone name is displayed (“Piano?”, for example). (5) Use the “1”, “2”, “3” buttons (or √ ®) to select the name of the correct sound. (6) Press ORCHESTRATOR [BIG BAND] to confirm your choice (“OK”).
EM-15orGB_F_Ar.book Page 17 Wednesday, July 25, 2001 6:34 PM EM-15 OR Guess Style Guess Style (deviner le style) After pressing OK (see step (4) on p. 15), the EM-15 OR plays a given type of accompaniment, while the display shows a Style name (“TWIST?”, for example). (5) Use the “1”, “2”, “3” buttons (or √ ®) to select the name of the correct style. (6) Press ORCHESTRATOR [BIG BAND] to confirm your choice (“OK”). Une fois que vous avez appuyé sur OK (voyez l’étape (4) à la p.
EM-15orGB_F_Ar.book Page 18 Wednesday, July 25, 2001 6:34 PM r EM-15 OR Root Chord Finder Chord Finder Apart from being a fun game, the Chord Finder is also useful for learning how to play certain chords you are unfamiliar with. Here is how to play this game: (1) Press the [MUSICAL GAME] button. See p. 14 for a detailed discussion. (2) Press [MUSICAL GAME] again to select “ChordFnd”. Press “3” [ACCOMP] to select it directly.
EM-15orGB_F_Ar.book Page 19 Wednesday, July 25, 2001 6:34 PM EM-15 OR (2) (1) F#A C# F#A C# F#A#C# F#A#C# ¶¶ To specify the Type: • Press the “2” button. The display now shows the message “2 Type”. • Use the √ ® buttons to select the chord type (“m”, for example). The complete name of this chord appears in the CHORD field of the display (2). Pour spécifier le type: • Appuyez sur le bouton “2”. L’écran affiche alors le message “2 Type”.
EM-15orGB_F_Ar.book Page 20 Wednesday, July 25, 2001 6:34 PM r EM-15 OR 20 6. Playing with accompaniment 6. Jeu avec accompagnement Let us now take advantage of the EM-15 OR’s accompaniment function. This function is called “Arranger”. (1) Press the [ARRANGER] button. The [ARRANGER] icon is displayed and the keyboard is split into two halves. The keys you press in the left half are used to specify the key of the accompaniment.
EM-15orGB_F_Ar.book Page 21 Wednesday, July 25, 2001 6:34 PM EM-15 OR Button Function Bouton Fonction INTRO Playback of an introduction. Press this button before activating [START/ STOP]. INTRO Joue une introduction. Appuyez sur ce bouton avant d’activer [START/STOP]. ORIGINAL Version simple d’accompagnement. ORIGINAL Simple accompaniment version. FILL FILL Transition (“Fill In”) to VARIATION or ORIGINAL. Transition (“Fill In”) pour passer à VARIATION ou ORIGINAL.
EM-15orGB_F_Ar.book Page 22 Wednesday, July 25, 2001 6:34 PM r EM-15 OR Stopping Arranger playback Arrêter le jeu de l’Arranger (7) Press [START/STOP] again to stop playback. You can also press [ENDING]. In that case, you first hear an ending phrase. When it is finished, Arranger playback stops automatically. (7) Appuyez à nouveau sur [START/STOP] pour arrêter la reproduction. Vous pouvez aussi enfoncer [ENDING]. Dans ce cas, vous entendrez d’abord la phrase finale.
EM-15OR.GB Page 23 Thursday, August 2, 2001 9:49 AM EM-15 OR Piano 2 Selecting sounds for the right hand Choix des sons pour la main droite Do the following if you wish to assign a different sound to your (right-hand) melody playing: (1) Press the [TONE] button. The arrow (√) jumps to the “TONE” entry. You can now select Tones. (2) Have a look at the TONE A/TONE B lists on the right-hand side of front panel to locate the Tone (sound) you need. In this example, we will select the Tone “B41 Fantasia”.
EM-15orGB_F_Ar.book Page 24 Wednesday, July 25, 2001 6:34 PM r EM-15 OR 7. Splitting the keyboard 7. Partage de clavier (Organ) (Organ) Lower (+M. Bass) Upper Here is how to split the keyboard without using the Arranger. This allows you to play separate sounds with your left and right hands: • One sound in the right half (Upper). • One sound in the left half (Lower). You can also add an automatic bass line (M.Bass). See p. 60. (1) Press the [ORGAN] button. The [ORGAN] icon appears in the display.
EM-15orGB_F_Ar.book Page 25 Wednesday, July 25, 2001 6:34 PM EM-15 OR Upper Upper 8. Playing one sound (Piano) 8. Jeu avec un son (Piano) Here is how to play one sound via the entire keyboard. This mode is automatically selected when you switch on the EM-15 OR. As it was mainly meant to use the EM-15 OR like a digital piano, this mode is called “PIANO”. Voici comment jouer un seul et même son sur tout le clavier. Ce mode est automatiquement choisi quand vous mettez l’EM-15 OR sous tension.
EM-15orGB_F_Ar.book Page 26 Wednesday, July 25, 2001 6:34 PM r EM-15 OR Using oriental tunings Your EM-15 OR allows you to change the tuning of the keys, which then applies to all notes of the same name. Here’s an example: If you press the ORIENTAL SCALE [Bb] button (indicator lights), that note’s tuning is lowered by a quarter tone (–50 cents). This setting applies to all B-flat keys on the keyboard.
EM-15orGB_F_Ar.book Page 27 Wednesday, July 25, 2001 6:34 PM r EM-15 OR Scale F Using other tuning values Utilisation d’autres valeurs d’accord Pressing an ORIENTAL SCALE button toggles between the western tuning of the corresponding notes and a setting that is a quarter tone below western tuning (–50 cents). However, you can also select other tuning values. (1) Press and hold the ORIENTAL SCALE button of the note whose tuning you wish to change until the display reads Scale, followed by the note name.
EM-15orGB_F_Ar.book Page 28 Wednesday, July 25, 2001 6:34 PM r EM-15 OR (3) Wait until all three SCALE MEMORY indicators briefly light, and release the button you pressed. If necessary, you can select another, SCALE MEMORY by briefly pressing the SCALE MEMORY button assigned to the settings you wish to use. To return to the western tuning, press the SCALE MEMORY button in question again so that its indicator goes dark, and/or switch off all ORIENTAL SCALE buttons whose indicators light.
EM-15orGB_F_Ar.book Page 29 Wednesday, July 25, 2001 6:34 PM EM-15 OR PITCH SHIFT Using the Pitch Shift buttons Utilisation des boutons Pitch Shift Your EM-15 OR comes with two Pitch Shift buttons that allow you to momentarily raise (®) or lower (√) the pitch of your melody notes. At first (and after initializing your EM-15 OR), these buttons will change the pitch by two semitones (“2”). Here’s how to take advantage of the Pitch Shift buttons: (1) Play and hold a note with your right hand.
EM-15orGB_F_Ar.book Page 30 Wednesday, July 25, 2001 6:34 PM r EM-15 OR M.Drums dr1 Standard dr2 Room dr3 Power dr4 Electron dr41 TR-808 9. Drumming on the keyboard 9. Jouer de la batterie sur le clavier Here is how to assign drum and percussion sounds to the entire keyboard. Cette section vous montre comment assigner des sons de batterie et de percussion au clavier entier. (1) Press the [M.DRUMS] button. The [M.DRUMS] icon appears in the display. Play a few notes on the keyboard.
EM-15orGB_F_Ar.book Page 31 Wednesday, July 25, 2001 6:34 PM EM-15 OR 10. Recording your music 10. Enregistrer votre jeu (1) Press the [ARRANGER] button. The [ARRANGER] icon is displayed in the center of the display. You can now use your left hand for transposing the Arranger’s key in realtime. Votre EM-15 OR comporte une fonction Recorder d’enregistreur 2 pistes que vous pouvez exploiter pour enregistrer vos propres morceaux.
EM-15orGB_F_Ar.book Page 32 Wednesday, July 25, 2001 6:34 PM r EM-15 OR (8) Assign the desired Tone to the right half of the keyboard. Press [TONE], and use the [A/B] and [1]~[8] buttons. See also page 23. Note: If necessary, you can also use the [VARIATION] button to select a Tone Variation. See p. 42 for details. Remarque: Si nécessaire, vous pouvez aussi utiliser le bouton [VARIATION] pour choisir un son de variation. Pour en savoir plus, voyez p. 42.
EM-15orGB_F_Ar.book Page 33 Wednesday, July 25, 2001 6:34 PM EM-15 OR (11) Stop recording in one of the following ways: • Press [START/STOP]. • Press the [ENDING] button to start the Ending phrase. As soon as it ends, recording stops. (11) Arrêtez l’enregistrement en suivant une des méthodes ci-dessous: • Appuyez sur [START/STOP]. • Appuyez sur le bouton [ENDING] pour lancer la phrase de finale. L’enregistrement s’arrête dès que la finale se termine.
EM-15orGB_F_Ar.book Page 34 Wednesday, July 25, 2001 6:34 PM r EM-15 OR Upper 34 Upper (2) Press the [● REC] button. The EM-15 OR now automatically selects the [2nd≈TRK] function. (3) Select the Upper Tone you wish to use. See page 23. (2) Appuyez sur le bouton [● REC]. L’EM-15 OR choisit à présent automatiquement la fonction [2nd≈TRK]. (3) Choisissez le son Upper Tone que vous voulez utiliser. Voyez page 23. (4) Play a few notes on the keyboard: this time, all keys are assigned to the Upper part.
EM-15orGB_F_Ar.book Page 35 Wednesday, July 25, 2001 6:34 PM EM-15 OR 11. Additional Music Style functions 11. Fonctions Music Style supplémentaires Apart from the basic Music Style functions covered on page 20 and following, your EM-15 OR also provides the following functions. The following are only available after pressing the [ARRANGER] button (the [ARRANGER] icon must be displayed).
EM-15orGB_F_Ar.book Page 36 Wednesday, July 25, 2001 6:34 PM r EM-15 OR Melody Intelligence (INT) Melody Intelligence (INT) The Melody Intelligence function adds a second voice (harmony notes) to the melodies you play with your right hand. Melody Intelligence est une fonction qui ajoute une deuxième voix (des notes d’harmonie) aux mélodies que vous jouez de la main droite.
EM-15orGB_F_Ar.book Page 37 Wednesday, July 25, 2001 6:34 PM EM-15 OR Orchestrator The Orchestrator function allows you to vary the accompaniment patterns played by the Arranger. You can leave out parts, thin out the drum part, or even use a totally different accompaniment – in realtime (i.e. while you are playing). (1) Select the Music Style you wish to use for playing. See page 22.
EM-15orGB_F_Ar.book Page 38 Wednesday, July 25, 2001 6:34 PM r EM-15 OR Style Morphing Style Morphing allows you to use one or several accompaniment parts of one Music Style and the others of a second Music Style. Every time you select a Music Style, the EM-15 OR automatically prepares a second Style in the background. The Style you select is called “STYLE A” (this is indicated by the [STYLE≈A] icon in the upper right corner of the display. The “covert” Style is called “STYLE B”.
EM-15orGB_F_Ar.book Page 39 Wednesday, July 25, 2001 6:34 PM EM-15 OR Press it again to return to the previous bass part. (3) Press the [ACCOMP A/B] button once to select the melodic parts of the “other” Style (A or B). Press it again to return to the previous accompaniment parts. Selecting another “B” Style As stated earlier, the “B” Style is prepared automatically whenever you select an “A” Style, so that the Style Morphing function is ready whenever you are.
EM-15orGB_F_Ar.book Page 40 Wednesday, July 25, 2001 6:34 PM r EM-15 OR Additional Music Style functions • • • • • • Here are yet other functions related to Music Styles. These can be set via the FUNCTION menu, or are covered elsewhere: Bass Inversion (see p. 60) Balance between the Keyboard parts and the Music Style parts (see p. 43) Volume of certain Music Style parts (see p. 59) Arranger split point (see p. 61) Hold function for the Arranger notes (see p. 59).
EM-15orGB_F_Ar.book Page 41 Wednesday, July 25, 2001 6:34 PM EM-15 OR 12. More Keyboard part functions 12. Autres fonctions de parties Keyboard Using two Upper parts (Layer) Utiliser deux parties Upper (Layer) The EM-15 OR’s Upper 1 part is assigned to the right half of the keyboard (in ARRANGER and ORGAN modes) or to the entire keyboard (PIANO mode). In all modes except M.DRUMS, you can add a second part (Upper 2) to Upper 1 by activating the LAYER function.
EM-15orGB_F_Ar.book Page 42 Wednesday, July 25, 2001 6:34 PM r EM-15 OR Selecting Tone Variations Tone Variations are alternatives for the Tones you can select with the numeric keypad. The PIANO bank, for instance, contains a grand piano, an upright piano, an electric piano, etc. These are the Tones. If you also want to specify the kind of grand piano (mellow, bright, stereo/ mono), you need to turn to the Variations (i.e. “Tone subcategories”).
EM-15orGB_F_Ar.book Page 43 Wednesday, July 25, 2001 6:34 PM EM-15 OR Balance The BALANCE [√ACCOMP] and [KEYBOARD®] buttons allow you to change the volume balance between the Arranger (or Song) parts and the Keyboard parts (the ones you can play yourself). Balance Les boutons BALANCE [√ACCOMP] et [KEYBOARD®] permettent de changer la balance de volume entre les parties Arranger (ou parties du morceau) et les parties Keyboard (à savoir celles que vous jouez vous-même).
EM-15orGB_F_Ar.book Page 44 Wednesday, July 25, 2001 6:34 PM r EM-15 OR Transpose Transpose The Transpose function changes the pitch of the notes and chords you play (similar to the Oriental Scale function but based on musical keys rather than individual note pitches). Instead of figuring out what other keys you need to press to accommodate the singer or an instrumentalist, you can set the required Transpose value and go on playing the song the way you practised it while sounding in a different key.
EM-15orGB_F_Ar.book Page 45 Wednesday, July 25, 2001 6:34 PM EM-15 OR Other Keyboard part functions • • • • • • • • • • • • Here are yet other functions related to the Keyboard parts. These can be set via the FUNCTION menu, or are covered elsewhere: Reverb effect (see p. 57) Chorus effect (see p. 58) Keyboard velocity (see p. 56) Octave transposition of the Upper 1, Upper 2, and Lower parts (see p. 59) Master Tune (see p. 56) Volume of the Keyboard parts (see p.
EM-15orGB_F_Ar.book Page 46 Wednesday, July 25, 2001 6:34 PM r EM-15 OR 13. Recorder functions 13. Fonctions Recorder Playback functions Fonctions de reproduction The [INTRO], [ORIGINAL], etc. buttons have two functions: one in Style mode (printed above the buttons), and another one in Song mode (printed below the buttons). You need to select the Song mode (by pressing the [SONG] button). Les boutons [INTRO], [ORIGINAL], etc.
EM-15orGB_F_Ar.book Page 47 Wednesday, July 25, 2001 6:34 PM EM-15 OR Live performance with song backing (Minus One) (1) (2) (3) (4) Your EM-15 OR allows you to mute the solo part of the song you are playing back. This is called Minus One playback (because one part of the original song will not be played back). Press the [SONG] button. Press the [MINUS ONE] button. Press [|√] and [®/■] to start playback. You will now hear all parts except the melody, which can be played using the Upper 1 part.
EM-15orGB_F_Ar.book Page 48 Wednesday, July 25, 2001 6:34 PM r EM-15 OR Other recording modes (1) (2) (3) (4) Autres modes d’enregistrement Here are some other possibilities for recording your music. Select one of these if you do not wish to use the Arranger (see p. 31). Voici d’autres possibilités pour enregistrer votre propre musique. Choisissez une de ces alternatives si vous ne voulez pas utiliser l’Arranger (voyez p. 31).
EM-15orGB_F_Ar.book Page 49 Wednesday, July 25, 2001 6:34 PM EM-15 OR Note: If you start recording without the Arranger drums and want to bring them in at a later stage, it would be a good idea to switch on the metronome. Remarque: Si vous lancez l’enregistrement sans la partie de batterie de l’Arranger et que vous comptez l’incorporer plus loin dans le morceau, nous vous conseillons d’activer le métronome. b) Press the [START/STOP] button to start Arranger drum playback with the selected Division.
EM-15orGB_F_Ar.book Page 50 Wednesday, July 25, 2001 6:34 PM r EM-15 OR Recording in PIANO mode Enregistrement en mode PIANO Select this method when you want to record piano music, or any other song that requires the use of only one sound for the entire keyboard. What is recorded onto Track “A” cannot be replaced without overwriting the entire song. Here, however, you can record a first Upper part (Track “A”) and add a second one on track “B” during your second session.
EM-15orGB_F_Ar.book Page 51 Wednesday, July 25, 2001 6:34 PM EM-15 OR (8) Stop recording in one of the following ways: a) If you started recording using methods (b) or (c) above, press [START/STOP] to stop both the Arranger and recording. b) Press [● REC] again. c) Press the [ENDING] button to start the Ending phrase. As soon as it ends, recording stops. Here is what can be recorded. Not all parts need to be used at all times. (Upper 2 cannot be used without Upper 1, while M.
EM-15orGB_F_Ar.book Page 52 Wednesday, July 25, 2001 6:34 PM r EM-15 OR Recording in M.DRUMS mode Enregistrement en mode M.DRUMS Select this method to record a live drum part using the EM-15 OR’s M.Drums function (see p. 30). What is recorded onto Track “A” cannot be replaced without overwriting the entire song, so be sure to get your first (or all) drum notes right. You can, however, add more drum notes using the 2nd TRACK function – or add a melodycum-chords to your drum track.
EM-15orGB_F_Ar.book Page 53 Wednesday, July 25, 2001 6:34 PM EM-15 OR c) Press [SYNC START] to activate this function, and play one or several notes. The Arranger drums will start in sync with your first notes. (8) Stop recording in one of the following ways: a) If you started recording using methods (b) or (c) above, press [START/STOP] to stop both the Arranger and recording. b) Press [● REC] again. c) Press the [ENDING] button to start the Ending phrase. As soon as it ends, recording stops.
EM-15orGB_F_Ar.book Page 54 Wednesday, July 25, 2001 6:34 PM r EM-15 OR very useful. Just remember that the start/stop functions related to the Arranger (Sync Start, Ending) are no longer available. (1) Press the [SONG] button and check whether the display contains the [SONG] icon. (2) Select the desired mode by pressing [M.DRUMS], [ORGAN], or [PIANO]. The options are practically the same as when the [STYLE] icon is displayed (see p.
EM-15orGB_F_Ar.book Page 55 Wednesday, July 25, 2001 6:34 PM EM-15 OR 14. Function menu 14. Menu Function The EM-15 OR’s Function mode contains more advanced settings you may not need every day. They allow you to fine-tune your instrument’s response. It would therefore be a good idea to familiarize yourself with these parameters. All settings (except Mstr Tune, Local and Resume) can be written to a User Program (see p. 64).
EM-15orGB_F_Ar.book Page 56 Wednesday, July 25, 2001 6:34 PM r EM-15 OR (5) Press [FUNCTION] again and use TEMPO [–][+] to select another Function parameter. (6) To leave the Function mode, press [SONG], [TONE], [STYLE], or [USER PROGRAM]. General Function parameters Kbd Velocity (On/Off) The EM-15 OR is velocity sensitive, which means that the volume and brightness of the Upper 1/2, Lower, M.Drums, and M.Bass notes depend on the force/speed with which you strike the keys.
EM-15orGB_F_Ar.book Page 57 Wednesday, July 25, 2001 6:34 PM EM-15 OR Metro Vol (metronome volume) (0~127, Default setting: 100) Use this parameter whenever you think the metronome is too loud/soft with respect to the music. The default value is usually an appropriate setting. Reverb Metro Vol (volume du métronome) (0~127, Défaut: 100) Servez-vous de ce paramètre s’il vous semble que le son du métronome est trop fort/faible par rapport à la musique.
EM-15orGB_F_Ar.book Page 58 Wednesday, July 25, 2001 6:34 PM r EM-15 OR Chorus (On/Off) This parameter allows you to switch the onboard digital Chorus effect on or off. When it is on, the icon is displayed. Chorus is an effect that adds “width” and “warmth” to the sound by simulating several identical instruments that play in unison. Use the following parameter for selecting the kind of effect you need.
EM-15orGB_F_Ar.book Page 59 Wednesday, July 25, 2001 6:34 PM EM-15 OR ADrums, ABass, Accomp: volume & status (OFF, 0~127, Default setting: 90) Here are the volume parameters for certain Arranger parts. This also means that they are only available when the [ARRANGER] icon is displayed. In fact, the parts correspond exactly to what can be selected using the STYLE MORPHING function (see p. 38). You could also select “OFF” for a part you do not want to hear.
EM-15OR-2.GB Page 60 Friday, July 27, 2001 2:12 PM r EM-15 OR Bass Inv ( ) (On/Off) Use this parameter to change the way in which the Arranger reads the chords you play. If the icon is not displayed, the A. Bass part plays the root of the chords that feed the Arranger. If you play a C (or C chord), the bass sounds a C; if you play an A minor chord (or if you press A and the C to its right), the bass sounds an A, etc. By activating Bass Inversion, you can specify the note played by the A.
EM-15orGB_F_Ar.book Page 61 Wednesday, July 25, 2001 6:34 PM EM-15 OR ArrSplit (Arranger Split) ArrSplit (Arranger Split) (48~84, Default setting: 60) Use this parameter to set the split point for the Arranger mode. Arranger (48~84, Défaut: 60) Ce paramètre sert à régler le point de partage du mode Arranger. Upper 1 (+ Upper 2) Arranger ArrSplit= 48 The note you set here is the lowest note you can play with the Upper1/2 parts. The number refers to a note.
EM-15orGB_F_Ar.book Page 62 Wednesday, July 25, 2001 6:34 PM r EM-15 OR PitchBnd (0~24, Default setting: 2) This parameter allows you to specify by how many semitones the pitch should rise or fall when you press the PITCH SHIFT ® or √ button. A semitone corresponds to the distance (interval) between a “C” and a “C#”, for example. “12” means that the pitch will rise/fall 1 octave, while “24” corresponds to 2 octaves. In most cases, you will probably use “1” or “2” to achieve meaningful effects.
EM-15orGB_F_Ar.book Page 63 Wednesday, July 25, 2001 6:34 PM EM-15 OR Resume Resume Select this function to recall the EM-15 OR’s factory Function settings. Choisissez cette fonction pour rappeler les réglages Function d’usine de l’EM-15 OR. Note: Resume does not reset the MIDI parameters of the Function mode (see p. 68). Remarque: La fonction Resume n’initialise pas les paramètres MIDI du mode Function (voyez p. 68). Press TEMPO [+] in response to the flashing “YES” message.
EM-15orGB_F_Ar.book Page 64 Wednesday, July 25, 2001 6:34 PM r EM-15 OR 15. Working with User Programs The EM-15 OR is equipped with 8 User Program memories that allow you to store almost all settings (or registrations) you make on the front panel and via the Function menu (see p. 56). Note: MIDI settings (see p. 68) are not saved to a User Program because the EM-15 OR memorizes them automatically. 15.
EM-15orGB_F_Ar.book Page 65 Wednesday, July 25, 2001 6:34 PM EM-15 OR Notes about writing User Programs Remarques sur la sauvegarde des programmes utilisateur Leaving the User Program environment Press [USER PROGRAM] to leave the User Program environment. The User Program field in the display will go blank again. Quitter l’environnement User Program Appuyez sur [USER PROGRAM] pour quitter l’environnement User Program. La zone User Program de l’écran redevient vide.
EM-15orGB_F_Ar.book Page 66 Wednesday, July 25, 2001 6:34 PM r EM-15 OR Selecting a User Program Sélection d’un programme utilisateur Though the User Program memory you specified above is already selected, there will be times when you need to select another memory. In that case, here is what you need to do: (1) Briefly press [USER PROGRAM/WRITE]. Do not hold this button down because doing so will start the Write procedure (see above).
EM-15orGB_F_Ar.book Page 67 Wednesday, July 25, 2001 6:34 PM EM-15 OR To actually select a User Program… (2) Press a numeric button. The settings of the selected User Program will be recalled. Note: As soon as you modify any setting (on the front panel or in the Function menu), four dashes appear below the User Program number. (3) Once again press [USER PROGRAM/WRITE] to leave the User Program mode. Pour sélectionner un programme utilisateur… (2) Appuyez sur un bouton du pavé numérique.
EM-15orGB_F_Ar.book Page 68 Wednesday, July 25, 2001 6:34 PM r EM-15 OR 16. MIDI functions 16. Fonctions MIDI MIDI is short for Musical Instrument Digital Interface. The word refers to many things, the most obvious being a connector type that is used by musical instruments and other devices to exchange messages relating to the act of making music. Every time you play on the EM-15 OR’s keyboard or start the Arranger, your instrument transmits MIDI data to its MIDI OUT socket.
EM-15orGB_F_Ar.book Page 69 Wednesday, July 25, 2001 6:34 PM EM-15 OR Note: All EM-15 OR parts are set to receive MIDI messages. If they do not seem to respond to the messages you send from the external controller, you should check whether the external controller’s MIDI OUT is connected to the MIDI INput of your EM-15 OR. Remarque: Toutes les parties de l’EM-15 OR peuvent recevoir des messages MIDI.
EM-15OR-2.GB Page 70 Thursday, July 26, 2001 5:14 PM r EM-15 OR NTA Rx14 (Note-to-Arranger reception on/off) (On/Off) NTA is short for “Note-to-Arranger”, or the notes you play in the left half of the keyboard to feed the Arranger with chord information. These notes can also be received via MIDI. If you want the Arranger to use these notes, you must transmit them on MIDI channel 14 (from your computer or external MIDI instrument to the EM-15 OR) and select “On” here.
EM-15orGB_F_Ar.book Page 71 Wednesday, July 25, 2001 6:34 PM EM-15 OR Please note that synchronization is only possible when you connect the external device’s MIDI OUT socket to the EM-15 OR’s MIDI IN socket (though you can also work the other way around; in that case, see the sequencer’s manual for details).
EM-15orGB_F_Ar.book Page 72 Wednesday, July 25, 2001 6:34 PM r EM-15 OR Local (On/Off, Default setting: On) The Local parameter allows you to establish or remove the connection between the EM-15 OR’s keyboard/Recorder and the internal tone generator. When set to “ON” (default), playing on the EM-15 OR’s keyboard or playing back a Recorder song will cause the corresponding notes to sound.
EM-15orGB_F_Ar.book Page 73 Wednesday, July 25, 2001 6:34 PM EM-15 OR 17. Using the outputs and an optional pedal 17. Utilisation des sorties et d’une pédale en option Using an external amplifier Utilisation d’un ampli externe If you like, you can also record your performance (or the Recorder song) to cassette, MD, etc. To this end, you need to connect the EM-15 OR’s PHONES 1/OUTPUT socket to the external device’s REC IN jacks.
EM-15orGB_F_Ar.book Page 74 Wednesday, July 25, 2001 6:34 PM r EM-15 OR Sustain Footswitch (1) (2) (3) (4) (5) You can connect an optional DP-2, DP-6, or BOSS FS-5U footswitch to the SUSTAIN FOOTSWITCH jack in order to hold the Upper Tone notes even after releasing the keys. Here’s how it works. Connect a DP-2, DP-6, or BOSS FS-5U footswitch to the SUSTAIN FOOTSWITCH jack. Play a note with your right hand. Press the footswitch. Release the key.
EM-15orGB_F_Ar.book Page 75 Wednesday, July 25, 2001 6:34 PM EM-15 OR 18. Miscellaneous 18. Divers Functions for educational purposes Fonctions à caractère pédagogique The EM-15 OR provides two functions that may come in handy for music teachers or for those who use the EM-15 OR in class: Deactivating or activating the Demo function The EM-15 OR’s Demo function can be switched off so that pressing the [DEMO] button will have no effect at all.
EM-15orGB_F_Ar.book Page 76 Wednesday, July 25, 2001 6:34 PM r EM-15 OR Deactivating both the Arranger and the Demo function Verrouillage de l’Arranger et de la fonction Demo A third “educational” option is to switch off both the Demo and the Arranger functions in one go: (1) Switch off the EM-15 OR. (2) Hold down the [START/STOP] button while you switch the EM-15 OR back on again. It will now be impossible to start/stop the Arranger or demo song playback.
EM-15orGB_F_Ar.book Page 77 Wednesday, July 25, 2001 6:34 PM EM-15 OR Thanks Roland Corporation wishes to express gratitude and thanks to: Mr. Abdallah George (General Manager/Al Fanny Trading – Egypt) Mr. Ammar El Sherei For composing “Arabesque” demo song 2. Mr. Alain Slim For composing “Oriental Percussion” demo song 1, and developing the “Saidi Masrahy”, “Gypsy Oriental” and “Disco Oriental” styles. Mr. Mohsen Adly For developing oriental styles. Mr.
EM-15orGB_F_Ar.book Page 78 Wednesday, July 25, 2001 6:34 PM r EM-15 OR Specifications Fiche technique EM-15 OR Creative Keyboard EM-15 OR Creative Keyboard GENERAL Keyboard: 61 keys, velocity sensitive Display: Custom graphic display (backlit) Output power: 2x 5W Memories: 8 User Programs Modes: Arranger, Piano, Organ, M.
EM-15orGB_F_Ar.
EM-15orGB_F_Ar.
EM-15orGB_F_Ar.book Page 81 Wednesday, July 25, 2001 6:34 PM EM-15 OR Music Style list No. 11 12 13 14 15 16 17 18 Name CC00 CC32 Maks-Mlf 50 28 Maksoum 50 27 Wehda-Kb 50 1 Baladi 50 29 SaidiMdn 50 25 SaidiMsh 50 71 Saidi 50 19 Fallahi 50 30 BPM 105 120 135 95 135 96 110 180 TimeS 4/4 4/4 4/4 4/4 4/4 4/4 4/4 4/4 No.
88 86 C6 84 83 81 79 77 76 74 C5 72 71 69 67 65 64 62 C4 60 59 57 55 53 52 50 C3 48 47 45 43 41 40 38 C2 36 35 33 31 29 28 87 85 82 80 78 75 73 70 68 66 63 61 58 56 54 51 49 46 44 42 39 PC: <--: ---: [EXC]: <-<-<-<-Room Low Tom 2 <-Room Low Tom 1 <-Room Mid Tom 2 <-Room Mid Tom 1 Room High Tom 2 <-Room High Tom 1 <-<-<-<-<-<-<-<-<-<-<-<-<-<-<-<-<-<-<-<-<-<-<-<-<-<-<-<-<-<-<-<-<-<-<-<-<---- <-<-<-<-<-<-<-<-<-<-- PC 9 ROOM <-Gated SD 1 <-<-Room L
88 86 C6 84 83 81 79 77 76 74 C5 72 71 69 67 65 64 62 C4 60 59 57 55 53 52 50 C3 48 47 45 43 41 40 38 C2 36 35 33 31 29 28 87 85 82 80 78 75 73 70 68 66 63 61 58 56 54 51 49 46 44 42 39 37 34 32 30 27 PC: <--: ---: [EXC]: Program change number (Drum Set Number) Same as the percussion sound of “STANDARD” (PC1) No sound Percussion sounds of the same EXC number cannot be played simultaneously.
0,32 1 5 6, 38 7 10 11 64 65 66 67 84 91 93 98, 99 100, 101 Mode 2: OMNI ON, MONO Mode 4: OMNI OFF, MONO Mode 1: OMNI ON, POLY Mode 3: OMNI OFF, POLY Aux Messages O (120, 126, 127) O (121) O O (123-125) O X O O X X X O O 0~127 O O O O O O O O O O O O O (Reverb) O (Chorus) O O O *1 O X is selectable *2 Recognized as M=1 even if M≠1 *3 Only for Style parts X X X X O X All Sounds Off Reset All Controllers Local On/Off All Notes Off Active Sense Reset *1 *1 *3 *3 *3 *3 *3 *3 *3 O O O X
0,32 1 5 6, 38 7 10 11 64 65 66 67 84 91 93 98, 99 100, 101 Mode 2: OMNI ON, MONO Mode 4: OMNI OFF, MONO Mode 1: OMNI ON, POLY Mode 3: OMNI OFF, POLY Aux Messages O (120, 126, 127) O (121) O O (123-125) O X O O O X X O O 0~127 O O O O O O O O O O O O O (Reverb) O (Chorus) O O O O O *1 O X is selectable *2 Recognized as M=1 even if M≠1 *3 Only for Song parts O O X O O X All Sounds Off Reset All Controllers Local On/Off All Notes Off Active Sense Reset *1 *1 *1 *3 *3 *3 *3 *3 *3 *3 *3 O
EM-15orGB_F_Ar.book Page 86 Wednesday, July 25, 2001 6:34 PM r EM-15 OR Index Numerics Flanger . . . . . . . . . . . . . . . . . . . . . . . . . .58 Music Style . . . . . . . . . . . . . . . . . . . . . .22 2nd TRK . . . . . . . . . . . . . . . . . . . . . . . . . 34 G N A Game . . . . . . . . . . . . . . . . . . . . . . . . . . .14 Guess Style . . . . . . . . . . . . . . . . . . . . . . . . . 17 Tone . . . . . . . . . . . . . . . . . . . . . . . . . 16 Note to Arranger . . . . . . . . . . . . . .