English Deutsch Français Italiano Español Owner’s Manual Português Nederlands
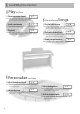
&& Look What You Can Do! && Play the Piano ee Play using various sounds g p. 7 ee Sound a metronome g p. 7 ee Play duets g p. 8 This unit contains a wide variety of tones (sounds). You can freely select and perform using these tones. You can sound a metronome. &&Play and Record Songs ee Play the built-in songs g p. 10 ee Play back individual parts g p. 10 ee Record your performance g p. 11 This unit contains numerous built-in songs. For the song titles, refer to “Internal Song List” (p.
&& Contents Look What You Can Do!. . . . . . . . . . . . . . . . . . . . . . . . . . . . . . . . . . . . . . . . . . . . . . . . . . . . . . . . . . . . . . . . . . . . . . 2 Panel Descriptions. . . . . . . . . . . . . . . . . . . . . . . . . . . . . . . . . . . . . . . . . . . . . . . . . . . . . . . . . . . . . . . . . . . . . . . . . . 4 Front Panel. . . . . . . . .
&& Panel Descriptions Front Panel Piano [Grand], [Ensemble] buttons Use these buttons to select tones (p. 7) or adjust the manner in which they are sounded (p. 9). To select a grand piano Press the [Grand] button. To select various piano tones Press the [Ensemble] button. To select other tones Press [Grand] or [Ensemble] button, and then press the [–] [+] buttons. To adjust the reverberation Hold down the [Grand] button and press the [–] [+] buttons.
Panel Descriptions Display [Metronome] button This indicates the tone number, song number, measure number, tempo, selected function, or value. Grand piano Tone Various piano number tones Other GP1 En1 o 1 Song number Internal song This sounds the metronome (p. 7). a. 0 1 U. 0 1 User To sound the metronome Turn on the [Metronome] button. To change the tempo Turn on the [Metronome] button to display the tempo, and then press the [–] [+] buttons.
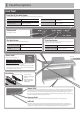
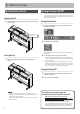
&& Before You Play Opening/Closing the Lid Turning the Power On/Off First, open the lid. You must use both hands to open or close the lid. Once the connections have been completed (p. 22), turn on power to your various devices in the order specified. By turning on devices in the wrong order, you risk causing malfunction and/or damage to speakers and other devices. Opening the Lid 1. Use both hands to lift the edge of the lid, and push it away from yourself. Turning the Power On 1.
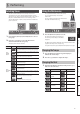
&& Performing Selecting Tones Using the Metronome This unit contains numerous tones (sounds). The tones are organized into two groups. The Piano [Grand] button is for the grand piano tone group, and the [Ensemble] button is for group of the piano combined with other tones such as strings or bass. You can perform while the metronome sounds. You can adjust the tempo or beat of the metronome. If a song is playing, the metronome will sound at the tempo and beat of that song.
Performing Dividing the Keyboard in Two (Twin Piano) Disabling the Buttons (Panel Lock) When you activate Panel Lock, all buttons will be disabled. This prevents the tones or settings from being changed if you inadvertently press a button. You can divide the keyboard into left and right sections so that two people can play the same pitch ranges. This function lets you use the unit as though it were two pianos. 1. 1. Hold down the [Song] button and press the [Key Touch] button.
&& Adjusting the Keyboard Sensitivity and the Sound Adjusting the Keyboard Sensitivity (Key Touch) Adding Reverberation to Sounds (Reverb Effect) Here’s how to change the way in which the sound responds to your keyboard dynamics. You can adjust the response as appropriate for your playing strength. Press the [Key Touch] button so it’s lit. 1. Now you can adjust the key touch. Value Explanation The key touch setting will be set to “medium.
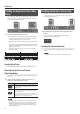
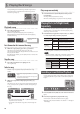
&& Playing Back Songs Let’s try listening to the internal songs and the songs recorded in internal memory. For the titles of the internal songs, refer to “Internal Song List” (p. 19). Play songs consecutively 1. Hold down the Piano [Ensemble] button and press the [Song] button. The songs will be played back successively. When the currently playing song ends, the next song will play. Playing Parts (Left/Right Hand) Separately Play back a song 1.
&& Recording You can record your performances. You can play back a performance you have recorded to check what and how you played, and play melodies on the keyboard along with prerecorded accompaniment. If you don’t want a count to sound before recording Recording will start automatically if you play the keyboard while in recording-standby mode. Stopping recording 6. Press the [Song] button. Recording will stop. 1. 2. Select the tone that you want to play (p. 7). Sound the metronome if desired.
&& Various Settings (Function Mode) Function mode lets you make various settings for this unit. Basic Operation in Function Mode Saving the Settings (Memory Backup) When this unit’s power is turned off, it will return to its default settings. However, if desired, you can save the following settings so that they will be remembered even after the power is off. This is called the “Memory Backup” function. Here’s the basic procedure for making settings in Function mode. 1.
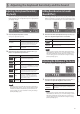
Various Settings (Function Mode) Function Settings Display Function Setting Value Explanation Changing the Key of the Keyboard (Transpose) F01 -6 – 0 – 5 Transpose steps) (semitone If you play C E G g It will sound E G B You can use the Transpose function to transpose the keyboard in semitone steps. (default: 0 ) For example, if a song is in the key of E major, and you want to play it with the fingering of C major, set Transpose to a value of “4”. 15. 3 – 40. 0 – 66. 2 Master Tuning (415.
Various Settings (Function Mode) Display Function Setting Value MIDI Transmit Channel OFF , 1 – 16 (default: 1 ) Explanation MIDI Transmit Channel Settings F05 This setting specifies the MIDI channel on which this unit will transmit. MIDI uses sixteen “MIDI channels,” which are numbered 1 through 16. By connecting MIDI devices and specifying the appropriate MIDI channel for each device, you can play or select sounds on those devices. This unit will receive all sixteen channels (1–16).
&& Making the Power Automatically Turn Off After a Time (Auto Off ) With the factory settings, the unit’s power will automatically be switched off 240 minutes (4 hours) after you stop playing or operating the unit. 4. If you don’t want the power to turn off automatically, change the “Auto Off” setting to “OFF” as follows. 5. Value Explanation 240 (default) The power will automatically turn off when 240 minutes (4 hours) have passed since you last played or operated the unit.
&& Troubleshooting Symptom Cause/Action Even though you’re using headphones and the sound is muted, a thumping sound is heard when you play the keyboard This unit uses a hammer action keyboard in order to simulate an acoustic piano’s playing touch as realistically as possible. For this reason, you’ll hear the hammers thump when you play the keyboard, just as you would when playing an acoustic piano.
&& Message List Indication E. 4 0 E. 4 1 E. 4 3 E. 5 1 Meaning This unit cannot deal with the excessive MIDI data sent from the external MIDI device. Reduce the amount of MIDI data sent to the unit. A MIDI cable has been disconnected. Connect it properly and securely. A MIDI transmission error has occurred. Check the MIDI cable and connected MIDI device. There may be a problem with the system. Repeat the procedure from the beginning.
&& Tone List Piano [Grand] button No. Name Explanation GP1 Grand Piano 1 A splendid concert grand piano sound. This is the most highly recommended tone; it can be used for any style of music. GP2 Grand Piano 2 A more mellow grand piano sound. Appropriate for quiet songs. GP3 Grand Piano 3 A brilliant grand piano sound. Appropriate when you want the piano to stand out in the band. GP4 Ragtime A honky-tonk piano. Ideal for ragtime. Piano [Ensemble] button No.
&& Internal Song List Composer No. Song Name Composer a. 0 1 a. 0 2 a. 0 3 Valse, op.34-1 Fryderyk Franciszek Chopin Carl Czerny Fryderyk Franciszek Chopin Le Coucou Louis Claude Daquin Nocturne No.20 Fryderyk Franciszek Chopin Menuett G dur Johann Sebastian Bach a. 0 4 Die Forelle Franz Peter Schubert, Arranged by Franz Liszt Spinnerlied Albert Ellmenreich a. 0 5 a. 0 6 a. 0 7 a. 0 8 a. 0 9 a. 1 0 a. 1 1 a. 1 2 a. 1 3 a. 1 4 a. 1 5 a. 1 6 a. 1 7 a. 1 8 a. 1 9 a. 2 0 a. 2 1 a. 2 2 a.
&& USING THE UNIT SAFELY • Explanations noted as (F-120 only) or (RP301 only) are cautions that apply only to the corresponding model; the F-120 or the RP301. They do not apply to other models. CAUTION About WARNING and CAUTION Notices Used for instructions intended to alert the user to the risk of death or severe injury should the unit be used improperly. Used for instructions intended to alert the user to the risk of injury or material damage should the unit be used improperly.
&& IMPORTANT NOTES • Explanations noted as (F-120 only) or (RP301 only) are cautions that apply only to the corresponding model; the F-120 or the RP301. They do not apply to other models. Power Supply • Do not connect this unit to same electrical outlet that is being used by an electrical appliance that is controlled by an inverter (such as a refrigerator, washing machine, microwave oven, or air conditioner), or that contains a motor.
&Assembling & Assembling the RP301 * 5 1 0 0 0 2 3 2 0 1 - 0 2 * * To ensure that you assemble this unit correctly, please read this manual carefully before you begin assembly. Keep this manual nearby for reference when needed. * Keep this unit horizontal when lifting it during assembly or transport. * Be careful not to pinch your hands or drop this unit on your foot during assembly or transport.
5. Use screws 2. Assembling the Piano 1. E (4 x 16 mm) to fasten the headphone hook . Align the screws on the bottom of the piano (one each at left and right) with the metal brackets on the side boards, and while keeping the front of the piano slightly raised, pull it toward yourself to engage the screws in the metal brackets . * When handling the piano, firmly grasp it. Be careful, so you do not get your fingers pinched. 2. Fasten the piano to the stand with the screw D (5 x 20 mm) .
&& Index A I O T AC adaptor. . . . . . . . . . . . . . . . . . 23 Input jack . . . . . . . . . . . . . . . . . . . . 5 Output jacks. . . . . . . . . . . . . . . . . . 5 Tempo . . . . . . . . . . . . . . . . . . . . . . . 7 K P Transpose. . . . . . . . . . . . . . . . . . . 13 B Key Touch. . . . . . . . . . . . . . . . . . . . 9 Panel Lock. . . . . . . . . . . . . . . . . . . . 8 Twin Piano . . . . . . . . . . . . . . . . . . . 8 Beat. . . . . . . . . . . . . . . . . . . . . . . . . .
For EU Countries For China
For the U.K. IMPORTANT: THE WIRES IN THIS MAINS LEAD ARE COLOURED IN ACCORDANCE WITH THE FOLLOWING CODE. BLUE: NEUTRAL BROWN: LIVE As the colours of the wires in the mains lead of this apparatus may not correspond with the coloured markings identifying the terminals in your plug, proceed as follows: The wire which is coloured BLUE must be connected to the terminal which is marked with the letter N or coloured BLACK.
Information AFRICA EGYPT Al Fanny Trading Office 9, EBN Hagar Al Askalany Street, ARD E1 Golf, Heliopolis, Cairo 11341, EGYPT TEL: (022)-417-1828 REUNION MARCEL FO-YAM Sarl 25 Rue Jules Hermann, Chaudron - BP79 97 491 Ste Clotilde Cedex, REUNION ISLAND TEL: (0262) 218-429 SOUTH AFRICA T.O.M.S. Sound & Music (Pty)Ltd. 2 ASTRON ROAD DENVER JOHANNESBURG ZA 2195, SOUTH AFRICA TEL: (011) 417 3400 Paul Bothner(PTY)Ltd.
* 5 1 0 0 0 2 3 1 9 7 - 0 2 *