TD-12K_e 1 ページ 2007年1月5日 金曜日 午後1時27分 Owner’s Manual Thank you, and congratulations on your choice of the TD-12K Roland Drum System. Before using this unit, carefully read the sections entitled: “USING THE UNIT SAFELY” (p. 2) and “IMPORTANT NOTES” (p. 4). These sections provide important information concerning the proper operation of the unit. Additionally, in order to feel assured that you have gained a good grasp of every feature provided by your new unit, Owner’s manual should be read in its entirety.
TD-12K_e 2 ページ 2007年1月5日 金曜日 午後1時27分 USING THE UNIT SAFELY The symbol alerts the user to important instructions or warnings.The specific meaning of the symbol is determined by the design contained within the triangle. In the case of the symbol at left, it is used for general cautions, warnings, or alerts to danger. Used for instructions intended to alert the user to the risk of death or severe injury should the unit be used improperly.
TD-12K_e 3 ページ 2007年1月5日 金曜日 午後1時27分 104 • Try to prevent cords and cables from becoming entangled. Also, all cords and cables should be placed so they are out of the reach of children. ............................................................................................................ 106 • Never climb on top of, nor place heavy objects on the unit. ............................................................................................................
TD-12K_e 4 ページ 2007年1月5日 金曜日 午後1時27分 IMPORTANT NOTES 291a In addition to the items listed under “USING THE UNIT SAFELY” on pages 2–3, please read and observe the following: Placement 354a • Do not expose the unit to direct sunlight, place it near devices that radiate heat, leave it inside an enclosed vehicle, or otherwise subject it to temperature extremes. Excessive heat can deform or discolor the unit.
TD-12K_e 5 ページ 2007年1月5日 金曜日 午後1時27分 IMPORTANT NOTES Check the Contents of the Box ❑ TD-12 (Percussion Sound Module) x 1 TD-12 (Percussion Sound Module) Attach the stand holder (included with the drum stand MDS12) to the TD-12. Using the screws attached to the bottom panel, attach the holder so the unit is oriented as shown in the diagram.
TD-12K_e 6 ページ 2007年1月5日 金曜日 午後1時27分 IMPORTANT NOTES KD-85 (V-Kick Trigger Pad) • On the KD-85, adjusting the head tension affects only the head response, and does not change the pitch of the sound as it would on an acoustic drum. • The head tension will change as the instrument is used, so you should readjust when necessary. Frame Stay Output Jack 1. Use the tuning key supplied with the VH-11 to tighten the tuning bolts.
TD-12K_e 7 ページ 2007年1月5日 金曜日 午後1時27分 6. Tighten the nut and rubber foot to secure the IMPORTANT NOTES rubber foot in place and keep it from loosening. Assembling the KD-85 The nut and rubber foot must be tighten to prevent the malfunctions. Take care not to pinch your fingers between the KD-85 pad and the stand plate. 1. Place the KD-85 pad, with the head surface facing downward, on a flat surface such as the floor. 7. Loosen the T-bolts for the stay and mount the legs on the stay.
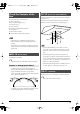
TD-12K_e 8 ページ 2007年1月5日 金曜日 午後1時27分 IMPORTANT NOTES To Obtain More Stability If you are using a kick pedal with an under plate Adjust the length of the legs and the angle of the stay so that the four legs of the KD-85 and the heel of the kick pedal contact the floor evenly. 13. Adjust the striking point for the beater. The beater’s striking point is adjusted to fall at the center of the head. Adjust the striking point so that it doesn’t extend beyond the cushion on the back of the head.
TD-12K_e 9 ページ 2007年1月5日 PD-105 金曜日 午後1時27分 1. Loosen the tuning bolts until a slight gap is IMPORTANT NOTES produced. (V-Pad) Stand Fixing Screw Head 2. Tighten all tuning bolts by fingers, as tightly as you can. Hoop (Rim) Tuning Bolts Lugs Bracket Shell Output Jack Tuning bolt Washer Slight gap Hoop 3. Using the tuning key, turn the tuning bolts two full revolutions each, thus tightening them. Tighten each tuning bolt one by one, observing the numerical order shown in the figure.
TD-12K_e 10 ページ 2007年1月5日 金曜日 午後1時27分 IMPORTANT NOTES PD-85 (V-Pad) • On the PD-85, adjusting the head tension affects only the head response, and does not change the pitch of the sound, as it would on an acoustic drum. Hoop (Rim) Sensor • The head tension will change as the instrument is used, so you should readjust when necessary. Head Washer Stand Fixing Screw Tuning Bolt 1. Use the tuning key supplied with the VH-11 to tighten the tuning bolts.
TD-12K_e 11 ページ 2007年1月5日 金曜日 午後1時27分 1. Remove all tuning bolts and washers. NOTES IMPORTANT Attaching the Pad to a Stand fig.PD-85-Set.e Tighten * Press the lock bushing (in figure below) in place with your finger as you remove each tuning bolt, to prevent the bushings from being pulled off the frame. fig.PD-85-Head3.e Loosen Tighten Tuning Key Loosen Tuning Bolt Hoop’s Rubber Portion Washer Hoop Lock Bushing Rod Pass the rod through the pipe that is inside the holder.
TD-12K_e 12 ページ 2007年1月5日 金曜日 午後1時27分 IMPORTANT NOTES CY-12R/C (V-Cymbal Ride/Crash) Bell Attaching the V-Cymbal to the Cymbal Mount 1. Remove the wing nut, felt, collar, and washer included with the cymbal mount. 2. Use the tuning key supplied with the VH-11 to tighten the stopper bolt. Bow The stopper keeps the CY-12R/C from turning, and prevents the cables from catching or getting tangle on the stand.
TD-12K_e 13 ページ 2007年1月5日 金曜日 午後1時27分 IMPORTANT NOTES Assemble the “TD-12K” Using the built-in connection cables of the MDS-12, connect the pads, cymbals, hi-hat, and kick trigger pad. To prevent malfunction and/or damage to speakers or other devices, always turn down the volume, and turn off the power on all devices before making any connections. fig.Setting1.e TD-12 Rear Panel * When connecting the cables, please refer to the marking labels that are attached to both ends of the cables.
TD-12K_e 14 ページ 2007年1月5日 金曜日 午後1時27分 IMPORTANT NOTES Playing the PD-105/PD-85 Head Shot Head Rim Shot Playing the CY-12R/C Bow Shot This is the most common playing method, playing the pad face of the cymbal. It corresponds to the sound of the “headside” of the connected trigger input. Head Bow Rim To play the sound assigned to the head, hit only the head. To play a rim shot, you must strike both the head and the rim of the pad simultaneously.
TD-12K_e 15 ページ 2007年1月5日 金曜日 午後1時27分 IMPORTANT NOTES Choking Choking (pinching) the cymbal’s edge with the hand immediately after hitting the cymbal makes the sound stop. Choke the location of the edge sensor shown in the figure. If you choke an area where there is no sensor, the sound does not stop. * To make use of choking play techniques, you’ll need to connect to a trigger input jack on the percussion sound module that accommodates rim shots.
TD-12K_e 16 ページ 2007年1月5日 Information AFRICA EGYPT Al Fanny Trading Office 9, EBN Hagar A1 Askalany Street, ARD E1 Golf, Heliopolis, Cairo 11341, EGYPT TEL: 20-2-417-1828 REUNION Maison FO - YAM Marcel 25 Rue Jules Hermann, Chaudron - BP79 97 491 Ste Clotilde Cedex, REUNION ISLAND TEL: (0262) 218-429 SOUTH AFRICA T.O.M.S. Sound & Music (Pty)Ltd. 2 ASTRON ROAD DENVER JOHANNESBURG ZA 2195, SOUTH AFRICA TEL: (011)417 3400 FAX: (011)417 3462 Paul Bothner(PTY)Ltd.