English Deutsch Français Italiano Español Português Nederlands Look what you can do with the TM-2 By using the TM-2 in conjunction with separately sold pads or acoustic drum triggers, you can easily play the internal sounds or your own audio files.
Contents Main Features. . . . . . . . . . . . . . . . . . . . . . . . . . . . . . . . . . . 2 Quick Start. . . . . . . . . . . . . . . . . . . . . . . . . . . . . . . . . . . . . . 3 Preparations Others Restoring the Factory Settings. . . . . . . . . . . . . . . . . . 14 Saving a Backup to the SD Card. . . . . . . . . . . . . . . . . 15 Installing Batteries . . . . . . . . . . . . . . . . . . . . . . . . . . . . . . 4 Adjusting the Connected Pads. . . . . . . . . . . . . . . . . .
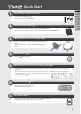
Quick Start 1 ENG Connect the AC adaptor/Install batteries JPN DEU Connect the AC adaptor. p. 6 Alternatively, install batteries. p. 4 FRA ITA ESL 2 Connect amplified speakers 3 Connect your pads/acoustic drum triggers 4 Turn the power on 5 Make settings for your pads or acoustic drum triggers p. 6 POR NLD Connect your amplified speakers or mixer to the OUTPUT jacks. You can also listen to the sound by connecting headphones to the PHONES jack. p.
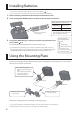
Installing Batteries * You must turn off the power before installing or removing the batteries. p. 6 * If you’re using the unit on battery power, disconnect the AC adaptor from the DC IN jack. 1. 2. Open the battery compartment cover located on the bottom panel. Install rechargeable Ni-MH batteries or alkaline batteries (four AA batteries). Battery life (under continuous use) Rechargeable Ni-MH battery 1 Alkaline battery Approx. 4.5 hours 2 3. Approx.
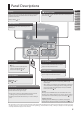
Panel Descriptions Display [ ] (Power) button When you turn on the power, the display shows the kit number and name. If you press the [INST] button, the display shows parameters and values. Turns the power on/off. Hold down the button until the power turns on or off. p. 6 Display settings ENG JPN DEU FRA p. 14 ITA [VOLUME] knob ESL Adjusts the volume of the OUTPUT jacks and PHONES jack. POR NLD [INST] button [-] [+] buttons • Displays the instrument edit screen. p.
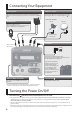
Connecting Your Equipment OUTPUT jacks TRIG IN 1, 2 jacks These jacks output the sound. Connect them to amplified speakers, mixers etc. If you’re outputting in monaural, connect only the L/MONO jack. Connect pads (PD series: sold separately) or acoustic drum triggers (RT series: sold separately) here. p. 7 Connection examples RT-10S PHONES jack PD-128S Connect headphones here. Even if headphones are connected, sound will still be output from the OUTPUT jacks.
Connecting Pads ENG Connecting Pads JPN DEU To make connections, use the cables included with the pad or acoustic drum trigger. FRA * Subsequently, acoustic drum triggers are called “drum triggers.” We use the term “pads” to include drum triggers.
Selecting a Kit Your choice of sounds (instruments) assigned to the connected pads are saved as a “kit.” The TM-2 lets you easily select and play 99 different kits. KIT 99 KIT 01 TRIG IN 1 TRIG IN 2 EFFECT HEAD RIM HEAD RIM INST INST INST INST Rim Head Rim Pads Head Selecting a Kit Immediately after the power is turned on, the display shows the “kit screen.” * If any other screen is shown, press the [INST] button several times to make the kit screen appear. 1. Press the [-] [+] buttons.
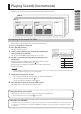
Playing Sounds (Instruments) ENG In each kit, you can assign four instruments (inst) and play them from the pads. JPN KIT 99 DEU FRA KIT 01 TRIG IN 1 HEAD INST TRIG IN 2 RIM HEAD INST INST ITA EFFECT ESL RIM POR NLD INST Assigning Instruments to Pads 1. 2. 3. 4. Here’s how to assign the TM-2’s internal instruments to the pads. Use [-] [+] buttons to select a kit. Press the [INST] button. The INST screen will appear.
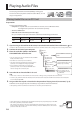
Playing Audio Files You can play your favorite audio files (WAV) by striking pads. You can use this to play drum sounds and sound effects, or even songs or loop phrases. WAV Placing Audio Files on an SD Card Preparations You’ll need the following items. • Computer: A computer that can read and write an SD card, such as a Windows or Mac. You might need to provide an SD card reader separately.
Editing the Instruments You can adjust a variety of settings (parameters) such as the instrument’s volume and pitch. This process is called “editing.” You can also edit the audio files on an SD card in the same way. * Editing will not modify the audio files that are on the SD card. 1. 2. 3. ENG JPN DEU Use the [-] [+] buttons to select a kit. FRA Press the [INST] button. ITA The INST screen will appear. ESL Use the [<] [>] buttons to select a parameter.
Using a Kit Effect You can use a kit effect to modify the sound of the instruments. You can choose from numerous types such as effects that distort the sound, make it richer, or add cyclic modulation. KIT 99 KIT 01 TRIG IN 1 HEAD INST TRIG IN 2 RIM INST HEAD INST EFFECT RIM INST * One kit can use only one type of kit effect. Selecting the Effect Type 1. 2. 3. 4. Before you continue, turn on the “EffectSend” of each instrument to which you want the effect to apply. p.
Naming a Kit 1. 2. 3. 4. 5. ENG Here’s how to assign a name to a kit. Use the [-] [+] buttons to select a kit. JPN Press the [INST] button. DEU Use the [>] button to select “UTILITY,” and press the [+] button. FRA Press the [+] button once again. ITA The KIT NAME screen will appear. ESL Use the [<][>] buttons to select a character, and use the [-][+] buttons to change the character. POR NLD The selected character blinks. Copying a Kit/Instrument Settings 1. 2.
Overall Settings for the TM-2 Here’s how to make overall settings that apply to the entire TM-2, such as display and MIDI channel. 1. 2. 3. 4. Hold down the [SHIFT] button and press the [INST] button. Use the [<] [>] buttons to select “SYSTEM” and press the [+] button. Use the [<] [>] buttons to select a parameter that you want to edit. Use the [-] [+] buttons to change a value. * INFO contains no editable values. 5. Press the [INST] button several times to return to the kit screen.
Saving a Backup to the SD Card 1. Backup will save all kits, all settings of the TM-2, and the pad and drum trigger settings. It is convenient to switch between backups when you’re playing with different bands or at different live events. Hold down the [SHIFT] button and press the [INST] button. ENG JPN DEU Saving a Backup FRA 2. ESL 3. 4. 5. 6. ITA Use the [<] [>] button to select “BACKUP SAVE” and press [+] button.
Adjusting the Connected Pads Here’s how to adjust the connected pads or drum triggers. If the “Input” and “Type” parameters are set correctly, the other parameters are set appropriately for the specified type. You can also make more detailed adjustments if you like. If you’ve connected a drum trigger, adjust parameters such as “Threshold”, “Curve”, and “RetrgCancel” as appropriate for the way in which your drum trigger is attached and how the head is stretched.
Adjusting the Connected Pads ENG Parameter Explanation RetrgCancel This parameter prevents a single strike from triggering two notes (retriggering). In particular since a drum trigger produces an irregular waveform, the sound may also be triggered at point ‘A’ in the illustration. This phenomenon is more likely to occur while the waveform is decaying, and unintended triggering is prevented by detecting the irregularity of the waveform.
Troubleshooting Problem Items to check Action Page If you hear sound in the headphones, there is a problem with the connection cables or with the connected amp or speaker. – Problems with sound No sound A specific pad does not sound A pad does not respond correctly Check whether you hear sound through headphones. Could muting be enabled? Disable muting. p. 8 Could the instrument be “OFF”? Assign an instrument. p. 9 Could the instrument’s “Level” be lowered? Adjust the instrument’s “Level.
Main Specifications ENG Roland TM-2: Trigger Module JPN Connectors OUTPUT (L/MONO, R) jacks: 1/4-inch phone type PHONES jack: Stereo miniature phone type TRIG IN jack x 2: 1/4-inch TRS phone type MIDI (IN, OUT) connectors DC IN jack Interface SD/SDHC memory card (Max. 32 GB) Power Supply AC adaptor, Rechargeable Ni-MH battery (HR6) or Alkaline battery (AA, LR6) x 4 Current Draw 400 mA Expected battery life under continuous use Rechargeable Ni-MH battery: Approx.
USING THE UNIT SAFELY Please read this in conjunction with the leaflet “USING THE UNIT SAFELY.” WARNING To completely turn off power to the unit, pull out the plug from the outlet Even with the power switch turned off, this unit is not completely separated from its main source of power. When the power needs to be completely turned off, turn off the power switch on the unit, then pull out the plug from the outlet.
FEDERAL COMMUNICATIONS COMMISSION RADIO FREQUENCY INTERFERENCE STATEMENT For the USA This equipment has been tested and found to comply with the limits for a Class B digital device, pursuant to Part 15 of the FCC Rules. These limits are designed to provide reasonable protection against harmful interference in a residential installation.
For EU Countries For China
* 5 1 0 0 0 3 7 4 8 5 - 0 1 *