For the following languages, a PDF version of the Owner’s Manual can be found on the CD-ROM.
Flowchart for recording with the TRI-CAPTURE Install the driver (p. 14). Do you have a DAW? Yes. DAW (Digital Audio Workstation) is the generic term used for music creation software, such as SONAR, etc. No. Windows Mac OS X Install the included SONAR LE. Prepare the DAW software, such as GarageBand, Logic, etc. Register SONAR LE. Set the input/output audio device on the DAW (p. 21). For details, refer to the installation guide of the SONAR LE. Connect a guitar or microphone to the TRI-CAPTURE (p.
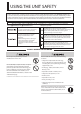
USING THE UNIT SAFETY Before using this unit, carefully read the sections entitled: “USING THE UNIT SAFELY” and “IMPORTANT NOTES” (p. 3; p. 5). These sections provide important information concerning proper operation of the unit. Additionally, in order to feel assured that you have gained a good grasp of every feature provided by your new unit, the Owner’s Manual should be read in its entirety. The manual should be saved and kept on hand as a convenient reference.
USING THE UNIT SAFETY This unit, either alone or in combination with an amplifier and headphones or speakers, may be capable of producing sound levels that could cause permanent hearing loss. Do not operate for a long period of time at a high volume level, or at a level that is uncomfortable. If you experience any hearing loss or ringing in the ears, you should immediately stop using the unit, and consult an audiologist. Do not place containers containing liquid on this product.
IMPORTANT NOTES Power Supply Maintenance • Before connecting this unit to other devices, turn off the power to all units. This will help prevent malfunctions and/or damage to speakers or other devices. • For everyday cleaning wipe the unit with a soft, dry cloth or one that has been slightly dampened with water. To remove stubborn dirt, use a cloth impregnated with a mild, non-abrasive detergent. Afterwards, be sure to wipe the unit thoroughly with a soft, dry cloth.
IMPORTANT NOTES * Microsoft, Windows and Windows Vista are either registered trademarks or trademarks of Microsoft Corporation. * Windows® is known officially as: “Microsoft® Windows® operating system.” * The screen shots in this document are used in compliance with the guidelines of the Microsoft Corporation. * Macintosh, Mac OS are either registered trademarks or trademarks of Apple Inc. * Cakewalk is a registered trademark of Cakewalk, Inc. in the United States.
Contents USING THE UNIT SAFETY........................................................................................................................3 IMPORTANT NOTES..................................................................................................................................5 Contents of the Package.........................................................................................................................8 Panel Descriptions.................................................
Contents of the Package After you open the package, please check that all items are present. (If any accessories are missing, please contact the place of purchase.) TRI-CAPTURE Owner’s Manual This is the document you’re reading. Keep it at hand for reference when needed. TRI-CAPTURE Driver CD-ROM This CD-ROM contains the TRI-CAPTURE drivers and demo songs. Cakewalk SONAR LE DVD-ROM (Windows) DAW software allows you to record or play audio data on a computer.
Contents of the Package You’ll need to provide the following items • External amplifier, speakers, headphones, etc., for listening to the sound that is output via the TRI-CAPTURE • Microphone, guitar, etc.
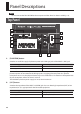
Panel Descriptions Note Do not connect the TRI-CAPTURE to the computer until the driver has been installed (p. 14). Top Panel 1 8 2 9 3 4 10 5 7 6 1. [PHANTOM] button Switches on or off the supply of phantom power to the XLR type jacks of the INPUT 1 (MIC) jack. Connected equipment [PHANTOM] button Condenser microphone 48V Other equipment OFF You must leave the [PHANTOM] button set to “OFF” unless condenser microphones requiring phantom power are connected to the XLR type jacks.
Panel Descriptions 3. PEAK indicators Light up when level of the input signal is too high. Use the [INPUT 1 (MIC)], [INPUT 2 (GUITAR)], and [INPUT 3 (AUX)] knobs to adjust the input level so that a PEAK indicator does not light. 4. SIG indicators The corresponding indicator lights up when an audio signal is input via the INPUT 1 (MIC), INPUT 2 (GUITAR), or INPUT 3 (AUX) jack. 5.
Panel Descriptions 10. [PHONES] knob Adjusts the volume of the audio signal that is output from the PHONES jack. * The volume of the signals output from the OUTPUT jacks cannot be adjusted on the TRICAPTURE itself. Rear Panel 11 12 13 14 15 16 11. PHONES jack Used to connect headphones. The audio signal is output from the PHONES jack regardless of the [OUTPUT MUTE] button’s setting. 12. OUTPUT jack (combined balanced TRS/unbalanced TS) Outputs the analog audio signal.
Panel Descriptions 16. INPUT 1 (MIC) jack This is an analog audio input jack. Rated input level: -60– -30 dBu This jack can provide 48 V phantom power, allowing you to connect a phantom-powered condenser microphone. In this case, set the [PHANTOM] button to “48V.” * This instrument is equipped with balanced (XLR, TRS) type jacks. Wiring diagrams for these jacks are shown in the illustration.Make connections after first checking the wiring diagrams of other equipment you intend to connect.
Driver Installation Windows Mac OS X Note Do not connect the TRI-CAPTURE to the computer until you are directed to do so. A “driver” is software that transfers data between the TRI-CAPTURE and application software running on your computer when your computer and the TRI-CAPTURE are connected. 1. Start up the computer without the TRI-CAPTURE connected. Disconnect all USB cables other than those for a USB keyboard and/or USB mouse (if used).
Driver Installation Windows 5. When a confirmation screen regarding user account control appears, click [Yes] or [Continue]. 6. When “The TRI-CAPTURE Driver will be installed on your computer.” appears, click [Next]. 7. Click [Next] again. Windows 8/Windows 7/Windows Vista If a dialog box regarding Windows security appears, click [Install]. Windows XP If the “Software Installation” dialog box appears, click [Continue] to proceed with the installation.
Driver Installation 9. Windows 8/Windows 7/Windows Vista When “Installation has been completed.” appears, click [Close]. If the “System Settings Change” dialog box appears, click [Yes] to restart Windows. 10. Open the “Control Panel,” click [Hardware and Sound], and then click [Sound]. If you have selected Icon view or Classic view, double-click [Sound]. 11. Click the [Playback] tab, select the TRI-CAPTURE’s [OUT], and then click [Set Default]. 12. Click [OK]. Proceed to p.
Driver Installation 9. Windows XP If a dialog box that asks whether you want to connect to Windows Update appears, select [No, not this time] and click [Next]. 10. Select [Install the software automatically (Recommended)] and click [Next]. 11. If the “Hardware Installation” dialog box appears, click [Continue Anyway] to proceed with the installation. 12. When “Completing the Found New Hardware Wizard” appears, click [Finish]. 13. When “Installation has been completed.” appears, click [Close].
Driver Installation Mac OS X If a dialog box requesting a password appears during installation, enter a computer administrator’s user name and password and click the [Install Software] button or [OK] button. 5. When “Welcome to the TRI-CAPTURE Driver installer” appears, click [Continue]. 6. If the screen for selecting the installation destination appears, select the startup disk and click [Continue]. 7. When the installation type appears, click [Install] or [Upgrade]. 8.
Driver Installation Confirm that Sound can be Heard Windows 1. Mac OS X Connect the headphones or amplified speakers as shown in the figure. Headphones Amplified speakers * To prevent malfunction and/or damage to speakers or other devices, always turn down the volume, and disconnect the USB cable on all devices before making any connections. 2. Open the folder named [Sample] on the included CD-ROM, and copy the file “TTears” (.mp3) to the desktop. 3. Double-click the file “TTears” (.
Driver Installation 4. Adjust the volume. Use the TRI-CAPTURE’s [PHONES] knob to adjust the volume. * The volume of the signals output from the OUTPUT jacks cannot be adjusted on the TRI-CAPTURE itself. If the sample file can be heard, the computer and TRI-CAPTURE are connected properly and the driver has been successfully installed. If you cannot hear the sample file, refer to “Problems When Using the TRI-CAPTURE” (p. 31).
How to Use This section explains the basic connections and settings for the TRI-CAPTURE. Refer also to the block diagrams (p. 48). Precautions Concerning the Use of Software Before using any software, please note the following points. • Connect the TRI-CAPTURE to the computer before starting the software. • Do not disconnect the TRI-CAPTURE from the computer while the software is running. After exiting the software, disconnect the TRI-CAPTURE.
How to Use Playing Back Connect the TRI-CAPTURE to a computer using the USB cable. Audio data is transferred in both directions between the TRI-CAPTURE and computer via the USB cable. By connecting headphones or amplified speakers as shown in the illustration, you can monitor playback from your DAW software or the sound from an instrument or audio device connected to the TRI-CAPTURE.
How to Use Recording Using your software, you can record sound input via the INPUT 1–3 jacks. You can also record sound input to the TRI-CAPTURE while combining it with audio data played on the computer. The TRI-CAPTURE has three recording modes. Select the mode that is appropriate for the purpose you have in mind. Front panel MIC/GUITAR Record microphone or guitar sound (p. 24). ALL INPUTS Record microphone or guitar sound along with audio device sound (p. 26).
How to Use Recording Microphone or Guitar Sound (MIC/GUITAR) When you set the recording mode to “MIC/GUITAR,” you can record microphone and guitar sounds on each track individually. Set the input port for the track in the software. Headphones Amplified speakers When using SONAR, set as follows: When recording the microphone sound: Left IN (TRI-CAPTURE) When recording the guitar sound: Right IN (TRICAPTURE) Computer Rear panel When connecting a condenser microphone, set the [PHANTOM] button to “48V.
How to Use Features of the “MIC/GUITAR” Mode • You can separately edit audio data recorded from a microphone and guitar. By setting the input port of the track to monaural in the software, the microphone sound will be recorded on the left channel (L), and the guitar sound will be recorded on the right channel (R). • You cannot record or monitor sound input via the INPUT 3 (AUX) jacks. When recording sound input via the INPUT 3 (AUX) jacks, set the [REC MODE] button to “ALL INPUTS” or “LOOP BACK.
How to Use Recording Microphone or Guitar Sound Along with Audio Device Sound (ALL INPUTS) When you set the recording mode to “ALL INPUT,” you can record microphone and/or guitar sound in combination with the stereo sound of an audio device. Select the “ALL INPUT” mode when recording microphone or guitar sound with the stereo playback of the audio device. Headphones Amplified speakers Set the input port for the track in the software. When using SONAR, set to “Stereo IN (TRI-CAPTURE).
How to Use Use the corresponding knob ([INPUT 1 (MIC)], [INPUT 2 (GUITAR)], or [INPUT 3 (AUX)]) to adjust the volume of the microphone, guitar, or audio device so its PEAK indicator does not light. Features of the “ALL INPUT” Mode • Microphone or guitar sound is localized at the center. • If you record audio device sound only, do not connect any equipment to the INPUT 1 (MIC) or INPUT 2 (GUITAR) jack, and turn the [INPUT 1 (MIC)] and [INPUT 2 (GUITAR)] knobs fully to the left.
How to Use Record Microphone or Guitar Sound While Mixing it with Audio Data Played on a Computer (LOOP BACK) When you set the recording mode to “LOOP BACK,” you can record microphone, guitar, and/or audio device sound on another software by combining audio data played on the computer. Headphones Amplified speakers Set the input port in the software. When using SONAR, set to “Stereo IN (TRI-CAPTURE),” and set “Driver mode” to [MME] or [ASIO].
How to Use Use the corresponding knob ([INPUT 1 (MIC)], [INPUT 2 (GUITAR)], or [INPUT 3 (AUX)]) to adjust the volume of the microphone, guitar, or audio device so its PEAK indicator does not light. Features of the “LOOP BACK” Mode • Microphone or guitar sound is localized at the center.
Troubleshooting If you experience problems, read this chapter first. It contains tips for solving most problems. If this chapter cannot help you solve a problem, please refer to the support section of our website. If the problem is not resolved, refer to the contact information listed at the end of this document. Roland support website: http://www.roland.
Troubleshooting Problems When Using the TRI-CAPTURE Problem Confirmation Resolution Is the driver installed? Install the driver (p. 14).
Troubleshooting Problem Sound played by your computer is inaudible or too soft Computer playback sound is “doubled” Insufficient volume from your microphone Confirmation Resolution Can you hear sound by connecting headphones? If you can hear sound through headphones connected to the PHONES jack, check that you have correctly connected your audio playback system (external monitors), and adjust the volume of your equipment.
Troubleshooting Problem Confirmation Resolution Distorted sound from a device connected to the input jack Is the PEAK indicator lighting up? Turn the [INPUT 1 (MIC)], [INPUT 2 (GUITAR)], or [INPUT 3 (AUX)] knob toward the left to reduce the input level (p. 11).
Troubleshooting Problem Confirmation Resolution Sound is interrupted during playback or recording, sound drops out Is the monitoring function of Windows enabled? (Windows 8/Windows 7) Disable the monitoring function (p. 40). Did you try to play back or record immediately after the computer started up or after it woke up from sleep mode? Wait a while before attempting playback or recording. Move as far away from the computer as possible.
Troubleshooting Problem Confirmation Is the [SAMPLE RATE] switch set to “96k”? Resolution When the [SAMPLE RATE] switch is set to “96k,” the TRI-CAPTURE cannot record and play audio data simultaneously. For playback, set the [MODE] switch to “PLAY,” and for recording, set the [MODE] switch to “REC.” Or, set the [SAMPLE RATE] switch to “44.1k” or “48k.
Troubleshooting Changing Computer Settings to Avoid Problems Changing these computer settings can help you avoid the problems described in “Problems When Installing the Driver” (p. 30) and “Problems When Using the TRI-CAPTURE” (p. 31). Driver Signing Options Setting (Windows XP) If the “Driver Signing Options” setting is set to [Block], you cannot install the driver. Configure as follows. 1. Open the “Control Panel,” click [Performance and Maintenance], and then click the [System] icon.
Troubleshooting Power Management Settings If the sound is interrupted during a performance or if sounds are missing, you may be able to resolve the problem by changing the computer’s power management settings. 1. Windows 8/Windows 7/Windows Vista Open the “Control Panel,” click [System and Security] or [System and Maintenance], and then click [Power Options]. • If you have selected Icon view in Windows 8/Windows 7, double-click the [Power Options] icon.
Troubleshooting System “Performance” Settings (Windows) If the sound is interrupted during a performance or if sounds are missing, you may be able to solve the problem by changing the “Performance” setting of the system as described below. 1. Windows 8/Windows 7/Windows Vista Open the “Control Panel,” click [System and Security] or [System and Maintenance], and then click [System]. • If you have selected Icon view in Windows 8/Windows 7, double-click the [System] icon.
Troubleshooting Setting the System Volume If the playback volume is too loud or too quiet, try adjusting the system volume. 1. Windows 8/Windows 7 Open the “Control Panel” and set the display mode to “Category.” 2. Click [Hardware and Sound], and then click [Adjust system volume]. 3. After the volume mixer appears, select the TRI-CAPTURE’s [OUT] from the “Device” pull-down menu and adjust the volume. 1. Windows Vista Open the “Control Panel” and click [Hardware and Sound].
Troubleshooting Voice Communication Software Settings (Windows 8/Windows 7) If you are using voice communication software, the volume of the audio device can be adjusted automatically to suit the conversation. Use the following procedure to disable automatic volume adjustment. 1. Open the “Control Panel,” click [Hardware and Sound], and then click [Sound]. If you have selected Icon view, click [Sound]. 2. In the [Communications] tab, set “When Windows detects communications activity” to [Do nothing].
Troubleshooting Reinstalling the Driver If you experience problems installing the driver, use the following procedure and reinstall the driver. 1. Delete the TRI-CAPTURE’s driver. 2. Install the driver again as described in “Driver Installation” (p. 14). Deleting the Driver If the computer does not detect the TRI-CAPTURE correctly, use the following procedure to delete the driver, and then install the driver again as described in “Driver Installation” (p. 14). 1.
Troubleshooting  1. Mac OS X Start up the computer without the TRI-CAPTURE connected. Disconnect all USB cables other than those for a USB keyboard and/or USB mouse (if used). 2. Insert the included CD-ROM into the computer’s DVD-ROM drive. 3. Double-click [Uninstaller] in the [MacDriver] folder on the included CD-ROM. 4. When “This uninstalls TRI-CAPTURE driver from this Macintosh.” appears, click [Uninstall]. If other messages appear, follow the instructions on the screen. 5.
Troubleshooting Advanced Driver Settings You can set the input and output audio buffer size and ASIO-related settings. Windows When using Windows 8/Windows 7, driver settings cannot be changed while the monitoring function of Windows is enabled. Disable the monitoring function (p. 40). 1. 2. Exit all programs that are using the TRI-CAPTURE. Open the “Control Panel” and set the display mode as follows. • Windows 8/Windows 7: Icon view • Windows Vista/Windows XP: Classic view 3.
Troubleshooting Mac OS X 1. Open “System Preferences” and click “TRI-CAPTURE.” The “Driver Settings” panel appears. Setting Description You can adjust the driver’s input and output audio buffer size. Audio Buffer Size Recording Margin Decrease the buffer size to decrease latency. Increase the buffer size if audio drops out. * After adjusting the buffer size, make sure to restart all programs that are using the TRI-CAPTURE.
Main Specifications USB Audio Interface: Roland TRI-CAPTURE UA-33 1 pair of stereo Number of Audio Record/ Playback Channels Record Playback Signal Processing 24 bits (linear) Sampling Frequency 96 kHz, 48 kHz, 44.1 kHz Nominal Input Level Nominal Output Level Residual Noise Level * All inputs are mixed to 1 pair stereo on ALL INPUTS and LOOP BACK mode.
Main Specifications Dimensions Weight 171 (W) x 134 (D) x 40 (H) mm 6-3/4 (W) x 5-5/16 (D) x 1-5/8 (H) inches 320 g / 12 oz. (TRI-CAPTURE unit only) Owner’s Manual Accessories CD-ROM USB cable Cakewalk SONAR LE DVD-ROM (for Windows) (0 dBu = 0.775 Vrms) * In the interest of product improvement, the specifications, and/or appearance of this unit are subject to change without prior notice.
Index A R ALL INPUTS. . . . . . . . . . . . . . . . . . . . . . . . . . . . . . . . . . . . . 26, 48 Audio input device. . . . . . . . . . . . . . . . . . . . . . . . . . . . . . . . . . 21 Audio output device. . . . . . . . . . . . . . . . . . . . . . . . . . . . . . . . 21 REC MODE. . . . . . . . . . . . . . . . . . . . . . . . . . . . . . . . . . . . . . . . . . 23 ALL INPUTS. . . . . . . . . . . . . . . . . . . . . . . . . . . . . . . 26, 48 LOOP BACK. . . . . . . . . . . . . . . . . . . . . . . .
Block Diagrams for REC MODE For details about the REC MODE function, refer to “Recording” (p. 23).
Block Diagrams for REC MODE LOOP BACK +48V PEAK/SIG INPUT 1 (MIC) STEREO MONO INPUT 2 (GUITAR) OUTPUT A/D Hi-Z INPUT 3 (AUX) OUTPUT MUTE + D/A USB PEAK/SIG + A/D PEAK/SIG + + IN AUDIO PHONES OUT + D/A INPUT MONITOR 49
For EU Countries For China 50
For the USA Model Name : Type of Equipment : Responsible Party : Address : Telephone : DECLARATION OF CONFORMITY Compliance Information Statement UA-33 USB Audio Interface Roland Corporation U.S. 5100 S. Eastern Avenue, Los Angeles, CA 90040-2938 (323) 890-3700 For EU Countries This product complies with the requirements of EMC Directive 2004/108/EC.
* 5 1 0 0 0 1 9 2 0 5 - 0 5 * www.maxlight.