For the following languages, a PDF version of the Owner’s Manual can be found on the CD-ROM.
Before using this unit, carefully read the sections entitled: “USING THE UNIT SAFELY” and “IMPORTANT NOTES” (p. 3; p. 5). These sections provide important information concerning the proper operation of the unit. Additionally, in order to feel assured that you have gained a good grasp of every feature provided by your new unit, this Owner’s Manual should be read in its entirety. The manual should be saved and kept on hand as a convenient reference. Copyright © 2011 ROLAND CORPORATION All rights reserved.
USING THE UNIT SAFETY About WARNING and CAUTION Notices Used for instructions intended to alert the user to the risk of death or severe injury should the unit be used improperly. Used for instructions intended to alert the user to the risk of injury or material damage should the unit be used improperly. * Material damage refers to damage or other adverse effects caused with respect to the home and all its furnishings, as well to domestic animals or pets.
USING THE UNIT SAFETY • In households with small children, an adult should provide supervision until the child is capable of following all the rules essential for the safe operation of the unit. • Protect the unit from strong impact. (Do not drop it!) • DO NOT play a CD-ROM disc on a conventional audio CD player. The resulting sound may be of a level that could cause permanent hearing loss. Damage to speakers or other system components may result.
IMPORTANT NOTES Power Supply Additional Precautions • Before connecting this unit to other devices, turn off the power to all units. This will help prevent malfunctions and/or damage to speakers or other peripheral devices. • Use a reasonable amount of care when using the unit’s buttons, sliders, or other controls; and when using its jacks and connectors. Rough handling can lead to malfunctions.
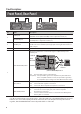
Contents USING THE UNIT SAFETY. . . . . . . . . . . . . . . . . . . . . . . . . . . . . . . . . . . . . . . . . . . . . . . . . . . 3 IMPORTANT NOTES. . . . . . . . . . . . . . . . . . . . . . . . . . . . . . . . . . . . . . . . . . . . . . . . . . . . . . . . 5 Panel Descriptions. . . . . . . . . . . . . . . . . . . . . . . . . . . . . . . . . . . . . . . . . .
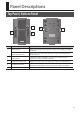
Panel Descriptions Top Panel, Bottom Panel 2 1 No. 4 5 3 Name Description PEAK indicator Blinks in time with the audio signal that is input via the LINE IN jack or MIC/ GUITAR jack. [INPUT VOLUME] slider Adjusts the volume of the audio signal that is input via the LINE IN jack or MIC/GUITAR jack. 2 USB indicator Lights when the DUO-CAPTURE is connected to a computer and the computer has detected the DUO-CAPTURE.
Panel Descriptions Front Panel, Rear Panel 6 No. 7 9 8 Name Description LINE IN jack Used to connect the audio device that will send audio signals to the DUOCAPTURE. Use the [INPUT VOLUME] slider to adjust the volume (*1). MIC/GUITAR jack Used to connect a guitar or monaural dynamic microphone. Use the [INPUT VOLUME] slider to adjust the volume (*1). 7 PHONES jack Used to connect headphones. Use the [OUTPUT VOLUME] slider to adjust the volume.
Driver Installation Windows Mac OS X Note Do not connect the DUO-CAPTURE to the computer until you are directed to do so. A “driver” is software that transfers data between the DUO-CAPTURE and application software running on your computer, when your computer and the DUO-CAPTURE are connected. 1. Start up the computer without the DUO-CAPTURE connected. Disconnect all USB cables other than those for a USB keyboard and/or USB mouse (if used).
Driver Installation Windows 5. When a confirmation screen regarding user account control appears, click [Yes] or [Continue]. 6. When “The DUO-CAPTURE Driver will be installed on your computer.” appears, click [Next]. 7. Click [Next] again. Windows 7/Windows Vista If a dialog box regarding Windows security appears, click [Install]. Windows XP If the “Software Install” dialog box appears, click [Continue] to proceed with the installation. If you cannot proceed, click [OK] to cancel the installation.
Driver Installation 9. Windows 7/Windows Vista When “Installation has been completed.” appears, click [Close]. Close the "DUO-CAPTURE Driver Setup" dialog box. 10. Open the “Control Panel,” click [Hardware and Sound], and then click [Sound]. If you have selected Icon view or Classic view, double-click [Sound]. 11. Click the [Playback] tab, select the DUO-CAPTURE’s [OUT], and then click [Set Default]. 12. Click [OK]. Proceed to p.
Driver Installation 9. Windows XP If a dialog box that asks whether you want to connect to Windows Update appears, select [No, not this time] and click [Next]. 10. Select [Install the software automatically (Recommended)] and click [Next]. 11. If the “Hardware Installation” dialog box appears, click [Continue Anyway] to proceed with the installation. 12. When “Completing the Found New Hardware Wizard” appears, click [Finish]. 13. When “Installation has been completed.
Driver Installation Mac OS X If the “Authenticate” or “Installer requires that you type your password” dialog box appears during the installation, enter an administrator password and click [OK]. 5. When “Welcome to the DUO-CAPTURE Driver installer” appears, click [Continue]. 6. If the screen for selecting the installation destination appears, select the startup disk and click [Continue]. 7. When the installation type appears, click [Install] or [Upgrade]. 8.
Driver Installation Confirm that Sound can be Heard Windows 1. Mac OS X Connect the headphones or speakers as shown in the figure. * To prevent malfunction and/or damage to speakers or other devices, always turn down the volume, and turn off the power on all devices before making any connections. 2. Open the folder named [Sample] on the included CD-ROM, and copy the file “TTears” (.mp3) to the desktop. 3. Double-click the file “TTears” (.mp3) that you copied to the desktop.
Basic Use Precautions Concerning the Use of Software Before using the DUO-CAPTURE with your software, please note the following points. • Connect the DUO-CAPTURE to the computer before starting the software. • Do not disconnect the DUO-CAPTURE from the computer while the software is running. After exiting the software, disconnect the DUO-CAPTURE. • Select the DUO-CAPTURE for the software’s audio device setting. • The DUO-CAPTURE will not operate in the Mac OS X Classic environment.
Basic Use Recording Audio Set to match the software’s sample rate setting DUO-CAPTURE bottom panel Software’s Audio Input Device: DUO-CAPTURE or Cassette deck Turntable * We recommend using one input jack (i.e., either the LINE jack or the MIC/GUITAR jack) at a time. If devices are connected to both jacks at the same time, the sound input via both jacks is mixed together, but the DUO-CAPTURE cannot adjust the balance of the mix.
Troubleshooting If you experience problems, read this chapter first. It contains tips for solving most problems. If this chapter cannot help you solve a problem, please refer to the support section of our website. If the problem is not resolved, refer to the contact information listed at the end of this document. Roland website: http://www.roland.
Troubleshooting Problem Numeral such as “2-” appears at beginning of device name (Windows) Confirmation Did you connect the DUO-CAPTURE to a different USB connector than the one you used when installing the driver? Resolution If you connect the DUO-CAPTURE to a different USB connector than the one you used when installing the driver, a numeral may appear with the device name.
Troubleshooting Problem Confirmation Resolution Is the driver installed? Install the driver (p. 9). Are the software’s input device and output device configured? Select the DUO-CAPTURE as the input and output device (p. 15, p. 16).
Troubleshooting Problem Confirmation Was the DUO-CAPTURE connected to the computer while the computer was starting up? Cannot play back or record Did the computer perform a processorintensive task while you were using the DUO-CAPTURE? No sound from computer’s speakers This is not a malfunction. Resolution Connect the DUO-CAPTURE after the computer has started up. (With some computers, the DUO-CAPTURE cannot be used if it is connected to the computer while the computer is starting up.
Troubleshooting Problem Confirmation Resolution Recorded sound is too loud Is the input level too high? Use the [INPUT VOLUME] slider to decrease the input level. If your software has an input level adjustment, check the input level setting. Are multiple programs running? Exit programs that are not in use. Did you adjust the software’s audio buffer size? If the software allows you to adjust the audio buffer size, change the buffer size.
Troubleshooting Changing Computer Settings to Avoid Problems Changing these computer settings can help you avoid the problems described in “Driver Installation” (p. 17) and “Using the DUO-CAPTURE” (p. 18). Driver Signing Options Setting (Windows XP) If the “Driver Signing Options” setting is set to [Block], you cannot install the driver. Configure as follows. 1. Open the “Control Panel,” click [Performance and Maintenance], and then click the [System] icon.
Troubleshooting 4. Click [Change settings that are currently unavailable]. 5. In the [Advanced settings] tab of the “Power Options” control panel, click the [+] mark next to “Hard disk,” and then click the [+] mark next to “Turn off hard disk after.” 6. Click [Setting], click the down arrow, and then select [Never]. 7. Click [OK] to close the “Power Options” window. 8. Close the “Edit plan settings” screen. 1.
Troubleshooting 3. A User Account Control dialog box will appear; click [Yes]. If you’re asked to enter an administrator password, log on to the computer with a user account that has administrator privileges, and make the setting again. 4. Click “Performance” [Settings], and click the [Advanced] tab. 5. Choose [Background services] and click [OK]. 6. Click [OK] to close “System Properties.” 1. Windows Vista Open the “Control Panel,” click [System and Maintenance], and click [System].
Troubleshooting Setting the System Volume If the playback volume is too loud or too quiet, try adjusting the system volume. 1. Windows 7 Open the “Control Panel” and set the display mode to “Category.” 2. Click the [Hardware and Sound] tab, and then click [Adjust system volume]. 3. After the volume mixer appears, select the DUO-CAPTURE’s [OUT] from the “Device” pull-down menu and adjust the volume. 1. Windows Vista Open the “Control Panel” and click [Hardware and Sound].
Troubleshooting Voice Communication Software Settings (Windows 7) If you are using voice communication software, the volume of the audio device may be adjusted automatically to suit the characteristics of the conversation. Use the following procedure to disable automatic volume adjustment. 1. Open the “Control Panel,” click [Hardware and Sound], and then click [Sound]. If you have selected Icon view, click [Sound]. 2.
Troubleshooting Reinstalling the Driver If you experience problems installing the driver, use the following procedure and reinstall the driver. 1. Delete the DUO-CAPTURE’s driver. 2. Install the driver again as described in “Driver Installation” (p. 9). Deleting the Driver If the computer does not detect the DUO-CAPTURE correctly, use the following procedure to delete the driver, and then install the driver again as described in “Driver Installation” (p. 9). 1.
Troubleshooting Mac OS X 1. Start up the computer without the DUO-CAPTURE connected. Disconnect all USB cables other than those for a USB keyboard and/or USB mouse (if used). 2. Insert the included CD-ROM into the computer’s CD-ROM drive. 3. Double-click [Uninstaller] in one of the following folders on the included CD-ROM. 4. Operating System Folder Mac OS X 10.6 or later Open [Driver], and then [10.6] Mac OS X 10.5 or earlier Open [Driver], and then [10.
Troubleshooting 3. Double-click the DUO-CAPTURE icon. The “DUO-CAPTURE Driver Settings” dialog box will appear. 1 2 3 4 5 6 No. Setting Description You can adjust the input and output audio buffer size. 1 Audio Buffer Size Decrease the buffer size to decrease latency. Increase the buffer size if audio drops out. After adjusting the buffer size, make sure to restart all programs that are using the DUO-CAPTURE. If using software that has an “audio device test” function, run the test function.
Troubleshooting Mac OS X 1. Open “System Preferences” and click “DUO-CAPTURE.” The driver setting panel appears. Setting Audio Buffer Size Recording Margin Description You can adjust the driver’s input and output audio buffer size. Decrease the buffer size to decrease latency. Increase the buffer size if audio drops out.
Main Specifications USB Audio Interface: Roland DUO-CAPTURE UA-11 Number of Audio Record/ Playback Channels Record 1 pair of stereo Playback 1 pair of stereo Signal Processing 24 bits Sampling Frequency 44.
Block Diagram USB Connector USB Indicator USB CODEC LINE IN Jack MIC/GUITAR Jack 32 PHONES Jack PHONES Jack PEAK Indicator [INPUT MONITOR] Button
MEMO 33
For EU Countries For China 34
For the USA DECLARATION OF CONFORMITY Compliance Information Statement Model Name : Type of Equipment : Responsible Party : Address : Telephone : For EU Countries This product complies with the requirements of EMC Directive 2004/108/EC.
* 5 1 0 0 0 1 7 8 6 1 - 0 2 *