
Owners Manual
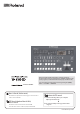

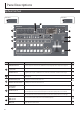


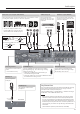
Table Of Contents
- USING THE UNIT SAFELY
- IMPORTANT NOTES
- Panel Descriptions
- Basic Operations
- Video Input/Output Settings
- Video Operations
- Video Composition Operations
- Audio Operations
- Adjusting the Volume Level
- Outputting AUX-bus Audio
- Applying Effects to Audio
- Controlling Volume Levels Automatically (Auto Mixing)
- Muting Out Specific Input Audio (Mute)
- Interlinking Audio Output to Video Switching (Audio Follow)
- Separating Discrete Analog Input Audio Streams and Adding Them to SDI Video
- Other Features
- Saving/Recalling Settings (Preset Memory)
- Saving the Unit’s Settings on a USB Flash Drive
- Formatting USB Flash Drives
- Returning Settings to the Factory-default State (Factory Reset)
- Preventing Unintended Operation (Panel Lock)
- Operating the V-60HD by Remote Control
- Outputting a Tally Signal
- Using Smart Tally
- Appendices

6
Panel Descriptions
Top Panel/Side Panel
17
Side Panel
16
NO.
Name
Explanation Page
1
COMP/LMT indicators
When the compressor is turned on for AUDIO IN 1–5/6, this lights up when compression is applied. p. 26
AUDIO INPUT LEVEL
[1]–[5/6] knobs
These adjust the volume level for AUDIO IN 1–5/6. p. 25
SIG/PEAK indicators
This lights up when input via AUDIO IN 1–5/6 is detected, and when the volume level is too high.
p. 24
2
[AUTO MIXING] button
This switches the Auto Mixing feature on and o. When the feature is turned on, the [AUTO MIXING]
button lights up.
p. 28
3
[MASTER OUTPUT] knob
This adjusts the volume level for master out.
p. 25
MASTER OUTPUT level meter
This displays the volume level for master out.
4
[PinP 1] button
[PinP 2] button
[SPLIT] button
This switches PinP or split video composition on and o. When the feature is turned on, the button lights
up.
p. 21
p. 22
[H/PGM-CTR] knob
PinP: This adjusts the horizontal display position of the inset screen.
Split: This adjusts the vertical and horizontal position of the video displayed above or on the left.
[V/PST-CTR] knob
PinP: This adjusts the vertical display position of the inset screen.
Split: This adjusts the vertical and horizontal position of the video displayed below or on the right.
5
[MIX] button
[WIPE 1] button
[WIPE 2] button
These select video transition eects. The selected button lights up.
p. 16
p. 42
[TIME] knob
This sets the video transition time. p. 17
Side Panel
17
1
4
6
7
2 3
9
5 10
8
12
11
14
15
13