R-BUS Equipment Connection and Setting Guide 2 In this booklet, connections and parameter settings for R-BUS equipment and other digital audio systems are introduced. Please refer to the application example which is similar to the system you wish to construct, and also the "Basic Conditions for Digital Audio Connection" at the end of this booklet. * ADAT( * TASCAM ( ) is a registered trademark of Alesis Corporation. )is a registered trademark of TEAC Corporation.
Contents Important Note Concerning R-BUS Cables ............................................................................................ 3 ■ VM-7200/7100 (1) Connecting and synchronizing multiple (six) VSR-880s with the VM-7200/7100 ..................... 4 (2) Connecting one VSR-880 to the VM-7200/7100 ............................................................................... 6 (3) Connecting an ADAT to a VM-7200/7100 and controlling the system with the VM-C7200/C7100 .............................
Important Note Concerning R-BUS Cables The RBC-5 (5-meters R-BUS cable/discontinued) does not support the use of 64 kHz or higher sampling frequencies. When using sampling frequencies of 64 kHz or higher, please use the RBC-1(1-meter R-BUS cable) or the RBC-3(3-meters R-BUS cable). Operation may be unstable when using the RBC-5 with the DIF-AT or AE-7000. Use the RBC-1 or the RBC-3 when using these devices.
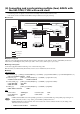
(1) Connecting and synchronizing multiple (six) VSR-880s with the VM-7200/7100 • Transferring audio via digital connection between multiple VSR-880s and the VM-7200/7100. • VSR-880 can be controlled with the VM-C7200/7100’s transport buttons such as play and stop. ■ Connection fig.
VSR-880 [SHIFT]+[SYSTEM( )] → “SYS System PRM ?” → [ENT/YES] → (PARAMETER[ • SYS MasterClk=: R-BUS → [ENT/YES] [SHIFT]+[SYSTEM( )] → “SYS MIDI PRM ?” → [ENT/YES] → (PARAMETER[ • SYS MID:Thru=: 1st VSR-880 Out 2nd VSR-880 and all others Thru • SYS MID:SysEx.Rx=: 2nd VSR-880 and all others • SYS MID:SysEx.
(2) Connecting one VSR-880 to the VM-7200/7100 • Transferring audio via digital connection between the VSR-880 and the VM-7200/7100. • A VSR-880 can be controlled with the VM-C7200/7100’s transport buttons such as play and stop. ■ Connection fig.
(3) Connecting an ADAT to a VM-7200/7100 and controlling the system with the VM-C7200/C7100 • Transferring audio via digital connection between the ADAT and the VM-7200/7100. • ADAT can be controlled with the VM-C7200/7100’s transport buttons such as play and stop. ■ Connection fig.
(4) Connecting and synchronizing multiple (two) ADATs with the VM-7200/7100 with word clock • Transferring audio via digital connection between multiple ADATs and the VM-7200/7100. • The ADATs can be controlled with the BRC’s transport buttons such as play and stop. ■ Connection fig.
(5) Connecting and synchronizing multiple (two) ADATs with the VM-7200/7100 • Transferring audio via digital connection between multiple ADATs and the VM-7200/7100. • An ADAT can be controlled with the VM-C7200/7100’s transport buttons such as play and stop. ■ Connection fig.
(6) Connecting and synchronizing multiple (two) TASCAM DA series recorders with the VM-7200/7100 with word clock • Transferring audio via digital connection between the TASCAM DA series and the VM-7200/7100. • TASCAM DA series can be controlled with TASCAM RC-848. * TASCAM DA series: DA-98/88 ■ Connection fig.
TASCAM DA-98/88 1st unit • MACHINE ID: • CLOCK: • DIGITAL IN: 2nd unit (chase) DA-98: 1, DA-88: 0 WORD ON • MACHINE ID: DA-98: 2, DA-88: 1 • CHASE: ON • DIGITAL IN: ON VM-C7200/C7100 cannot be controlled with the [PLAY] and [STOP] buttons on the RC-848. To play in synchronization, press [PLAY] button on the VM-C7200/C7100 to wait for the time code, then press [PLAY] button on the RC-848.
(7) Connecting a TASCAM DA series recorder to the VM-7200/7100 and controlling the system with the VM-C7200/C7100 • Transferring audio via digital connection between TASCAM DA series and the VM-7200/7100. • The TASCAM DA series can be controlled with the VM-C7200/7100’s transport buttons such as play and stop. * TASCAM DA series: DA-98/88 ■ Connection fig.
(8) Connecting and synchronizing multiple (two) TASCAM DA series recorders with the VM-7200/7100 • Transferring audio via digital connection between the TASCAM DA series and the VM-7200/7100. • The TASCAM DA series can be controlled with the VM-C7200/7100’s transport buttons such as play and stop. * TASCAM DA series: DA-98/88 ■ Connection fig.
(9) Connecting ProTools and two 888 I/Os to the VM-7200/7100 via AES/EBU • Transferring audio via digital connection between 888 I/O and the VM-7200/7100. ■ Connection fig.
■ Settings for Time Code (MTC) synchronization Connect MIDI OUT on the ProTools and MIDI IN on the VM-C7200/C7100 with a MIDI cable. VM-C7200/C7100 SYS SYNC/MMC page [SHIFT]+[SYSTEM(PROJECT)] → (CURSOR) → [F3](SYNC CLOCK) • SYNC MASTER: EXT, MTC Press [PLAY] and wait for the time code coming in. ProTools • Set the MTC (MIDI TIME CODE) to be transmitted.
(10) Connecting an ADA-7000 to the VM-7200/7100 • Connecting an ADA-7000 to the VM-7200/7100 and add analog inputs and outputs. ■ Connection fig.10 ADA-7000 VM-C7200/C7100 VM-7200/7100 R-BUS 1-8 S VM-LINK S S 17-24 9-16 R-BUS ADA-7000 R-BUS ADA-7000 S Sampling Clock ■ Equipment required VM-7200/7100 [equipped with the VM-24E sold separately], VM-C7200/C7100, ADA-7000 ■ Turning on the system Connect the equipment and then turn the power on in the following order.
(11) Connecting a computer-based recording system to the VM-7200/7100 via ADAT interface • Transferring audio via digital connection between a computer-based recording system with an ADAT interface and the VM-7200/7100. ■ Connection fig.
(12) Connecting a VSR-880 to the VM-3100Pro • Transferring audio via digital connection between the VSR-880 and the VM-3100Pro. • The VSR-880 can be controlled with the VM-3100Pro’s transport buttons such as play and stop. ■ Connection fig.12 VM-3100Pro VSR-880 R-BUS S S Sampling Clock C Control Signal T Time Code C T ■ Equipment required VM-3100Pro, VSR-880 [internal IDE hard disk installed] ■ Turning on the system Connect the equipment and then turn the power on in the following order.
(13) Connecting an ADAT to the VM-3100Pro • Transferring audio via digital connection between the ADAT and the VM-3100Pro. • The ADAT can be controlled with the VM-3100Pro’s transport buttons such as play and stop. ■ Connection fig.
(14) Connecting a TASCAM DA series recorder to the VM-3100Pro • Transferring audio via digital connection between TASCAM DA series and the VM-3100Pro. • The TASCAM DA series can be controlled with the VM-3100Pro’s transport buttons such as play and stop. * TASCAM DA series: DA-98/88 ■ Connection fig.
(15) Connecting an ADA-7000 to the VM-3100Pro • Connecting the ADA-7000 to the VM-3100Pro to add analog inputs and outputs. ■ Connection fig.16 VM-3100Pro ADA-7000 R-BUS S Sampling Clock S ■ Equipment required VM-3100Pro, ADA-7000 ■ Turning on the system Connect the equipment and then turn the power on in the following order.
(16) Connecting ProTools and the 888 I/O to the VM-3100Pro with AES/EBU • Transferring audio via digital connection between 888 I/O (ProTools) and the VM-3100Pro. ■ Connection fig.15 DIGITAL OUTPUT (AES/EBU) VM-3100Pro AE-7000 R-BUS B/C/D S DIGITAL INPUT A (AES/EBU) S AES/EBU OUT 888 I/O AES/EBU IN S Sampling Clock ProTools ■ Equipment required VM-3100Pro, AE-7000, 888 I/O (ProTools system) ■ Turning on the system Connect the equipment and then turn the power on in the following order.
(17) Connecting a computer-based recording system to the VM-3100Pro via an ADAT interface • Transferring audio via digital connection between a computer-based recording system equipped with an ADAT interface and the VM-3100Pro. ■ Connection fig.
(18) Connecting an ADAT to the VSR-880 • Transferring audio via digital connection between the ADAT and the VSR-880. • The ADAT can be controlled with the VSR-880’s transport buttons such as play and stop. ■ Connection fig.
(19) Connecting a TASCAM DA series recorder to the VSR-880 • Transferring audio via digital connection between TASCAM DA series and the VSR-880. • The TASCAM DA series can be controlled with the VSR-880’s transport buttons such as play and stop. * TASCAM DA series: DA-98/88 ■ Connection fig.
(20) Connecting a VSR-880 to the VS-2480 • Transferring audio via digital connection between the VSR-880 and the VS-2480. • The VSR-880 can be controlled with the VS-2480. ■ Connection fig.19 VS-2480 VSR-880 R-BUS R-BUS1 S C T S Sampling Clock C Control Signal T Time Code ■ Equipment required VS-2480 [internal IDE hard disk installed], VSR-880 [internal IDE hard disk installed] ■ Turning on the system Connect the equipment and then turn the power on in the following order.
(21) Connecting a XV-5080 to the VS-2480 • Transferring audio via digital connection between the VS-2480 and the XV-5080. ■ Connection fig.18 XV-5080 VS-2480 R-BUS1 S R-BUS S Sampling Clock ■ Equipment required XV-5080, VS-2480 [internal IDE hard disk installed], RBC-1/5 R-BUS cables (sold separately) ■ Turning on the system Connect the equipment and then turn the power on in the following order.
(22) Connecting a VM-7200/7100 to the VS-2480 with word clock • Transferring audio via digital connection between the VS-2480 and the VM-7200/7100. • VS-2480 can be controlled with the VM-C7200/7100’s transport buttons such as play and stop.
(23) Connecting a ADA-7000 to the VS-2480 • Transferring audio via digital connection between the VS-2480 and the ADA-7000. ■ Connection VS-2480 ADA-7000 S R-BUS1 R-BUS Sampling Clock S ■ Equipment required ADA-7000, VS-2480 [internal IDE hard disk installed] ■ Turning on the system Connect the equipment and then turn the power on “ADA-7000 ➔ VS-2480.
Basic conditions for Digital Audio Connection In this setting guide, the typical parameter settings for each respective equipment combination are introduced. There may be other possible connections and parameter settings which work.
...MEMO...
02674901 ’02-12-B3-41KS