® ÂØÒňΠGetting Started with the VM-7000 Application Guide Welcome! Congratulations on your purchase of the VM-7000 digital mixing system. Your VM-7000 combines incredible sound quality with a powerful suite of mixing tools. The VM-7000 is very easy to use, as you’ll see. You can quickly get to everything you need to do, usually with just a few button-presses. We’ve prepared this application guide as an overview of the VM-7000’s architecture, and as a quick introduction to its basic operation.
®ÂØÒňΠApplication Guide I. Getting Started with the VM-7000 The Components of a VM-7000 System A basic VM-7000 system consists of two components: a mixing processor and a console. A VM-7000 system can contain one or two processors and one or two consoles. This application guide primarily discusses the operation of a one-console/one-processor system. Let’s discuss what these two different components actually do. The mixing processor is where the real power of the VM-7000 system lies.
®ÂØÒňΠApplication Guide Getting Started with the VM-7000 Adding Options (Continued) More Convenience The following options for your console make using a VM system even easier and make it look even more visually attractive. Though the console already provides a big built-in display, you can also add an MB-24 Level Meter Bridge. The MB-24 helps you see at a glance what’s going on in the system by adding 28 LED level meters, a multi-mode time counter and a set of status LEDs.
®ÂØÒňΠApplication Guide Getting Started with the VM-7000 Listening to the VM-7000 (Continued) We highly recommend using Roland DS-90A or DS-50A digital powered monitors with the VM-7000, for three reasons. First, these are incredibly accurate monitors—what you hear is really what you get. Second, they can be connected to the VM-7000’s digital MONITOR OUTs, providing, for the first time anywhere, the amazing quality of a truly digital monitoring system.
®ÂØÒňΠApplication Guide V. Getting Started with the VM-7000 Initializing the System You can return the mixer to the state it was in when it left the factory by “initializing” it. When you initialize the mixer, all of its settings are reset to their original values. There are a few situations that call for initialization: • When you wish to undo all of the changes to the mixer’s settings in order to “start fresh.
®ÂØÒňΠApplication Guide VIII. Getting Started with the VM-7000 A New Kind of Bussing What Is a Bus? If you’re new to mixing, you may be wondering what a bus is. In every mixer, busses provide a way to get signals from one place to another. Bus Signals Destination A bus is simply a pathway down which one or more signals travel to a destination. This destination can be somewhere inside the console or outside of it.
®ÂØÒňΠApplication Guide IX. Getting Started with the VM-7000 What Do the Console’s Channel Strips Do? The VM-C7200 has 24 channel strips, and the VM-C7100 has 12. Just as they would on a traditional mixer, the strips provide access to most of the settings you’ll work with during mixing. Of course, given the incredible power and flexibility of the VM system, the mixing console would be impossibly huge if each setting had its own physical knob or button.
®ÂØÒňΠApplication Guide X. Getting Started with the VM-7000 What Do the Console’s Faders Do? On a traditional mixer, channel faders allow you to control the levels of signals. While that’s also true on the VM-7000, the VM-7000 faders can do more: you can actually use them to adjust many channel-related settings in the VM-7000. Each setting in the VM-7000 is referred to as a “parameter.” The PARAM VIEW on Fader buttons allow you to select the parameter to be controlled by the faders.
®ÂØÒňΠApplication Guide Getting Started with the VM-7000 The PARAM VIEW on Fader Buttons (Continued) In addition, while holding down SHIFT, you can press: • CH LEVEL—CUE LEVEL in green—to control the amount of signal sent from each input channel to the cue monitoring system. • CH PAN—or CUE PAN in green—to control the stereo positioning of each signal sent from an input channel to the cue monitoring system.
®ÂØÒňΠApplication Guide XII. Getting Started with the VM-7000 Navigating the Display The console display is central to everything you do in the VM-7000 system. It’s important to understand what the display is showing you, and to be able to get around on the display. To learn how to adjust the display’s contrast, see p. 25 in the VM-C7200/C7100 Owner’s Manual.
®ÂØÒňΠApplication Guide Getting Started with the VM-7000 Navigating the Display (Continued) Selecting Parameters Before you can adjust a parameter’s setting, or “value,” you must first select the area on the display that contains the desired parameter. A thick black outline—the selection box—appears around the currently selected group of parameters. The first six input channel PAN parameters are selected in this illustration.
®ÂØÒňΠApplication Guide XIV. Getting Started with the VM-7000 SHIFT and the Green Button Labels Many of the console buttons have two labels: a white label and a green label. The white label refers to the button’s normal functionality. The green label describes the button’s function when you press it while holding down SHIFT. For example: • If you press PROJECT without holding down SHIFT, the PROJECT screen appears containing parameters that relate to project management.
®ÂØÒňΠApplication Guide Getting Started with the VM-7000 The CH EDIT Buttons (Continued) Here’s how to use QUICK CH EDIT: • Hold down a channel’s CH EDIT button for a moment, and, without letting go, press the desired QUICK CH EDIT button. Release both buttons when the desired parameter screen appears. When working with Flex Bus channels, only STATUS buttons 19-24 invoke QUICK CH EDIT parameter screens. XVI.
®ÂØÒňΠApplication Guide Getting Started with the VM-7000 XVII. The Patchbay In a traditional recording studio, the inputs and outputs for each piece of equipment are connected to jacks in a single device called a “patchbay.” The patchbay’s jacks are arranged in a grid that make it easy for an engineer to interconnect the studio’s equipment using short cables called “patch cords.
®ÂØÒňΠApplication Guide Getting Started with the VM-7000 The Patchbay (Continued) The Components of the Patchbay In the VM-7000’s patchbay, signal flows from the top of the screen to the bottom. The screen has three basic sections. At the top of each section, you’ll find small boxes, or “nodes,” representing the section’s inputs.
®ÂØÒňΠApplication Guide Getting Started with the VM-7000 The Patchbay (Continued) How to Make a Connection in the Patchbay In the patchbay, you route a signal to a destination with two easy steps: • Press the CURSOR buttons to select the destination. • Turn the destination’s V knob to select the desired source signal. As an example, let’s route a cue mix to a pair of ASSIGNABLE OUT jacks—we’ll use ASSIGNABLE OUTs 7 and 8.
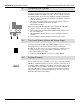
®ÂØÒňΠApplication Guide Getting Started with the VM-7000 Getting the First Signal (Continued) Channel 1’s meter Channel 2’s meter Preamp gain knob Preamp gain level Phantom power switch The display shows you the preamp gain and phantom power settings for all of your input channels, and provides a preamp level meter for each pair of channels. 6. Input some signal to the mic—speak into the mic or make some other sort of noise. 7.
®ÂØÒňΠApplication Guide Getting Started with the VM-7000 Getting the First Signal (Continued) 12. Bring up Input Channel 1’s fader until it’s set to 100. You should now be hearing the signal and seeing it in the stereo MAIN meter on the display and the MASTER meter on the meter bridge. The CH LEVEL/PAN screen and optional meter bridge are currently showing the pre-EQ input level in Channel 1’s meter.
®ÂØÒňΠApplication Guide XX. Getting Started with the VM-7000 Routing a Signal to a Multi Out Let’s send our signal to one of the multi outs. This is something you’ll do when sending a single signal to a track on a multitrack recorder—as a “direct out”—or to an external effect processor, for example. When you send a signal to an external effect processor, you’ll need to bring the effected signal back into the system by connecting the effect processor’s output(s) to one (or two) VM-7000 inputs.
®ÂØÒňΠApplication Guide XXI. Getting Started with the VM-7000 Using Flex Busses As we mentioned back on Page 6, you can send signals from one place to another in a VM-7000 system using any of its 12 Flex Busses. Flex Busses can carry signals to locations within the VM-7000, or carry signals to its output connectors to be sent to external devices. When a Flex Bus acts as a pathway inside the VM-7000, it’s operating in its INT—for “Internal”—mode.
®ÂØÒňΠApplication Guide Getting Started with the VM-7000 Routing Signals to an Internal Flex Bus (Continued) When a Flex Bus is set to INT, it acts as a pathway down which you can send signals to one of the VM-7000’s internal effects. Flex Bus 1 always sends signal to internal Effect 1 (or “FX 1”), Flex Bus 2 to Effect 2, and so on. Let’s use Flex Bus 1 to send our input signal to Effect 1: 1. Press INPUT CH1-24 so that the channel strips once again control input signals.
®ÂØÒňΠApplication Guide Getting Started with the VM-7000 XXIII. Routing Signals to an External Flex Bus As we mentioned earlier, Flex Busses can carry signals out of the VM-7000, both through R-BUS output connections and the system’s analog and digital output jacks. When you wish to send a single signal to an output, you can do so directly, using the method we discussed on Page 19. However, when you want to send more than one signal to an output, a Flex Bus is what you’ll need.
®ÂØÒňΠApplication Guide Getting Started with the VM-7000 Routing Signals to an External Flex Bus (Continued) 11. 12. 13. 14. In a real session, you could listen to what’s on Flex Bus 1 by listening to the track on the multitrack recorder through one of the VM-7000’s input or multi in channels. For now, let’s listen to Flex Bus 1 on the VM-7000 itself to hear what’s going to the ASSIGNABLE OUT 4 jack.
®ÂØÒňΠApplication Guide Getting Started with the VM-7000 Routing Signals to a Pair of Flex Busses (Continued) 7. 8. 9. 10. 11. 12. 13. We can see on this screen that Flex Bus 1 is already set to EXT and Multi Out 20 from our last example. All we need to do to view the same screen for Flex Bus 2 is to press its CH EDIT button. Press Flex Bus Channel 2’s CH EDIT button.
®ÂØÒňΠApplication Guide Getting Started with the VM-7000 Routing Signals to a Pair of Flex Busses (Continued) 16. Press F2 [SLAVE] to turn slaving off. 17. Turn V2 [PAN] counter-clockwise to pan Input Channel 1’s signal all the way to the left. 18. Press Input Channel 2’s CH EDIT button—the screen changes to show you the same parameters as they apply to Input Channel 2. 19. Press F2 [SLAVE] to de-activate slaving.
®ÂØÒňΠApplication Guide Getting Started with the VM-7000 Understanding the Internal Effects (Continued) Send-and-Return Effects When you want to add an effect to a signal and hear both the original signal and the effect-processed version mixed together, you’ll use a “send-and-return” effect. This would be the case, for example, when adding reverb or delay. Neither effect would make much sense without the original signal being audible as well.
®ÂØÒňΠApplication Guide Getting Started with the VM-7000 Understanding the Internal Effects (Continued) Insert Effects When you want an effect-processed version of a signal to completely replace the original signal, you’ll use an “insert” effect routing. You’ll want to do this when using effects such as dynamic processors, EQs, mic and amp modelers, rotary speakers, hum cancelers and so on—in each case you want to wind up with only the processed signal.
®ÂØÒňΠApplication Guide Getting Started with the VM-7000 Understanding the Internal Effects (Continued) To help ensure that you get the most from the VM-7000’s internal effects, it’s a good idea to plan out your effect strategy before setting up individual effects. As you plan, take into account the capabilities of each built-in and optional effect—considering, for example, the inputs or multi ins with which each effect processor is intended to work—to fully harness the system’s effect-processing power.
®ÂØÒňΠApplication Guide Getting Started with the VM-7000 Setting Up a Send-and-Return Effect (Continued) 5. Use the CURSOR buttons to select CHANNEL L’s parameters if they’re not already selected. These parameters control the left side of Effect 1. 6. To select a send-and-return configuration, turn V2 [POSITION] to select SEND/RETURN (INT F BUS). In our case, this value is already selected, so there’s nothing you need to do. 7.
®ÂØÒňΠApplication Guide Getting Started with the VM-7000 Setting Up a Send-and-Return Effect (Continued) You can turn V1 [SELECT GROUP] to jump between the samenumbered libraries in the P and U sets. The first 39 factory libraries—P000-P038—present the VM-7000’s algorithms in their default state. When you wish to create a new effect from scratch, you can begin by selecting one of these libraries. Let’s select a reverb designed for a single voice since we’ve got a mic plugged in. 3.
®ÂØÒňΠApplication Guide Getting Started with the VM-7000 Setting Up a Send-and-Return Effect (Continued) Edit the Effect Let’s demonstrate how to edit an effect by adjusting one of Vocal Plt’s parameters: 1. Press EFFECTS 1-8. 2. Press F2 [EDIT]. As you can see at the top of the screen, Vocal Plate is made up of an EQ and a Reverb (REV) component. Though this screen is showing us Vocal Plt’s EQ parameters, we actually want to change one of its reverb settings. 3.
®ÂØÒňΠApplication Guide Getting Started with the VM-7000 Setting Up a Send-and-Return Effect (Continued) 1. The sends from the individual input or multi in channels When you want to adjust the amount of effect applied to input or multi in channels relative to each other, you can adjust their individual sends to the effects. You can also think of these sends as the place where you set the basic amount of effect to be applied. For now, we don’t need to change the send levels to the effect. 2.
®ÂØÒňΠApplication Guide Getting Started with the VM-7000 Setting Up a Send-and-Return Effect (Continued) Even though we now have a lop-sided input balance, the output meters show an equal level for both the left and right outputs. This is because Vocal Plate combines both the left and right sides into a single mono input signal, so it doesn’t really matter whether the signal is coming more from its right input than its left. A balanced stereo reverb is produced regardless of which input side is louder.
®ÂØÒňΠApplication Guide Getting Started with the VM-7000 Setting Up a Send-and-Return Effect (Continued) 1. Press FLEX BUS MASTER 1-12. When you press this button, the console’s channel strips control the 12 Flex Busses. However, when you’re using a send-and-return effect, something special occurs: the channel strip that numerically corresponds to each send-and-return effect also controls how its return is sent into the main mix, cue mix and to other Flex Busses. 2. 3. 4. 5. 6. 7.
®ÂØÒňΠApplication Guide Getting Started with the VM-7000 Setting Up a Send-and-Return Effect (Continued) As before, let’s listen to our stereo Flex Bus output. 10. Press SOURCE SELECT, turn V1 [SELECT], choose FBUS 9/10, and press F6 [EXIT] to leave the SOURCE SELECT screen. Now we’re ready to actually send Effect 1 to Flex Busses 9 and 10. 11. Hold down Flex Bus Channel 1’s CH EDIT button—remember, this channel is controlling Effect 1’s return right now—and press the QUICK CH EDIT FLEX BUS 7-12 button.
®ÂØÒňΠApplication Guide Getting Started with the VM-7000 Setting Up a Send-and-Return Effect (Continued) The effect’s current name 4. 5. 6. 7. 8. 9. 10. 11. 12. ©2000 Roland Corporation U.S. The EZ NAMING feature provides a couple of handy shortcuts for naming a library. The first allows you to copy one of the category titles listed in the center of the display for use as part or all of an effect’s name. Turn V1 [CATEGORY] to select VOCAL.
®ÂØÒňΠApplication Guide Getting Started with the VM-7000 Setting Up a Send-and-Return Effect (Continued) 13. 14. 15. 16. 17. You can type by pressing the console buttons that have a letter or character printed to their left: • On the VM-C7200, you’ll find them to the left of the STATUS and CH EDIT buttons for Channels 13-24. • On the VM-C7100, you’ll find them to the left of the STATUS and CH EDIT buttons on Channels 1-12.
®ÂØÒňΠApplication Guide Getting Started with the VM-7000 Setting Up a Send-and-Return Effect (Continued) 5. Press F3 [SAVE]. The VM-7000 prepares to save the current effect in the selected location and asks “Are You Sure?” 6. We are, so press F5 [ENTER] to finish saving My First FX. 7. Press F6 [EXIT] to leave Effect 1’s library screen. You can store your user libraries on a memory card, re-loading them whenever you need them, or even into another VM-7000 system. We’ll discuss this later on.
®ÂØÒňΠApplication Guide Getting Started with the VM-7000 XXVII.Setting Up an Insert Effect Now let’s see how to set up an insert effect. This will take much less time since many of the things we’ve already discussed apply to both send-and-return and insert effects, and we needn’t go over them twice. The basic effect setup procedure still applies when you set up an insert effect, of course. You’ll still: • set up the effect’s insert routing. • select and load a new effect library if necessary.
®ÂØÒňΠApplication Guide Getting Started with the VM-7000 Setting Up an Insert Effect (Continued) 3. Use the CURSOR buttons, if necessary, to select the row of parameters containing Phaser Rate. 4. Turn V1 [Phaser Rate] clockwise to make the swirling go faster—set it to 2.0 Hz. Adjust Your Effect-Related Levels The effect-related levels for an insert effect are different than those for a send-and-return effect: there are only two of them.
®ÂØÒňΠApplication Guide Getting Started with the VM-7000 Stereo-In, Stereo-Out Effects (Continued) Set Up the Effect’s Routing 1. Turn V2 [POSITION] to select INS ON FBUS INTERNAL. 2. Turn V1 [CHANNEL SELECT], if necessary, to select BUS 1. We can use Flex Bus 1 since we know it’s currently set to INT. 3. Press F1 [SET] to activate the new setting. 4. Press CURSOR DOWN once to select the right side of Effect 1. 5. Turn V2 [POSITION] to select INS ON FBUS INTERNAL. 6.
®ÂØÒňΠApplication Guide Getting Started with the VM-7000 Stereo-In, Stereo-Out Effects (Continued) 1. Press FLEX BUS MASTER 1-12. By looking at the (AUDIO) STATUS buttons, we can see that Flex Busses 1 and 2 are already being sent into the main mix. 2. Press CH LEVEL. As we can see on the display, the levels for Flex Busses 1 and 2 are both set to 100—they’re properly balanced. However, both Flex Busses are panned to the center.
®ÂØÒňΠApplication Guide Getting Started with the VM-7000 XXX. Channel Dynamics Processing In addition to the tools provided by its effect processors, the VM-7000— with software Version 1.5 and higher—offers a dynamics processor for each input and multi in channel.
®ÂØÒňΠApplication Guide Getting Started with the VM-7000 Delay, Dynamics, EQ and Channel Libraries (Continued) These libraries allow you to: • copy delay, dynamics, EQ and channel settings from one input or multi in channel to another. • load convenient factory-programmed delay, dynamics and EQ libraries. • save and load your own copy delay, dynamics, EQ and channel libraries.
®ÂØÒňΠApplication Guide Getting Started with the VM-7000 Delay, Dynamics, EQ and Channel Libraries (Continued) You can save your own delay setups into the user library memory locations by pressing F3 [SAVE]. Let’s see how this works by saving Input Channel 2’s just-loaded Sci Fi settings. 7. Press COPY/LIBRARY, turn V1 [SELECT GROUP] to choose the user (U) libraries, and turn V2 [SELECT NUMBER] to choose a user memory location—select U000 for our example.
®ÂØÒňΠApplication Guide Getting Started with the VM-7000 Using a Memory Card (Continued) To initialize a memory card: 1. While holding SHIFT, press PROJECT. 2. Make sure that the group of icons containing MEMORY CARD is selected. 3. Press F6 [MEMORY CARD]. 4. Press F2 [FORMAT]. 5. Press F5 [OK]. The VM-7000 will ask one more time if you’re really sure that you want to proceed with the initialization. 6. If you’re sure you want to proceed, press F5 [OK] one more time. 7.
®ÂØÒňΠApplication Guide Getting Started with the VM-7000 XXXIV. Projects Although the VM-7000 retains most of your settings when you turn off its power, there’s a better—and more permanent—way to store them: by saving them in a project on a memory card. A project is a file on the memory card that contains all of your current settings. Projects allow you to: • save all of your settings for a particular song or piece. • save your basic setup for a particular artist or album.
®ÂØÒňΠApplication Guide Getting Started with the VM-7000 Projects (Continued) When you re-name a project, you change its name in the VM-7000’s memory, not in the project file on the card. To make this change permanent, you’ll need to update the project file. We’ll describe how to do this in the next section of this application guide. On this screen—though you don’t want to do this now—you can also protect the project from unintentional changes by engaging its memoryprotect function.
®ÂØÒňΠApplication Guide Getting Started with the VM-7000 XXXV. Scenes One of the best things about a digital mixer like the VM-7000 is that it can remember and instantly recall your setups. Much of the time spent mixing is spent setting things up, so this is a great time-saver. In the VM-7000, each setup that you save is called a “scene.” With a one-processor system, the VM-7000 allows you to store 100 scenes in each project, numbered from 00-99. With two processors, you can store 50.
®ÂØÒňΠApplication Guide Getting Started with the VM-7000 Scenes (Continued) 3. When all of the number buttons are no longer lit, press 4 on the numeric keypad—it flashes and then lights to show that a scene is now stored there. You’ve saved your current settings as Scene 64. 4. Let’s change a setting before saving another scene so we can see how this all works. 5. Press CH LEVEL and lower the first two faders all the way. 6.
®ÂØÒňΠApplication Guide Getting Started with the VM-7000 Scenes (Continued) Naming a Scene You can name a scene to help you remember the settings it represents. To do this: 1. Hold SHIFT and press SCENE. 2. Press CURSOR UP to select the scene list. The last-selected scene is highlighted to show that it’s currently selected for naming. You can re-name any scene in the list. Let’s re-name Scene 60. 3. Turn V1 [SELECT] to choose Scene 60. 4. Press F1 [RECALL] to confirm the selection and recall Scene 60. 5.
®ÂØÒňΠApplication Guide Getting Started with the VM-7000 Storing Libraries on a Memory Card (Continued) Storing User Libraries on a Memory Card 1. 2. 3. 4. 5. 6. 7. 8. 9. 10. Hold down SHIFT and press PROJECT. Select the bottom row of icons including the MEMORY CARD icon. Press F6 [MEMORY CARD]. Press PAGE DOWN once to display the memory card LIBRARY screen. Select the top row of parameters containing EQ, DELAY, DYNAMIC, CHANNEL and EFFECTS.
®ÂØÒňΠApplication Guide Getting Started with the VM-7000 XXXVII. Moving On... Now that have a good working knowledge of the basic features of your VM-7000, you’re ready to start enjoying its power—and marveling at its sound. An application guide like this only has room to discuss some of what your VM-7000 can do. The system has lots of other terrific features you won’t want to miss. The following chart lists some of these, as well as the pages in the VM-C7200 /C7100 Owner’s Manual that describe them.