
User`s manual


107
4
Part of
Practice
Accommodating to the Types and Condition of Media
Adjusting Head Height to Match Media Thickness
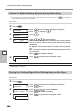
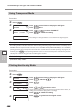
Procedure
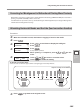
Press .
Press several times to display the left gure.
Press
.
When the left gure is displayed, open the front cover.
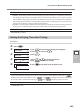
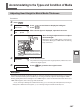
Move the height-adjustment lever to adjust
the head height.
Moving the lever to "HIGH" makes a warning beep
sound twice. Moving it to "LOW" makes the warning
beep sound once.
Close the front cover.
The print-head carriage moves to the original position, and then the screen
shown in the gure appears.
Press to go back to the original screen.
Description
Depending on the media, media may wrinkle or come loose from the platen during printing, increasing the
chance of contact with the print head. When you are using such media, adjust the head height to "HIGH."
Printing quality when the head height is set to “HIGH” may be coarser or otherwise lower than when set to
“LOW.” If this happens, refer to the pages indicated below.
P. 104, "Correcting for Misalignment in Bidirectional Printing," p. 44, "Performing the Initial Adjustment (Correcting for
Misalignment in Bidirectional Printing More," p.111, "Preventing Soiling of the Media and Dot Drop-out"
MENU
HEAD HEIGHT
HEAD HEIGHT
LOW
LOW
MENU
HEAD HEIGHT
W1200mm
SETUP SHEET
High
Low
Height-adjustment lever
Move rmly, until it stops.