
User`s manual


Performing Printing and Cutting Separately
4
Part of
Practice
129
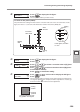
Cutting
position
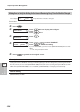
Printing position and Cut-
ting position are aligned.
Printing
position
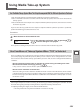
Press to display the left gure.
Press
.
The test pattern (C&C2) is printed and cut.
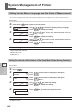
Press to display the left gure.
Press
.
Press to select a correction value of [F] (feed
direction of media).
Press
to select a correction value of [S] (move-
ment direction of head).
Press
to enable the setting.
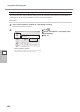
Press in this order to display the left gure.
Press
.
The test pattern (C&C1) is printed and cut. If the printing and cutting lines
are aligned, adjustment is complete. If further adjustment is needed, go
back to Procedure
and ne-tune the adjustment.
CROP - CUT ADJ.
TEST PRINT 2
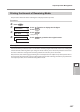
To check the test pattern (C&C2)
The point where the cutting line intersects the correction-value scale is the correction value. In this
gure, the value is "-0.3." Use the same method to read the value on the [FEED] side.
CROP - CUT ADJ.
SETTING
F :- 0.30 - 0.30mm
S : 0.00 - 0.20mm
CROP - CUT ADJ.
TEST PRINT
Scan
direction
[FEED]
side.
Correction-
value scale
Cutting
line
In this gure, the value
is "-0.3."
Cutting
line