
Assembly Manual


USER GUIDEUSER GUIDE
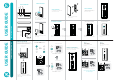
QUICK START GUIDE
ADVANCED PROGRAMMING
BUTTON OVERVIEW
GROUP CONTROL
Channel "ALL" is pre-set to
control ALL shades paired to your
Muli-channel remote.
REPLACE BATTERY
WALL MOUNTING
SELECTING A CHANNEL
Install battery CR2430 with positive (+)
side facing up.
Remove cover from remote;
unscrew with screw driver then firmly
press down and slide left.
Use supplied fasteners and anchors
to attach the base to wall.
Replace cover by pressing snap
latches into place.
CONTROL SHADE UP OR DOWN
STOPPING THE SHADE
Press any ch to see previously selected channels. The last selected channel will remain in memory.
To un-select a channel press the same channel and select any new channels.
Press the stop button to stop shade
at any point
While the channel is displayed press
up or down to move shade accordingly
UP BUTTON
STOP BUTTON
DOWN BUTTON
CHANNEL
SETTING (P2)
LOCK
DISABLE LIMIT SETTING
This mode is intended to be used after all shade
programming is completed. User Mode will prevent
accidental or unintended changing of limits.
LED solid on when locked
LED blinking when unlocked
Push switch to lock or
unlocked position
Pressing the lock button for 6 second will
toggle between locked and unlocked LED show
Solid or flashing
For 5 CH
CREATE CUSTOM GROUPS
It is possible to copy one channel to another
channel to create custom groups
P2
SET A FAVORITE POSITION
Move shade to desired position by
pressing UP or DOWN on the remote.
Press P2 on controller
Press STOP on controller
Press STOP on controller
BEEP
x
1
JOG
x
1
MOTOR RESPONSE
BEEP
x
1
JOG
x
1
MOTOR RESPONSE
BEEP
x
3
JOG
x
2
MOTOR RESPONSE
OR
Press P2 Button on existing remote.
Press P2 Button again on existing remote.
P2
P2
STEP 1.
Next step to be completed within
4 seconds of Step 1
STEP 2.
EXISTING REMOTE
Select the channel you want
to transfer
NEW REMOTE
Select the channel you want to
transfer too
BEEP
x
1
JOG
x
1
MOTOR RESPONSE
Press P2 Button on new remote.
P2
BEEP
x
1
JOG
x
1
MOTOR RESPONSE
BEEP
x
1
JOG
x
1
MOTOR RESPONSE