AUTOMATE Li-ion ARC TUBULAR MOTOR 433 MHZ BI-DIRECTIONAL ELECTRONIC LIMIT SELECTABLE RPM FAVORITE POSITION LEVEL CONTROL WIREFREE SOLAR POWERED AUTOMATE | Li-ion ARC motors offer a wirefree rechargeable easy to use and program solution to suit a large range of applications, torques and speeds. The Leveling Control feature allows for precise positioning of multiple shades ensuring perfect alignment. Additionally, a favorite position can be pre-set and recalled at any time.
NOTES 2 | Automate Programming Instructions | Tubular Li-ion Motors ROLLEASE ACMEDA
CONTENTS 1 ASSEMBLY 5 2 WIRING 6 2.1 Charging options 6 3 P1 BUTTON FUNCTIONS 7 4 INTIAL SET-UP 8 4.1 Pair motor with controller 8 4.2 Check motor direction 8 4.3 Set limits 9 5 ADJUSTING LIMITS 10 5.1 Adjust upper limit 10 5.2 Adjust lower limit 10 6 11 ADDING OR REMOVING CONTROLLERS AND CHANNELS 6.1 Using motor P1 button 11 6.2 Using a pre-existing controller 11 7 12 FAVORITE POSITIONING 7.1 Set a favorite position 12 7.2 Send shade to favorite position 12 7.
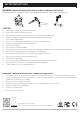
SAFTEY INSTRUCTIONS WARNING: Important safety instructions to be read before installation. Incorrect installation can lead to serious injury and will void manufacturer’s liability and warranty. CAUTION • • • • • • • • • • • • • • • • • Do not expose to moisture or extreme temperatures. Do not allow children to play with this device. Use or modification outside the scope of this instruction manual will void warranty. Installation and programming to be performed by a suitably qualified installer.
1 ASSEMBLY Please refer to Rollease Acmeda System Assembly Manual for full assembly instructions relevant to the hardware system being used. Step 1. Cut roller tube to required length. Step 2. Ensure roller tube is clean and free from burrs. Step 3. Fit required crown, drive and bracket adapters. Crown Tube must be close fitting with chosen crown and drive adapters. Refer to Rollease Acmeda System Assembly Manual for recommended crown, drive, and bracket adapter kits. Retaining Clip Drive Step 4.
2 WIRING 2.1 Charging options This motor has a 12V built in Li-ion battery pack with integrated charge management. Max power input for recharging: 12.6V / 1000mAh. • Before first use please charge motor for 6 hours. Using the reccomended AC charger. • During operation, if voltage drops to less than 10V, the motor will beep 10 times to prompt it needs to be charged. • Motor will stop running when the voltage is lower than 7V and it will resume again when the voltage is greater than 7.5V.
3 P1 BUTTON FUNCTIONS P1 Press Short Press Condition Function Achieved Visual Feedback Audible Feedback Function Described If limit is NOT set None No Action None No Action If limits are set Operational control of motor, run to limit.
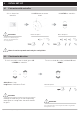
4 INTIAL SET-UP 4.1 Pair motor with controller Select channel on controller. IMPORTANT Hold P1 button on motor head. Hold STOP on controller. Motor Response Motor Response Consult user manual for your controller for information on selecting channel. Motor is now in step mode and ready for setting limits 4.2 Check motor direction To check travel direction of shade, press UP or DOWN on controller. To reverse shade direction, hold both UP and DOWN.
4.3 Set limits To save upper limit, hold UP and STOP. Move shade to the desired highest or lowest position by pressing the UP or DOWN buttons on controller. To save lower limit, hold DOWN and STOP. IMPORTANT Cycle shade up and down prior to setting limits to settle fabric Motor Response 5 SECS IMPORTANT After setting limits, motor will automatically exit from initial set-up mode.
5 ADJUSTING LIMITS 5.1 Adjust upper limit Hold UP and STOP on controller. Move shade to the desired highest position by pressing the UP button. Motor Response Motor Response 5 SECS 5.2 To save upper limit, hold UP and STOP. 5 SECS Adjust lower limit Hold DOWN and STOP on controller. Move shade to the desired lowest position by pressing the DOWN button. Motor Response 5 SECS 10 | Automate Programming Instructions | Tubular Li-ion Motors To save lower limit, hold DOWN and STOP.
6 ADDING OR REMOVING CONTROLLERS AND CHANNELS 6.1 Using motor P1 button Hold P1 button on motor head. Hold STOP on controller to add or remove. Motor Response 6.2 Motor Response Using a pre-existing controller Press P2 on existing controller. Motor Response IMPORTANT Consult user manual for your controller or sensor. Press P2 on existing controller. Motor Response Press P2 on new controller.
7 FAVORITE POSITIONING 7.1 Set a favorite position Move shade to the desired position by pressing the UP or DOWN button on the controller. Press P2 on controller. Motor Response 7.2 Press STOP on controller. Press STOP on controller. Motor Response Motor Response Send shade to favorite position Hold STOP on controller. 7.3 Delete favorite position Press P2 on controller. Motor Response Press STOP on controller. Press STOP on controller.
8 ADJUSTING MOTOR SPEED 8.1 Increase or decrease motor speed Press UP. Press UP. Press DOWN. Press DOWN. Press P2 on controller. Motor Response Motor Response Motor Response IMPORTANT If motor does not react to speed adjustment, the maximum or minimum speed has already been reached.
9 TILT & ROLLER MODE 9.1 Enter tilt mode Hold UP and DOWN on controller. Press STOP. Motor Response Motor Response 5 SECS 9.2 Enter roller mode (Default) Hold UP and DOWN on controller. Motor Response Press STOP.
10 TROUBLESHOOTING Problem Motor is not responding Motor beeps 10 times when in use Cause Remedy Battery in motor is depleted Recharge with compatible AC adaptor and check connection and positioning of PV panel. Insufficient charging from Solar (PV) Panel Check connection and orientation of PV panel.
This device complies with Part 15 of the FCC Rules / Industry Canada licence-exempt RSS standard(s). Operation is subject to the following two conditions: (1) this device may not cause harmful interference, and (2) this device must accept any interference received, including interference that may cause undesired operation. Le présent appareil est conforme aux CNR d'Industrie Canada applicables aux appareils radio exempts de licence.