The Rollei 35 The Rollei 35 is a special camera - the camera for you. It is designed for your pleasure! That is why we have designed this camera to be so compact and handy - you can always carry it in your pocket. We have fitted it with a cadmium sulphide exposure meter system for quick and reliable shooting. And with the 40 mm Carl Zeiss Tessar f/3.
Sie lernen die Rollei 35 kennen This manual scanned my M. Butkus www.butkus.org/chinon Vor der Aufnahme Sie ziehen das Objektiv heraus and drehen es bis zum Anschlag (1): jetzt rastet es ein, jetzt konnen Sie auslosen. Denn der Ausloser (2) ist gesperrt, solange sich das Objektiv nicht in Aufnahmestellung befindet. Das ist praktisch. Sie verlieren kein Bild durch einen vorzeitigen Schufg. Von Aufnahme zu Aufnahme Sie losen aus (2).
Before Shooting Pull out the lens and turn it as far as it will go towards the stop (1) until it engages. Now you can shoot. The shutter release button (2) is locked as long as the lens is not in shooting position. This handy safety measure stops you from wasting pictures by premature exposure. From Shot to Shot Press the release (2). Then fully pull out the winding lever (film transport) as far as it will go (3). So the Rollei 35 is immediately ready to shoot again.
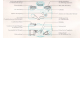
Das Laden der Kamera Film einlegen Hebel (1) nach unten stcllen. Ruckwand entriegeln (2) and abziehen. Platte (3) abklappen. Patrone (4) einschicben and Film so welt herausziehen, bis beide Perforationsrander von den Zahnen (5) gefa1 t sind. Danach Platte (3) auf den Film klappen and angedruckt halten. Filmanfang tief durch den Schlitz (6) stecken and zum Aufspulen die Randscheibe (7) in Pfeilrichtung so lange drehen, bis sic rich nicht mehr drehen Mt.
Loading the Camera Inserting the Film Turn down the lever (1). Unlock the back (2) and pull it off. Swing open the pressure plate (3). Push in the cartridge (4) and pull out the film until both perforated edges engage the sprocket teeth ( 5). Then swing the pressure plate (3) over the film and hold it down. Push the film leader fully trough the slot (6) and wind it up on the take-up-spool by turn ing the flange (7) in the direction of the arrow as long as it can be turned.
Die Aufnahme Beim Einstellen bedienen die Zeigcfinger die Skalen am unteren Rand. Das Blendenrad entsperrt sick bei diesem Griff durch den Druck auf die Taste. Samtliche Einstellwerte sind am Index (Dreieck) von oben her abzulesen. 1. Entfernung einstellen Objektivring an der Unterkante drehcn (1) and Entfernung auf den Index einstellen. Tip ®. Die gleiche Skala ist an der Unterseite der Objektivfassung auch mit Fuf3-Einteilung vorhanden. 2.
Shooting Set the controls by pressing the index finger against the lower edge of the setting wheels or rings. This also releases the aperture wheel by pressing on the ledge underneath. All settings are read off against the triangular index mark at the top. 1. Set the Distance Turn the lens mount by its lower edge (1) to set the required distance to the index mark. See also Note ®. The same scale underneath the lens rim carries distances in metres. 2.
Die Entnahme des Films Nach der letzten Aufnahme (36., 20. oder 12. Aufnahme, je nach Filmlange) wird der belichtete Film in die Patrone zuruckgespult: Hebel (1) nach oben stellen. Kurbel (2) herausklappen and in Pfeilrichtung drehen, his der Widerstand des Filmzugs verschwunden ist. Kurbel einklappen, Hebel (1) nach unten stellen. Ruckwand entriegeln and abnehmen, Patrone herausnehmen and moglichst in der Originalverpackung lichtsicher aufbewahren. Farbfilm baldigst zur Entwicklung geben.
Practical Notes • Film Transport You can operate the transport lever either it one swing or in two short swings until it locks whichever you prefer. • Is the Camera Loaded? If you are not sure after a long interval, unfold the rewind crank and try turning it gently in the direction of the arrow. If you meet a resistance you know that there is a film it the camera. If the camera is empty, the cranlk turns freely.
® Wahl der Belichtungszeit Die einrastendcn Ziffern 2 bis 500 der Zeitskala bezeichnen Sekundenbruchteile. Zwischenwerte sind nicht benutzbar. Die Wahl der ausreichend kurzen Belichtungszeit ist mitbestimmend fur die Scharfe des Bildes. 1. Forderung: Aus freier Hand kurz belichten, um die Aufnahme nicht zu ,verwackeln". Hierfur ist 1/ 30 sec die statthafte langste Zeit. Sicherer and meistbenutzt: 1/60 and 1/125 sec. 2.
Secondly, use faster shutter speeds for fast moving subjects to avoid movement blur. Thus sports shots need 1/500 second, running children 1/ 250, fast walking pedestrians 1/125, ambling people 1/60 or - if farther away - 1/30 second. As a rule, the farther away the moving subject, the sharper it will appear. The risk of movement blur is also reduced by shooting in the direction of the movement (rather than across it).
Scharfeinstellung bei Fernsichten mit Vordergrund: oc-Marke auf die Marke der benutzten Blende einstellen. So reicht die Scharfentiefe am weitesten in den Vordergrund. ® Blendenvorwahl Es hangt vom Motiv ab, ob Sie den Belichtungszeiger mit dem Blendenrad oder mit dem Zeitrad nachfuhren. Bei bewegten Objekten wird die Zeit vorgewahlt, urn sick die erforderliche kurze Belichtungszeit zu sichern. Nachgefuhrt wird mit der Blende.
Pre-selecting Apertures According to the type of subject you can line up the matching pointer with the meter needle by turning either the aperture wheel or the shutter speed wheel. With moving subjects pre-select the exposure time to make sure of a suitably fast shutter speed. Then match up the pointers by turning the aperture wheel. If on the other hand depth of field is more important, determine the required aperture and pre-select this. Now match up the pointers by turning the shutter speed wheel.
Ersatzmessung: Ist eine Nahmessung nicht moglich, visieren Sie ein Ersatzobjekt mit normalen Kontrasten bei gleicher Beleuchtung an and verwenden these Einstellung zur Aufnahme. Gegenlicht: Bei Aufnahmen gegen das Licht empfiehlt es sich, die gemessene Blende um einen Wert zu offnen (nachstkleinere Blendenzahl). Bei Farbmotiven, die Sie auf Farbumkehrfilm fotografieren, sind starke Helligkeitskontraste nach Moglichkeit zu vermeiden.
Substitute readings: If a close-up reading is not possible, point the camera at a substitute object of average contrast and under the same lighting. Use the setting obtained for the exposure. Against the light: When shooting against the light open the lens aperture by one step (next lower f/ number). For colour subjects to be taken on reversal colour film avoid very great brightness differences.
Blitzlampen oder Elektronenblitz benutzt werden. Bei Blitzlichtaufnahmen bleibt der Belichtungsmesser unbeachtet. Fur Belichtungszeit, Blende and Aufnahmeabstand gelten die Anweisungen des Blitzlicht-Herstellers. Hierbei sind die Angaben fur X-Kontakt zu benutzen. Die Schattenbildung verringert sich, wenn der Blitz uber dem Objektiv liegt and Sie die Kamera entsprechend halten: Blitz links bei Hochformat, Blitz oben bei Querformat. Auch in diesen beiden Haltungen laflt sick die Rollei 35 gut bedienen.
The Rollei 35 is easy to operate in both these positions. For flash shots ignore the exposure meter. Set the exposure time, aperture and subject distance as recommended by the manufacturer of the flash unit. Use the settings indicated for Xcontact. Shadow areas are reduced if the flash gun is situated above the lens and you hold the camera accordingly: keep the flash to the left of the camera for upright shots, and on top for horizontal shots.
is Tragschlaufe and Ledertasche Die Tragschlaufe wird am seitlichen Halter befestigt: Die vorstehenden Haltefedern mit dem Knopf der Schlaufe an die Kamera drucken and den Knopf einschieben. Zum Losen: Federn mit dem Fingernagel niederdriicken and Knopf abziehen. Mit der Schlaufe kann die Kamera audi in der Ledertasche am Handgelenk getragen werden. Nadi Offnen des Reiflverschlusses wird die Taschc zuriickgeschoben. Sie hangt wahrend der Aufnahme an der Tragschlaufe.
J3 The Wrist Strap and Leather Case The wrist strap is fixed to the fitting at the side. Push the protruding retaining spring against the camera body with the button on the strap and push the button home. To remove, push down the spring leaves with a fingernail and slide off the button. With the strap the camera can hang from the wrist even when it is in its leather case. Simply open the zip fastener of the case and push back the latter. During shooting it simply hangs from the strap.