
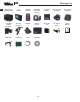
User's Manual
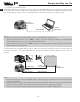

1. Insert a Micro SD card into the Rollei 5S video camera
Note: Use a branded Micro SD card. We recommend Class 10 memory cards.
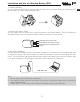
2. Powering on the Rollei 5S Video camera
Turn the power switch to the ON position to power on the Rollei 5S video camera. At this time,
the red indicator is on, and the Rollei 5S video camera changes to the preview state.
Note:
a. If the battery power is low, the ” “ symbol is displayed on the TFT screen together with a promot.
b. If no Micro SD card is inserted, no symbol is displayed in the bottom-right corner of the TFT screen.
3. Recording a Video
In the preview state, press the ”Video” key to start video recording. The video recording duration
is displayed in the upper-right part of the TFT screen. The "Video/Audio indicator (green)" and the
"Video/Photo indicator (green)" on the top of the video camera blink slowly. The recording
duration is correctly displayed on the LCD segment screen. During video recording, the video
camera responds only to operations for the zoom out (–) and zoom in (+) keys. Press the “Stop”
key once to stop and save the currently recorded video file, and the video indicator (green) on the
front side is off. The video camera restores to the preview state. The recording duration disappears
on the LCD segment screen.
Note:
a. During video recording, turn the power switch to the “OFF” position to power off the video
camera after saving the currently recorded file.
b. During video recording, if the battery power runs low, the system saves the currently recorded file
and enters standby mode, displaying a prompt of “Low battery ” on the TFT screen, until the video
camera is powered off.
c. During video recording, if the Micro SD card is full, the system saves the currently recorded file.
The system also displays a message “Card full” on the TFT screen, indicating that the Micro SD card
is full. In addition, the duration for video recording stops on the LCD segment screen, and the
system restores to the preview state.
d. Synchro Shot function: during the recording process,press the Shutter Key , the camera will take a
picture without interruption.(The synchro Shot function is unavailable in 1080i, 960P/48f,
960P/50f, 480P/100f and 480P/120f mode)
e. In Loop recording mode, the system automatically saves a file every 15 minutes. (The cyclic
recording function and the pre-video function cannot be simultaneously enabled.)
f. If the D23 backup battery is provided and fully recharged, the video camera can continuously
record video programs for about 160 minutes and record audio programs for about 180 minutes.
g. In 480P/100f and 480P/120f modes, the video camera does not support the zooming.
h. In audio recording mode, the volume cannot be adjusted by pressing the “+” or “–” key. In
playback, however, the volume can adjusted by pressing the “+” or “–” key.
i. If the video camera provides a TFT screen and is in the preview state, after using a HDMI patch cord
to connect the video camera to a HD display device, you can perform basic operations for the video
camera on the HD display device (These basic operations, however, cannot be performed if no TFT
screen is available on the video camera).
4. Taking a Picture
Before taking a picture, perform the following operations to set the image resolution.
— Press the “M” key to display the setup interface.
— Press the “>” key to display the camera setup interface ( ).
— Press the “+” or “–” key and choose “Image Resolution”.
— Press “
OK” to display the resolution setup menu.
You can set the resolution to any of the following three modes:
8M, with an image resolution of 3200 x 2400.
12M, with an image resolution of 3840 x 2880.
16M, with an image resolution of 4608 x 3456 (interpolated).
Four photo shooting modes are available for the video camera.
a. single shot (the default mode)
In the preview state, press the “Photo” key once to take a picture while the system generates a
click tone. The green indicator on the front side of the video camera also blinks once (the shooting
icon on the LCD segment screen blinks once), and the video camera restores to the preview state.
b. Fast shot
On the camera setup interface, press the “+” or “–” key and choose “Fast shot”. Press “OK” to
display the interface. Press the “>” key, and choose 3 p/s or 6p/s or 10 p/s (photo/second).
Press “OK” again to exit the interface. Press the “M” key to exit the camera setup interface. After
setting is complete, the Rollei 5S video camera continuously takes three pictures or six pictures or
ten pictures when you press the Photo key once.
c. Auto cont capture
On the camera setup interface, press the “–” key and choose “Auto Cont Capture”. Press “OK”
to set the time interval for continuous shooting to OFF, 0.5s,1s, 2s, 3s, 5s, 10s, 20s ,30s or 60s .
After press the “>” key to set the time interval. Press “OK” again to exit the intreface. Press the “M”
key to exit the setup interface. At this time, if you press the “Photo” key, the Rollei 5S video
camera takes a picture at each interval until you press the “Stop” key to cancel shooting.
d. Timed shooting: On the camera setup interface, press the “+” key and choose “Timed Shooting”.
Press “OK” to set the time in auto-shooting mode to OFF, 3 s, 5 s, or 10 s. Press the “>” key, and
choose “Timed Shooting”. Press “OK” again to save and exit the interface. Press the M key to
exit the camera setup interface. After setting is complete, the Rollei 5S video camera starts
reverse-counting timer when you press the Photo key once. When the preset time is reached, the
Rollei 5S video camera takes a picture.
5. Recording an Audio File
To record an audio file, perform the following operations:
— Press the “M” key on the video camera setup interface, choose “ Exe”, and then press “OK” to
display the video and audio options.
— Press the “<” or “>” key, and choose ” “ for audio only, and press ”OK” again. The system gets
ready for audio recording.
— Press the “Video” key to start recording an audio file. At this time, the green indicator blinks
slowly. The video camera also displays the audio recording symbol on the TFT screen and starts
counting time. In addition, the recording duration is correctly displayed on the LCD segment
screen.
— Press the “Stop” key to save and stop the currently recorded audio file. At this time, the green
indicator on the front side is off. The video camera restores to the preview state for audio
recording. The recording duration also disappears on the LCD segment
screen.
After audio recording is complete, press the “M” key. On the system setup interface, choose
“Exe”, press “OK” to display the video and audio options, and choose “Video”. Press “OK” again
to exit the setup interface. The video camera restores to the preview state for video recording.
Note:
a. Power on the video camera again to restore to the video recording mode. After audio recording is
complete, you can also press the ” “ key twice to restore to the video recording mode.
b. Press and hold the Stop key for two seconds to directly change the video camera to the ready state
for audio only.
6. Playing Back a File
You can view the recorded audio/video and photo files on the Rollei 5S video camera. To view a
file, perform the following operations:
— Press the “ ”key to display the playback interface. Press the“ ”key again to exit the playback
interface.
— Select ” “(the video files interface) to view a recorded video file. Select ” “(the photo files
interface) to view a photo file. Select ” “(the mixed file interface) to view all the video, audio,
and photo files.
If there are many files, it takes a few seconds time for the video camera to display the preview
interface.
1) Playing a Video File
To play a video file, perform the following operations: On the video file interface“ “, press the
“+”, “–”, “>”, or “<” key to display all the files displayed in thumbnails. Select the required file,
and press “OK“ to play it.
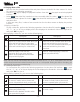
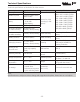
When playing a video file, you can use the following keys:
Note: You can set the fast forward and rewind functions to a 2-, 4-, 8- or 16-X speed. You can also
set the slow forward and rewind functions to a 1/2- or 1/4-X speed. During the slow or fast play, you
can press OK to resume normal playing.
2) Viewing a Photo File
To view a photo file, perform the following operations: On the photo file interface “ ”, press
the “+”, “–”, “>”, or “<” key to display all the files displayed in thumbnails. Select the required file,
and press “OK“ to view it.
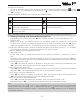
When viewing a photo file, you can use the following keys:
Operations
EN
-10-