
Operation Manual
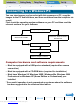


Introduction Getting Ready
Taking Pictures
Playback Set Up
GB-139
Viewing Still Images | Viewing Movies | [o] Viewing Images Automatically as a Slideshow (slideshow) | [O] Viewing Multiple Images | [INFORMATION] Viewing Image Information | [J]/[I] Erasing Unwanted
Images | [U] Protecting Images from Accidental Erasing (PROTECT) | [p] Adding Voice Messages to Still Images (POSTRECORDING) | [V] Resizing and Trimming Images (RESIZE) | [W] Rotating an Image |
[T] Using DPOF to specify print settings | [G] Printing by Connecting the Camera Directly to a Printer (PictBridge) | Connecting to a Windows PC | Connecting to a Macintosh
NEXTBACK
Contents (Top page) Detailed Contents Index Nomenclature Menus and Settings Troubleshooting
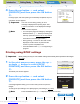
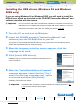
4 Press the POWER button H to turn the
camera on.
[PC MODE] appears on the LCD monitor and you can check the images
stored on the camera's memory card from your PC and copy the
images to your PC.
5 A [Removable Disk] icon appears in the
[My Computer] window. Double click the
icon to open the disk window.
6 Open the [xxxROBOX] folder or the [xxxRORSZ] resized
images folder in the DCIM folder and then select and double-
click the image file you want to view.
A Important
• In Windows XP, the Scanner and Camera Wizard window may appear. If it does,
click the Cancel button to close the window.
• When the camera is connected to a PC and you are viewing or copying images, the
card access LED flashes. Do not disconnect the USB cable or turn the computer off
while the card access LED is flashing.
BNote
• When the camera is connected to the PC and the two are communicating so that
data can be exchanged, the self-timer LED lights.
• The procedure for disconnecting the USB cable once the camera and PC are
communicating differs according to the version of Windows you are using. (
Æ
p.141)
• If you intend to use the camera in this way for a long period, we recommend that
you use the optional AC adapter.
A Important
If [PC MODE] is displayed on the LCD monitor but no [Removable Disk] icon appears
in the [My Computer] window on the PC, check that the USB cable is securely
connected.
BNote
A number between 100 and 999 is substituted for "xxx" in the [xxxROBOX] and
[xxxRORSZ] folder names. (Æ
p.165)
PC
MODE
Downloaded from www.Manualslib.com manuals search engine