Wireless Camcorder User Manual
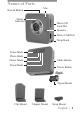
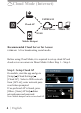
Names of Parts Record Button Mic Status Indicator Micro SD Card Slot Speaker Micro USB Port Strap Hook Video Mode Photo Mode Mode Button Direct Mode Cloud Mode Power Button Tripod Mount Clip Mount Magnet Mount Strap Mount English | 1
Getting Started Charging the Unit • Before initial use, fully charge the camera via the attached • power adapter or on your computer via USB. Note: The plug of the power adapter could be switched (European or UK Plug) • During charging, the status indicator flashes red. When the camera is fully charged the indicator turns off. Modes Navigation • Press Power button to turn on camera. • Press Mode button to switch among Video-Direct Mode, PhotoDirect Mode, and Cloud Mode.
Direct Mode (Intran Direct Mode (Local) For initial use, install [Unieye] app on mobile. Each camera has a unique Mobile / PC U2-xxxxxxxx) Camera ID. ( Password is not required for the initial use, however, it is advised to go to [Setup] in app to setup password after connected. Connect to Camera For iOS user: • Set camera to Direct Mode . • On mobile, go to [Settings] [Wi-Fi] Choose a camera. 3G connection will switch to WiFi within 1 min. • Run [Unieye]. • Press camera bar to start.
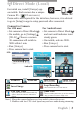
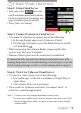
Cloud Mode (Internet) Cloud Mode (Internet) AP USTREAM Cloud AP AP Cloud Server 3G/4G Mobile / PC Mobile Hotspot Recommended Cloud Server for Access: USTREAM A live broadcasting social media. Before using Cloud Mode, it is required to set up cloud AP and cloud server on camera in Direct Mode: follow Step 1 ~ Step 4. Step 1: Setup Cloud AP On mobile, start the app and go to [Setup] [Cloud Settings] [Cloud AP]. Select a WiFi network from [AP List]; enter network password when prompted.
Cloud Mode (Internet) Step 2: Setup Cloud Server • New user, press then enter email/username/password/confirm for auto-registration. Returning user, enter username/password only. • Press [Save to Camera]. Step 3: Connect Camera to Cloud Server • To connect to cloud server, choose one of the following: 1. In the app [Setup] page, press [Camera to Cloud]. 2. Exit the app. On camera, press the Mode button to switch to Cloud Mode .
PC Applications To use [Unieye] features on PC, install [PC APP] first. The [PC APP] has similar features and interface to [Unieye] for easy user experience. Installing [PC APP] from Camera • Connect the camera to PC via a USB cable. • [PC APP] AutoRun/AutoPlay activates. • If AutoRun/AutoPlay is not starting: Go to [My computer] and search [PC APP] for installation. • Once installed, unplug the camera from PC then run [PC APP].
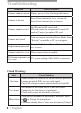
Camera Indication Condition Status Indicator Alert Recording Flashing green One time Loop Recording Flashing orange One time Charging Flashing red None Fully Charged No indication Two times Low Battery Flashing red every 5 sec. (Warning) Five times (Shutdown) Power Off No indication Two times Auto Power Off (5 mins idle) Flashing red Two times Memory Full SD Card Error Flashing red Three times Forced Shutdown Camera Hotkey Press and hold Power button for 5 sec.
Troubleshooting Situation Cause/Solution Camera cannot turn on Battery power is low. Recharge the battery. Camera is frozen Press Power button for 5 sec. to turn off. Press Power button twice to turn on. Camera cannot record No SD card or SD card is full. SD card cannot be recognized. Format SD card in [Unieye] or replace SD card. Camera not found Turn on camera, switch to Direct Mode. Press "Refresh" on mobile or PC to scan again.
Waterproof Housing Guide Placing the Camera into the Waterproof Housing Latch Arm 1. Slide [OPEN ] swtich to the right and hold its position, then lift up the latch arm to open the housing. Spring Button 2. Place the camera in the housing; camera's Record button must align with housing's spring button. Hinged Arm Backdoor 3. Hook hinged arm to the top of the backdoor, then push down the latch arm to snap into place.
License Statement The software used in this product is licensed subject to a license pursuant to the GNU – General Public License conditions. We expressly draw attention to the fact that under the GNU – General Public License conditions no liability is accepted. The starting point for the software is the software published online at http://sg-gpl.net/ The software listed there is licensed pursuant to the GNU – General Public License conditions.