
Operation Manual


EN-34
TRANSFERRING RECORDED IMAGES
AND VIDEOS TO YOUR COMPUTER
System Requirements (Windows)
Pentium III 600 MHz or higher Windows 2000/XP
64MB RAM 128MB hard disk space
CD-ROM drive Available USB port
System Requirements (Macintosh)
PowerPC G3/G4/G5 OS 9.0 or later
64MB RAM 128MB hard disk space
CD-ROM drive Available USB port
Downloading Your Files
1. Rotate the mode dial to and turn your camera on by pressing the power switch.
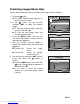
2. Press the four-way controller (X) to select the [Set-up2] menu, then use the
four-way controller (T) to select [USB Mode].
3. Press the button.
4. Use the four-way controller (T) to select [PC], then press the button.
5. Turn off your camera.
6. Connect your camera and the computer via
the supplied USB cable.
7. Turn your camera on by pressing the
power switch.
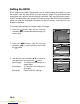
8. From the Windows desktop, double click
on “My Computer”.
9. Look for a new “removable disk” icon.
This “removable disk” is actually the
memory (or memory card) in your
camera. Typically, the camera will be
assigned drive letter “e” or higher.
10. Double click on the removable disk and locate the DCIM folder.
11. Double click on the DCIM folder to open it to find more folders.
Your recorded images and video clips will be inside these folders.
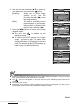
12. Copy & Paste or Drag-N-Drop image and video files to a folder on your computer.
Mac users: Double-click the “untitled” or “unlabeled” disk drive icon on your desktop.
iPhoto may automatically launch.
Downloaded from www.Manualslib.com manuals search engine