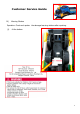
6V Express Train (5F60D19) Customer Service Guide MMXIII © Copyright Aria Child Inc.
Customer Service Guide Contents I) Check Wiring ………………………............................................. 3 II) Gearbox Replacement …………………………..………………………... 5 III) S t e e r i n g W h e e l R e p l a c e m e n t ….................................. 8 VIII) Warning Stickers ……………………………………………………………… 10 IX) Schematic diagram ……………..…………….…..….………..……………. 12 CAUTION : Disconnect the battery before proceeding with any of the following steps.
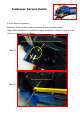
Customer Service Guide I) Check Wiring Connections Operation: There are four groups of connections that should be checked. Follow below procedures to remove the chassis, access the connectors inside, and then check for any connection problems.
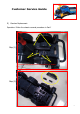
Customer Service Guide I) Check Wiring Connection Step (3) 1 3 2 5 4 6 Unscrew 12 screws (6 at each side) to remove the chassis. Lift up chassis carefully to avoid breaking the wiring Speaker (yellow wires) Step (4) Water level sensor (green wires) Gearbox (white connector) Headlight (blue/white wires) Reverse above procedures to re-assemble the train.
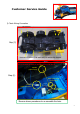
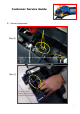
Customer Service Guide II) Gearbox Replacement Operation: Follow the chassis removal procedure in Part I Step (1) Unscrew the gearbox and axle holders as shown Step (2) 5
Customer Service Guide II) Gearbox Replacement Step (3) Unscrew the small circuit board from the inner side of the chassis. Step (4) Lift up the whole gearbox using a screwdriver to help lift up the axle.
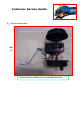
Customer Service Guide II) Gearbox Replacement Replace the gearbox with a new one Step (5) Reverse above procedures to re-assemble the train.
Customer Service Guide III) Steering Wheel Replacement Operation: Follow Part I to remove the chassis and unplug the four connections in I.4 Step (1) Locate the screw on the underside of the train that connects the wheel to the train body.
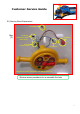
Customer Service Guide III) Steering Wheel Replacement to speaker Step (3) to sensor (black plug with black wires) to circuit (4-pins socket) to battery to gearbox Replace the whole handlebar unit with a good one Reverse above procedures to re-assemble the train 9
Customer Service Guide IV) Warning Stickers Operation: Check and repalce the damaged warning stickers after repairing.
Customer Service Guide IV) Warning Stickers (2) Next to the battery 11
Customer Service Guide IX) Wirings Schematic 12