96K ORGANIZER RF-2296 With Advanced Data Compression User’s Guide
License Agreement READ THIS LICENSE AGREEMENT BEFORE USING THE PRODUCT. YOUR USE OF THE PRODUCT DEEMS THAT YOU ACCEPT THE TERMS OF THIS LICENSE. IF YOU DO NOT AGREE WITH THESE TERMS, YOU MAY RETURN THIS PACKAGE WITH PURCHASE RECEIPT TO THE DEALER FROM WHICH YOU PURCHASED THE PRODUCT AND YOUR PURCHASE PRICE WILL BE REFUNDED. PRODUCT means the software product and documentation found in this package and FRANKLIN means Franklin Electronic Publishers, Inc.
Introduction Congratulations! You now own a ROLODEX® Electronics organizer, a powerful 64K electronic organizer that through advanced data compression can hold 96K.
Getting Started Before you can use your organizer for the first time, you must remove the battery insulation tape from your organizer. 1. Turn your organizer over. 2. Carefully pull the battery insulation tape out of the battery compartment. Note: You may have to reset your organizer by using a paperclip to gently press the Reset button, located on the back. Press Y to start the reset and display DEL SECRET?. To reset only your secret memory, press Y.
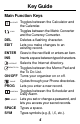
Key Guide Main Function Keys Toggles between the Calculator and the Calendar. CONV Toggles between the Metric Converter and the Currency Converter. DEL Deletes a flashing character. EDIT Lets you make changes to an existing record. ENTER Goes to the next field or enters an item. INS Inserts a space between typed characters. INTERNET Selects the Internet directory. MEMO/ TO DO Toggles between the Memo Pad and the To Do List. ON/OFF Turns your organizer on or off. PHONE Cycles through your Phone directories.
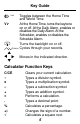
Key Guide Toggles between the Home Time and World Time. At the Home Time, turns the keytone on or off. At the Daily Alarm, enables or disables the Daily Alarm. At the Scheduler, enables or disables the Schedule Alarm. Turns the backlight on or off. SEARCH Cycles through your records. TIME V ▲ ▲ ▲ Moves in the indicated direction. ▲ Calculator Function Keys C/CE ÷ x – + = . % +/- √ Clears your current calculation. Types a division symbol. Types a multiplication symbol. Types a subtraction symbol.
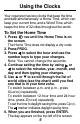
Using the Clocks Your organizer has two clocks that keep the time and date simultaneously: a Home Time, which can keep your current time, and a World Time, which keeps the time of 32 cities throughout the world. To Set the Home Time 1. Press TIME until the Home Time is on the screen. The Home Time does not display a city code. 2. Press PROG. 3. Press to select the hour and use the number keys to type your changes. Note: You cannot change the seconds. 4.
Using the Clocks To Use the World Time 1. Press TIME until World Time is on the screen. The World Time displays a city code (e.g., LON). 2. Use ▲ or ▼ to scroll through the list of world cities.
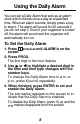
Using the Daily Alarm You can set a Daily Alarm that acts as an alarm clock which chimes once a day at a specified time. When an alarm sounds, simply press a key to stop it. The alarm will sound for 20 seconds if you do not stop it. Even if your organizer is turned off, the alarm will sound and the organizer will automatically turn on. To Set the Daily Alarm 1. Press SCHD/ALM until ALARM is on the screen. 2. Press PROG. The first digit in the hour flashes. 3.
Using the Phone Directories Your organizer has three Phone directories (Tel1, Tel2, and Tel3), which contain phone records. Phone records are made up of eight fields of information: Name, Company, Address, Phone 1, Phone 2, Fax/Pager, E-mail, and Note. Each field can hold up to 48 characters, except Address, which can hold up to 96 characters. To Enter a Phone Record 1. Press PHONE until the desired phone directory appears. 2. Press PROG. 3. Type a name and then press ENTER to go to the next field.
Using the Phone Directories To Find a Phone Record 1. Press PHONE repeatedly to find the desired Phone Directory. Note: You can search only one phone directory at a time. 2. Press the SEARCH keys ( or ) repeatedly to cycle through the phone records. 3. To search for a specific phone record, type its first few letters and then use or . To see the fields in a phone record, press ENTER repeatedly. If the text is too long to fit on the screen, use or to see it.
Using the Phone Directories To Edit or Delete a Phone Record 1. Find a phone record. To learn how, read “To Find a Phone Record.” 2. To edit a phone record, first press EDIT, type your changes, and then press ENTER at the last field to store your changes. To delete a typed character, press DEL. To insert a space, press INS. 3. To delete a phone record, first press DEL, and then press Y to delete it or press N to cancel the delete.
Using the Scheduler In each record, you can enter a schedule event description and the time and date that event is going to occur. When that time arrives, your organizer can sound a reminder alarm. To Enter a Schedule Record 1. Press SCHD/ALM until SCHEDULE is on the screen. 2. Press PROG. 3. Use the number keys to change the date and time of your Schedule record and then press ENTER. To switch between a.m. and p.m., use X(AM/PM). 4. Type the description of your Schedule record.
Using the Scheduler To View, Edit, or Delete a Schedule Record 1. Press SCHD/ALM until SCHEDULE is on the screen. 2. Press the SEARCH keys ( ) repeatedly to cycle through the Schedule records. 3. To edit a Schedule record, first press EDIT, type your changes, and then press ENTER at the last field to store your changes. To delete a typed character, press DEL. To insert a space, press INS. 4. To delete the Schedule record, first press DEL, and then press Y to delete it or N to cancel the delete.
Using Internet and Memo/ To Do To Enter a Memo, To Do, or Internet Record 1. Do one of the following: • To enter an Internet record, press INTERNET. • To enter a Memo record press MEMO/TO DO until MEMO is displayed. • To enter a To Do record, press MEMO/TO DO until TODO is displayed. 2. Press PROG. 3. Type your information and then press ENTER until the record is stored. Note: Each field of a Internet record can hold up to 48 characters. A Memo or To Do record can hold up to 96 characters.
Using the Calculator To Make a Basic Calculation You can use your organizer as a 10-digit calculator. First, press CALC/DATE until CAL is on the screen. Then type a number using the number keys, and then type a math operation (e.g., +,–, x, ÷). Type another number and then press = to see the result. To clear your calculation, press C/CE. To Use the Memory Your calculator can store a number in its memory for later calculation. 1. Make a calculation or simply type a number in the calculator. 2.
Converting Measures and Currency To Convert Measures 1. Press CONV until DEG C -> DEG F is on the screen. 2. Use the SEARCH keys ( ) to cycle through the conversion pairs. 3. Use the number keys to type an amount. 4. To convert the amount from the measure on the left into the measure on the right, press . 5. To convert the amount from the measure on the right into the measure on the left, press . 6. To clear the screen, press C/CE.
Converting Measures and Currency Or use SYM to find a currency symbol. 4. Press ENTER to select the other currency, make changes as needed and then press ENTER. 5. Type a rate of exchange and press ENTER. To clear a rate, press C/CE. To Convert Currency 1. Press CONV until the Currency Converter is on the screen, if needed. 2. Use the SEARCH keys to cycle through the currency conversion pairs. 3. Use the number keys to type an amount. 4.
Using the Password This organizer has a secret mode, which allows you to create secret Phone, Schedule, Internet Memo, and To Do records that only someone with the password you set can use. Note: You do not need to set a password to use this organizer. Warning! If you forget your password, you will not be able to recover any of the secret data stored in your organizer. To bypass the password, you will have to perform a reset, which will clear the password and erase all the data stored in its memory.
Using the Password Note: Records that you create in secret mode can only be viewed or edited while in secret mode. 1. Press PHONE, SCHD/ALM, INTERNET, or MEMO/TO DO. 2. Press PROG, type a record and then press ENTER to store it. 3. To exit secret mode, press TIME, CONV, or CALC/DATE. To View Secret Records 1. Press PHONE, SCHD/ALM, INTERNET, or MEMO/TO DO. 2. Press SECRET. 3. Type your password and then press ENTER. 4. View any secret records. To Change the Password 1.
Installing the Organizer PC Link Use the following steps to install the Organizer PC Link onto your personal computer. Please note, the following steps assume that your 3.5” floppy disk drive is drive a: and your hard drive is c:. For futher information, view the readme file on your installation disk. Note: The readme file can also be viewed from the dtl388 folder in the drive on which you installed the program. 1. Insert the diskette into a 3.5” floppy disk drive. 2.
Using the Organizer Features Adding a Record 1. Turn on the Organizer PC Link software. 2. Press a function key to go to an organizer feature. 3. Click Add Record. 4. Type information in each field, pressing TAB to cycle through the fields when needed. To cancel, click Summary. 5. Click Save Record to save the record. 6. Enter more records, if needed. 7. Click Summary when finished. Editing a Record 1. From a summary screen, use the arrow keys to highlight a record and press ENTER. 2.
Transmitting or Receiving Records Connecting the Serial Cable The following steps must be followed before you can transmit or receive records. 1. With your personal computer turned off, connect the 9-pin plug of the Organizer PC Link cable into a communications port. 2. Connect the single-pin plug of the cable into the PC PORT hole on the left side of your organizer. Configuring the Organizer Software 1. Turn on the Organizer PC Link software on your personal computer. 2.
Transmitting or Receiving Records For best results, perform the steps below in the order that they appear. Transmitting to your Handheld Organizer 1. Select the same organizer feature on both the Organizer PC Link and the handheld organizer. To select records to be transmitted, highlight the desired records and select Select Record from the Edit menu. Otherwise all records in the organizer feature will be transmitted from the Organizer PC Link. 2.
Product Care Your organizer is powered by three CR-2032 batteries - two main batteries and one backup battery that stores your data when you change the main battery. Do not press the Reset button when changing batteries. Doing so may delete all of your stored information. The main batteries should be changed when LOW BATTERY appears on the display. The backup battery should be changed once a year. Warning! When changing the main batteries, always make sure the backup is installed so no data will be lost.
Specifications Model RF-2296 Organizer, 96K • Size: 13.2 x 9 x 1.4 cm. • Weight: 4 oz. • Main Batteries: 2 CR-2032 3-volt lithium; Backup Battery: 1 CR-2032 3-volt lithium • Storage capacity: 64K with turbo memory storage that holds 96K Cleaning This Product To clean this product, spray a mild glass cleaner onto a cloth and wipe its surface. Don’t spray liquids directly onto the unit. Don’t use or store your unit in extreme or prolonged heat, cold, humidity, or other adverse conditions.
Specifications FCC Notice NOTE: This equipment has been tested and found to comply with the limits for a Class B digital device, pursuant to Part 15 of the FCC Rules. These limits are designed to provide reasonable protection against harmful interference in a residential installation. This equipment generates, uses, and can radiate radio frequency energy and, if not installed and used in accordance with the instructions, may cause harmful interference to radio communications.
Limited Warranty (U.S. only) Franklin Electronic Publishers, Inc. (“Franklin”) warrants to the end user that this product will be free from defects in material and workmanship for a period of ONE YEAR from the date of original retail purchase, as evidenced by sales receipt. On discovery of a defect, the end user must return this product (transportation charges prepaid) either to the dealer from whom it was purchased or directly to Franklin at the address given below.