USER GUIDE & RECIPES For all Models Food Dehydrator Convection-Only Model Dry fruits & vegetables, beef jerky, potpourri and more!
Table of Contents Food Dehydration History and Background............................................ 2 Principles of Dehydration........................................................................ 3 Procedure ............................................................................................... 3 Pretreating .............................................................................................. 4 Packing and Storage . .....................................................................
Food Dehydration A History and Background Your Food Dehydrator brings a new dimension to ancient food preservation processes. It allows you to enjoy a simpler and more rapid drying process in the convenience of you own home. Now you can have the satisfaction of preparing healthful and delicious treats in the comfort and convenience of your own home and save money and have fun at the same time.
Principles of Dehydration There are no uniform rules that apply to all food dehydration processes. The best way to become proficient is to experiment using this booklet as a guideline and then adjust your drying techniques accordingly. Dehydrating is a method of heating the food to evaporate the moisture present and then removing the water vapor formed. Keeping records is helpful in food dehydration. For instance, you can weigh food before and after dehydration.
Pretreating Enzymes in fruit and vegetables are responsible for color and flavor changes during ripening. These changes will continue during drying and storage unless the produce is pretreated to slow down enzyme activity. Blanching can be used in the pretreatment of vegetables. It helps set color and hastens drying by relaxing tissues. It can also help keep flavor during storage and improve reconstitution during cooking.
Before drying pretreated food, remove any excess moisture by placing the food on paper towels or clean cloths. Trays should be loaded with a thin layer of food as directed. If needed, clean cheesecloth can be spread on the trays to prevent food pieces from sticking or falling through. The food being dried should be about 1/4” thick and should not exceed roughly 3/4” of each tray’s surface area. Drying Drying time varies according to fruit or vegetable type, size of pieces, and tray load.
Reconstituting Foods Not all dehydrated foods need to be reconstituted. Some fruits are preferable in their dried form. Most vegetables taste better when reconstituted. To reconstitute vegetables for cooking, merely wash product in clean water, then place in an amount of cold, unsalted water and cover. Soak 2 to 8 hours. If possible cook in same water used for soaking. Add more water if necessary. Bring to a boil then reduce heat to simmer until just done. Add salt as desired at end of cooking time.
Remember Always use fresh, quality food and wash everything before starting to dehydrate 1. Best results are achieved when the quality of the food is high. Select ripe produce in good condition. Bad food may give an off-flavor to the entire lot. 2. Clean produce is important. Wash thoroughly, remove soft or spoiled areas, slice and pre-treat if necessary. Be certain that your hands, cutting utensils and food preparation areas are also clean. 3. Produce may be shredded, sliced or diced.
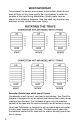
Most Important Trays nearest the bottom are exposed to the hottest, driest air and food on them will dry more rapidly. So it is important to rotate the location of the trays during dehydration. Simply move trays as shown in the following diagrams. Also turn each tray a quarter turn sideways to help insures more even drying. Example: Rotate trays about every 6 hours Occasionally check to see if your food is dehydrated.
Drying Table For Fruits & Vegetables The times given are approximate. Your drying times will vary with room temperature, humidity, moisture content of the food, how thinly the food is sliced, how many trays you are using, and personal preference. The presence of natural juices in food will also vary. Some fruit sugars tend to be stickier than others. always thoroughly wash food before dehydration Fruit Preparation Apples After paring, core, slice into rings and dip in pretreatment solution for 2 minutes.
Fruit Preparation Dryness Test 5-7 Tray No Fan Brussels Sprouts Cut sprouts from stalks, cut in half length wise through stem. Brittle 1 - 2 days Broccoli Trim and cut as usual. Steam until tender - 3 to 5 minutes. Brittle 1 - 2 days Cabbage Trim. Slice into strips 1/8” thick. Leathery 1 day Carrots Select young tender roots. Steam until tender.
Fruit Preparation Dryness Test Mushrooms Select mushrooms with cap curling under-these are young and tender. Wipe off with damp paper towels or brush gently to remove dirt. Leathery to brittle depending on size. Nectarines No need to peel. Halve and remove pit. Cut in 1/4” slices and arrange on tray. Brittle Onions and Leeks Peels and cut into 1/2” slices or nuggets, or chop. Stir several times during drying.
Fruit Plums Preparation Cut in half and remove pits. Prunes Same as plums, but soak in boiling water for two minutes first. Pumpkin & Hubbard Squash Dryness Test 5-7 Tray No Fan Pliable 1 - 3 days (3 tray max) Leathery 2 - 3 days (3 tray max) Bake or steam small pieces until tender. Cut into strips 1 to 3 inches wide, peel and remove pulp. Slice strips 1/2” thick. Scrape pulp, place in blender to puree. Dry with paper towels. Leathery 2 days Rhubarb Use only tender stalks.
FRUIT RECIPES Glazed Banana Cinnamon Chips Slice Bananas into lemon juice or ascorbic acid. Drain on paper towel. Arrange on tray. Sprinkle with a mixture of sugar and cinnamon. Dry to shiny crispness. Honey Glazed Banana Chips Slice bananas and dip into a glaze of 1/4 cup honey thinned with 1/4 cup water. Drain and place on trays. Dry. Dried Candied Fruits Rinse fruits or fruit rinds and cut into thin strips. Simmer slowly in a solution of approximately 2 cups water and 2 cups sugar for 1 1/2 hours.
Spiced Peach Pie Soak 1 1⁄2 cups dried peaches in the refrigerator overnight. Then stew until soft (about 45 minutes). Chop peaches. Add a mixture of: 1 1⁄2 tablespoon cinnamon 1⁄2 cup white or brown sugar 2 tablespoons water 2 tablespoons flour 4 tablespoons melted butter 1⁄8 teaspoon salt Add mixture to peaches and stir lightly. Pour into unbaked pie crust, cover with top crust. Bake 35 to 45 minutes until golden brown at 350 degrees.
Vegetable Recipes Vegetable Soup 2 cups dried beef, diced (optional) 8 cups water 1⁄2 cup diced dried onions Salt & Pepper to taste 1⁄2 cup diced dried carrots 1⁄4 teaspoon sage 2 tablespoons chopped dried parsley 1⁄4 cup dried peas 1⁄2 cup pearl barley 1 cup dried tomatoes 1 cup dried diced potatoes 1⁄2 cup dried chopped celery and crushed celery leaves Put meat and vegetables in soup pot, cover with cold water.
Trail Treats Quick Energy Snacks 4 cups rolled oats 1 cup brown sugar 1 cup dry roasted nuts 1 cup chopped dates or apricots 1⁄2 cup raisins 1 1⁄2 cups coconut flakes Mix all ingredients together thoroughly. Spread onto tray. Dry until crisp. Seal in individual ziploc sandwich bags for munching on hikes and camping trips.
JERKY Recipes For Meat And Fish Normally raw meat is used for jerky. However, cooked meat as well as raw meat may be dehydrated for later reconstitution. Cut meat to size for recipes before dehydration. You’ll find that meat is much easier to work with when it’s cut to size before it is dehydrated and becomes crispy. Be extra careful when making jerky from raw chicken or turkey because salmonella bacteria may be present in the poultry when you purchase it.
Food Dehydrator CLay For Arts, Crafts & School Projects • Hobbies Gifts • Holiday Ornaments • Decorations Rainy Day Fun Wreaths Napkin Rings Photo Frames Christmas Trim Ornaments Fun Jewelry Dolls Figurines Centerpieces Name Tags Candle Holders Child Hand Prints Dog Prints Magnet Arts Pins Toys Miniatures 18
Food Dehydrator Clay 2 cups flour 1 cup salt 1 cup water Mix flour and salt together, then add water. Blend mixture by hand. Knead by hand 2 or 3 minutes into a pliable, moist ball. Roll dough on a well-floured surface, adding flour to the top of the dough so it will not stick. Keep surface well-floured as you roll and turn dough. Cut into shapes or make figurines and then dry. Holiday Ornaments Roll dough thin - as you would a cookie. Use cookie cutters for designs. Make extra ornaments to use as testers.
Herbs Most herbs dry overnight. You will have about one pound of dry herbs for every eight pounds of fresh herbs. Dried herbs retain their flavor best if they are crushed just before using. Home dehydration saves a lot of money. Dry chives, oregano, basil, dill, rosemary, thyme, parsley, mint, peppers and almost any herb you can find. Herb Teas Many of your garden herbs can be dried in your Food Dehydrator and stored in air-tight containers for use throughout the year to make delicious, healthful herb teas.
Fruit Roll Ups or Fruit Leather Select fruits such as peaches, strawberries, bananas, apples, etc. Puree with a kitchen blender or food processor and add a little fruit juice. Sweeten to taste with sugar, honey or fruit juice. Pour the puree onto the Ronco Fruit Roll Up & Liquid Tray Insert (sold separately) or cover an entire tray with plastic food wrap. Be sure to cut out the middle hole to allow the hot air to circulate up through the center of the trays.
Important Notice Your Food dehydrator has a vent on its top and may have another vent on the bottom depending on the model. Do not operate with top or bottom vent blocked or closed at any time as this will interfere with proper air flow. Do not use oil sprays on the trays.
Prepare Healthy Meals Quickly and Easily Ronco Acquisition Corporation P.O. Box 1000 Peck Slip Station New York, NY 10272-1000 (800) 486-1806 www.Ronco.com Copyright © 2009 by Ronco Acquisition Corporation. All Rights Reserved. Ron Popeil name and likeness used with permission. U.S. and foreign patents pending. Printed in China. 11.