
Instructions and Recipes

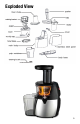
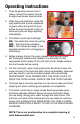

1. Once all parts are secure and in
place, connect the power cord to
an approved power source/outlet.
2. Place the pulp container under the
pulp ejector and a juice receptacle
or glass under the spout for juice
before turning the Smart Juicer on.
Juice and pulp will begin ejecting
immediately.
3. The Smart Juicer has 3 settings:
ON - this starts the motor for juicing.
OFF - This stops the operation.
REV - This moves the auger in the
opposite direction for unclogging or
unblocking.
4. Before placing food in the juicer, please make sure all foods
are thoroughly washed and cleaned. Cut all foods into the
appropriate size to easily fit into the food chute. Please remove
any hard seeds before juicing.
5. For the most part, when placing food into the Smart Juicer, the
auger will pull in the food and start juicing immediately. However,
you may need to use the included pusher with some foods.
NEVER INSERT YOUR FINGERS INTO THE FOOD CHUTE TO
MOVE THE FOOD ALONG. ALWAYS USE THE FOOD PUSHER.
6. The bowl has a non-drip cap that you can use to keep juice from
dripping out when switching juice glasses or receptacles.
7. The Smart Juicer has a unique simple flushing process when
switching between different flavors of juices and fruits. When
you are ready, simply pour water through the food chute. This
will rinse out most of the residue and you are ready to continue
juicing with a different food. MAKE SURE YOU HAVE A LARGE
ENOUGH RECEPTACLE READY TO CATCH THE WATER WHEN
FLUSHING.
NOTE: This is not an alternative to a complete cleaning of
each disassembled part.
Operating Instructions
9