
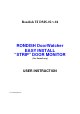
User's Manual
7
In normal alarm operation, this “strip” monitor features an array of red LED lights inside the translucent
cover. A number of LED’s are used to indicate “alarm on” (patient transmitter signal sensed - door
contact open), one LED is used for “signal sensed”. - no alarm (door contact closed).
Please refer to the Rondish Transmitter Programming Instruction Manual. To carry out testing and setting
up for the door monitor detection zone, a TXP-02 patient wristband transmitter should be pre-
programmed for test operation with the system.
This transmitter can then be used to test the door monitor range/detection zone. Refer to drawings 001/9
to 001/11 for recommended set-up procedure.
If magnetic door contacts are fitted and during this range setting/test procedure, each time the door
monitor has triggered in response to receiving and sensing the signal from the patient test transmitter
programmed (TXP-02) wristband transmitter, it will either trigger the “pre-alarm” warning or a main alarm
if the door is already opened.
3.3 Finally testing performance of the detection zone (refer to drawing 001/11)
3.3.1 General.
Before the system can be tested, it is first necessary to check the patient transmitter unit (TXP-02) is
switched on using the TTEST-01 test unit.
Note:
TXP-02 transmitters can be switched off only by entering “programming mode” and entering the password
as described in the Rondish transmitter programming instructions. Should a particular patient wristband
transmitter not be active (already switched off), the following steps should be followed:
(a) Please refer to drawing 001/4. Use a magnet or Caregiver key (CK-01) to activate the transmitter.
(b) To “switch on” a patient wristband transmitter, place the magnet/Caregiver key in contact with the
patient transmitter body (as indicated in the drawing 001/4) and observe the red LED inside.
(c) Continue to hold the magnet in this position for approximately three seconds. After this period, the red
LED inside the transmitter will “blink” three times. The unit is now activated (switched on) and emitting
signals that can be detected by the door monitor.
If the wristband is then worn and taken into the detection zone, the strip sensors will detect these signals.
Should the range of the detection field need to be adjusted, it is necessary to follow the procedure
described above and selecting a setting resulting in more, or less range, as required.
Notes:
1. These wristbands and door monitors are wireless devices and in practice the actual range for activation
of the door alarm can only be approximate. Therefore, the range will vary slightly from one activation, to
another.
2. The sound level of the sensor strip buzzer can be adjusted by turning VR1 with a small “crossed” screw
driver (clockwise to reduce level - see PCB and diagram 001/1).
3. Any other controls not mentioned I this instruction manual are used for factory settings and should not
be adjusted in the field.