
Assembly Instruction

800.301.9720 | roomandboard.com
4/1/13
assembly instructions: riley duo bunk bed
Directions
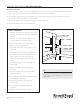
1. Hold left end upright near its desired placement.
2. With the metal bracket side of the side rail facing inward,
insert round metal connector “buttons” of the side
rail bracket into the “buttonholes” on the headboard
bracket. Tap top of rail with rubber mallet until
connector “buttons” are locked fully into lower position.
Repeat with the other side rail. See Diagram A.
3. Attach other ends of side rails to right end of bed as in
step 2.
4. Repeat steps 2 and 3 until all side rails are locked into
position.
5. Roll out corresponding slat rolls between top (twin) and
lower (full) side rails. The second slat from either end as
well as the middle slat of each roll should be positioned
between the cleat blocks as shown in Diagram B.
6. Secure each slat between cleats using 1¼" screws utilizing
the pre-drilled holes. See Diagram B.
6. Directions continued on page 2.
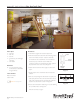
full-length guard fence
(back of top bunk)
59½" guard fence
left end
right end
ladder
List of parts
2 – bed ends
4 – side rails
2 – slat rolls
2 – guard fences (one full-length,
one 59½")
1 – bunk ladder
Hardware
17 – 1¼" coarse thread “bugle”
screws (black) to attach slats
and guard fences
Tools needed
Philips screwdriver
rubber mallet
Diagram A
Diagram B
side rail
bracket
button hole
headboard
bracket
button
cleats
side rail slat ledger
pre-drilled
holes
MADE IN Pennsylvania
MADE IN
Pennsylvania