
Measurement Guide

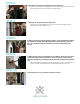

1. First, connect both portions of the tension rod.
• Slide/Twist the hollow tension rod tube over the silver connector piece until the
rods are fully attached.
• Turn the!hollow tension rod tube until the 2 holes!near the end of the tube are lined-
up over the screws in the silver connector piece.!
Thank you for your RoomDividersNow purchase! Instructions for installing your tension rod can be found below:
STEP 1:
STEP 4:
STEP 3:
CONTINUED
3. Now that the tension rod is attached and ready to go, we’ll begin to extend the rod.
• Locate the extension end cap of the tension rod and rotate the end cap counter-
clockwise to begin expanding the rod.
• If you are having trouble expanding the tension rod, make sure you are turning the
correct end of the rod that rotates counter-clockwise.
4. Extend the tension rod to a distance larger than the width of your space. For a
strong hold, please make sure to extend the rod within the size ranges below:
• Spaces 120in to 130in wide, extend the tension rod 1.75in to 3in wider than your space.
• Spaces 130in to 140in wide, extend the tension rod 3in to 4in wider than your space.
• Spaces 140in to 150in wide, extend the tension rod 4in to 5in wider than your space.
• Please note: the tension rod may bend if the rod is extended beyond the size ranges
provided above.
STEP 5:
5. To hang a curtain or room divider from your rod:
• Grab the smaller allen wrench from your tension rod box.
• Use the allen wrench to loosen (but don't remove) the set screws, on one of the
end caps, just enough to remove the end cap from the rod.
STEP 2:
2. Tighten the connection.
• Using the larger allen wrench found in your tension rod box,!turn the 4 screws
(already!installed at your point of connection) clockwise until tight.
• Tightening the screws will expand the silver connector (inside the tension rod)
providing a strong and sturdy connection between both sections of the rod.