ROPER” OWNER’S Home Appliances ELECTRIC DROP-IN MANUAL model D975 INSTALLATION CARE & USE RECIPES PART NO.
I THISPAGE
CONTENTS INSTALLATION USE AND CARE Important Instructions for Your Safety Your Oven and lts Features The Electronic Oven Control Oven Cooking Broiling Favorite American Recipes The Self-Clean Cycle Cleaning Tips Removable Range Parts SERVICE Replacing Oven Light Bulbs What to Do before Calling for Service Adjusting Oven Temperature WARRANTY EC0015
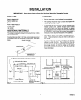
INSTALLATION IMPORTANT: Save these instructions for the local electrical TOOL LIST use. LOCATION Hand or electric drill Hand or saber saw Pencil Ruler or tape measure Straight edge l/8” drill bit ADDITIONAL inspector’s l l l MATERIALS This range is designed to hang from the counter top. It does not rest on the floor. l If countertop is less that 1-1/2”thick, reinforcing braces must be installed under the countertop, on each side. See figure below.
ELECTRICAL MAKE ELECTRICAL REQUIREMENTS 1. De-energize range branch circuit. 2. With range in front of opening, push flexible electrical cable through hole in floor or adjacent base cabinet and attach it to the junction box. Do not shorten this cable. The flexible cable connector must be securely attached to the junction box and the flexible cable must be securely attached to the connector.
INSTALL RANGE BE SURE RANGE BRANCH CIRCUIT IS DEENERGIZED. 1. Remove Oven Door n l Open the door to the stop position (see illustration). Grasp the door at each side and lift up and off the hinges. NOTE: When the door is removed and hinge arms are at stop position, do not bumportry to move the hinge arms. The hinges could snap back causing injury to the hands Or damage to the porcelain on the front of the range. Cover the hinges with toweling or empty towel rolls while working in the oven area.
IMPORTANT INSTRUCTIONS FOR YOUR SAFETY Teach or any Never where children not to play with range knobs other part of the range. leave children alone or unattended a range is in use. I Never leave the oven door open when you are not watching the range. Never let children sit or stand on the open oven door. CAUTION! Never store things children might want above a range. Never let anyone climb, sit or stand on the open door or any other part of the range. Their weight may make the range tip over.
IMPORTANT SAFETY INSTRUCTIONS Keep this book for later use. Be sure your range is installed and grounded properly. Choose pots and pans with flat bottoms, large enough to cover the entire cooktop element. This will cut down the risk of setting pot holders or clothing on fire with an uncovered element and waste less energy. Always use care when touching cooktop elements, areas near cooktop elements, oven heating elements or inside the oven.
Your Range IMPORTANT: The model and serial number of your range can be found on a tag located below the lift-up cooktop, at the rear. Copy the nt Jmbers into the box on the cover of this manual. n 12 1. Lift-Up Cooktop 7. Removable Oven Door 2. Oven Vent (below right rear element; area may get hot during oven use; DO NOT block vent) 8. Oven Door Gasket 3. Removable Cooktop Elements 9. Oven Bake Element 4. Oven Light Switch 10. Cooktop Control 5. Electronic Range Control (see next page) 11.
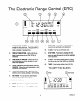
The Electronic Range Control (ERC) P 6 TIMER CLOCK sTop TIME CLEAN ;c; BROIL BAKE ------ 1. OVEN CANCEL BUlTON - Cancels everything except the clock and timer. Push this button to turn the oven off or to clear everything if you’ve made a mistake in programming. 9. COOK TIME - Push before setting length of cook time for automatic oven operations. 10. CLEAN - Push to use self-clean cycle. 2. DISPLAY INDICATORS - Light up to tell you what is being shown in the TIME DISPLAY WINDOW. 11.
To start things cooking Cooktop Cooking For best cooking results and energy efficient operalion, you should use pans that: A. Have flat bottoms and straight sides. B. Have light handles that do not tilt pans. C. Are about the same size as lhe element The sign near each cooktop control knob shows which element is turned on by that knob. 00 00 00 00 00 00 00 oa Left Rear Left Front Right Rear Right Front To operate cooktop controls: 1. Push to turn. 2. Set on or between marks for desired heat.
DELAYED BAKE CYCLE TO BAKE OR ROAST TURN TO SET LENGTH Q 3 PUSH WHEN FINISHED TURNTO SET TEMP TURN TO SET OVEN TURN TO SET TEMP Q 2 SET J TIMER CLOCK s:M4’ ------mmmmmm CLEAN FE; BROIL BAKE TIMER CLOCK s:M4’ ------mm F F 1 6 The red display will show the oven temperature as it rises (in 5” steps). BAKE -f--f- PUSH PUSH , PUSH When cook time has ended, a tone will sound and the oven will turn off. A tone will sound when the oven is ready.
Broiling 03 A Push When Finished 2 Do not cover the entlre broller grld with foil. Poor drainage of hot fat may cause a broiler flre. If a fire starts, close the oven door and turn controls off. If flre continues, throw baklng soda on the flre. Do not put water on the flre. G;rtfget 0 Broil \ POSITIONING TIMER CLOCK SToP TIME CLEAN ;f; Broiling is cooking by direct heat from the broil element. Tender cuts of meat or marinated meat should be selected for broiling.
Let the oven preheat thoroughly before cooking baked products. Allow 10 - 15 minutes preheat time. Avoid opening the door too often to check the food during baking as heat will be lost. This may result in poor baking results. Cakes, cookies, muffins, and quick breads should be baked in shiny pans - to reflect the heat - because they should have a light golden crust.
Favorite American Recipes A Collection from Around the Country LAZY-DAY COFFEE CAKE 3/4 cup margarine, 1 cup sugar 2 softened eggs 1 cup sour cream 2 cups all-purpose flour 1 teaspoon baking powder 1 teaspoon soda l/2 teaspoon salt 1 teaspoon nutmeg 3/4 cup light brown sugar l/2 cup chopped pecans 7 teaspoon cinnamon Cream margarine and sugar until light and fluffy. Add eggs and sour cream; mix well. Combine flour, baking powder, salt and nutmeg. Add to batter and mix well.
TWO CORN CASSEROLE l/2 cup margarine 314 cup chopped green pepper l/3 cup chopped onion 3 eggs, well beaten 17 oz. can cream style corn 17 oz. can whole kernel corn with liquid 8’12oz. pkg. corn muffin mix 1 cup cheddar cheese, shredded Preheat oven to 350” F. Saute green peppers and onion in margarine; combine with remaining ingredients except cheese. Pour into greased two (2) quart casserole; sprinkle with cheese and bake 45-55 minutes in 350°F oven. Let stand 5 minutes before serving.
The Self-Clean 4. Clean the door seal by using a clean sponge to soak the soiled area with hydrogen peroxide. Repeated soaking may be needed depending on the amount of soil. Frequent cleaning wi!l help prevent excessive soil build up. Do not rub the door seal. The fiberglass material of the seal has an extremely low resistance to abrasion. An intact and well fitting oven door seal is essential for energy efficient oven operation and good baking results.
TO SET SELF-CLEAN CYCLE (some models) TO INTERRUPT CYCLE A CLEAN P 1 PUSH L-“5 ~~.~~__.___. 4NCEL TIMER CLOCK ;;M4’ ----- CLEAN mm- COOK TIME BROIL TIMER CLOCK ;;; ------B!!ememEme BAKE mmmm A 1 BROIL PUSH TO SET DELAY SELF-CLEAN CYCLE after the controls are set The self-clean cycle lasts 3-1/2 hours When the oven reaches locking temperature the word LOCK WIII be shown in the ERC display.
Cleaning Tips On the following pages, all removable parts on your range are shown. Refer to those pages when cleaning your range. Do not use metal scouring mended. Warm, water. a mild detergent and a soft cloth are safe to use on all cleanable parts of your range. All-purpose cleaners, such as FantastikB, can also be used. Range cooktop finishes will be either porcelain enamel or brushed chrome. Porcelain enamel looks like a painted surface. Brushed chrome has a metallic appearance.
REMOVABLE KNOBS All control knobs may be removed for easy cleaning by pulling the knob straight off the stem. Be sure that the knob is in the OFF position before removal. MOLDED Hint: Slip a thin cloth (such as a handkerchief) or a piece of string under and around the knob edge and pull up. Cautlon: Read these instructions carefully before replaclng the knobs. Replacing the knobs Improperly will damage the knobs and the spring clip on the Stems. If this happens, the knobs will flt loosely.
LIFT-UP COOKTOP The cooktop can be raised so the area underneath can be cleaned. Raise the front of the cooktop until the support rods snap into position to hold the cooktop. To lower cooktop, push in on the front of the supports while lowering top. Porcelain enamel can chip. cooktops carefully. Handle porcelain enameled REMOVABLE OVEN RACKS Be careful not lo scratch the oven finish when installing or removing oven racks. To install: 1. Set the raised back edge of the rack on a pair of rack guides. 2.
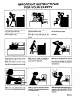
REPLACING THE OVEN LIGHT (self-cleaning models) Do not touch hot oven bulb. Do not touch oven bulb with wet hands. Do not wlpe oven light area with wet cloth. Unplug or disconnect the electrlcal supply to range before removlng. Never touch the electrically live collar on the bulb when replacing it. Electrical power must be shut off if you have to replace a broken bulb. 1. Remove the three screws and liff off the glass retainer, glass cover and gasket. COLLAR 2.
Before Calling for Service Save time and money - Check this list before you call for service. To eliminate unnecessary service calls, first, read all the instructions in this manual carefully. Then, if you have a problem, always check this list of common problems and possible solutions before you call for service. If you do have a problem you cannot fix yourself, call your nearest Store or Service Center for help. When calling.
Before Calling for Service PROBLEM l Foods do not broil properly DON’T CALL FOR SERVICE UNTIL YOU CHECK POSSIBLE CAUSE * Improper rack position Oven preheated Improper utensil used Oven door closed during broil l l l 9 Oven smokes l l l . Oven or work light does not work (if equipped) l l l Oven does not clean or poor cleaning results (self-clean models only) l l l Improper broiling time Check broil pan placement. See broiling section. Do not preheat when broiling.
THISPAGE INTENTIONAUY LEFTBLANK
I 1 ___ LIMITEDWARRANT! This Roper appliance is warranted by Whirlpool corporation to be free from defect in material and workmanship to the original domestic purchaser. Any parts which we find to be defective will be repaired or replaced at our option subject to the following limitations: RoPER A~BLOANGEB 1. Repair or replace during the first thirty (30) days from the date of purchase any finishes (porcelain, enamel or other) and glass parts which we find to be defective. 2.