[] Contents Dehumidifier Safety .................................. installation Instructions .............................. 2 3-4 Electrical Requirements ............................. Location Requirements ............................. Dehumidifier Use ................................... :3 4 5-8 Setting theControls ................................ Removing andEmptying WaterBucket .................. WaterLevelFloatandAutomatic Shutoff................. Dehumidifier Care .................................
Your safety and the safety of others are very important. We have provided many important safety messages in this manual and on your appliance. Always read and obey all safety messages. _1 his symbol is the safety This alerts alert you symbol. to potential hazards that can kill or hurt you and others. All safety messages will follow the safety alert symbol and either the word "DANGER" or '"WARNING." These words mean: You can be killed or seriously instructions.
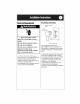
Electrical Requirements Grounding instructions 3 prongground-type outlet ....... 3 prong groundplug Electrical Shock Hazard Plug into a grounded 3 prong outlet. Do not remove ground prong. Do not use an adapter. Do not use an extension cord. Failure to follow these instructions can result in death, fire, or electrical shock. A 115-volt (103.5 min., 126.5 max.), 60-Hz, AC-only, 15- or 20-ampere fused and properly grounded electrical supply is required.
Location Requirements Good air circulation is needed for best performance - allow at least 12-18 in. (30.5 45.7 cm) of air space on all sides of the dehumidifier. Keep all outside doors, windows and other openings closed when operating dehumidifier. Humid outdoor air will increase dehumidifier workload. (30.5- 45.7cm] (30.5- 45.7cm) Install dehumidifier on a level floor strong enough to support the dehumidifier with a full bucket of water.
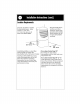
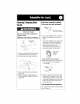
Setting theControls NOTE: Before turning dehumidifier be sure that: • Bucket is properly inserted into dehumidifier on, indicates the bucket is full .," OR .../" the bucket is not in position • Bucket is empty adjusts humidity removal set point (amount of moisture removed from room) ControlA Minimum operating temperature is65°F(18°C) indicates the bucket is fu!l ........ OR the bucket is not in position .......
Setting theControls o ....... ..,A.,, o C,,,T_.UOU_ o .... Control C .d_! __ OL0W _ Minimum 0perating temperature is44°F(7%) indicatesthe bucketis ful! ...."'"" OR ..... _ thebucketis not inposition _ 0 "';_:_,u. / J selectsmode To turn dehumidifier on Press the ON/OFF button. If the Empty/Adjust Bucket light comes on, the dehumidifier will not operate. Empty or adjust bucket. Each time you unplug the dehumidifier or power is interrupted, the control will return to your previous settings.
Removing & Emptying Water Bucket Drain hose connection method: (todrainwaterfrombucket continuously) I I _/ . cIFaln nose connectoF ......... i \ j" ..... cover(notonal!models) Sickness Hazard Do not drink water collected in water bucket. Doing so can result in sickness. --. ...... f ----- " 1. If your dehumidifier does not have a drain hose connector cover, go to Step 2. If your dehumidifier has a drain hose connector cover, use a flat-blade screwdriver to remove cover from drain connector.
WaterLevelFloat&Automatic Shutoff All dehumidifiers have automatic shutoff and a water level float. All dehumidifiers feature an adjustable Water Level Float. The bucket must be properly aligned for the Water Level Float to work. "High'setting: Water Level Float is preset to the"high" position - left side of opening.The dehumidifier will shut off automatically when bucket is % full. Water Level Float Adjustment: You can set the adjustable Water Level Float at the "high'or"low" position.
Youmaycleantheexterior ofyourproduct: General cleaning and maintenance Waterbucket cleaning 1. Dust the front grille and side panels with a soft brush or the dusting attachment of your vacuum. 2. If cabinet paint chips, you can touch up the paint with a good grade enamel paint to prevent rust. 3. Have an authorized servicer clean and the water bucket with a mild detergent to service the interior coils of your product annually.
If youneedserviceorcallwitha question, havethisinformation ready: Model number Serial number Purchase date Phone number Store Model and serial numbers are located on the wall behind the water bucket. 1.Before calling for assistance... 2.If youneedassistance in theU.S.A .... Performance problems often result from little things you can find and repair yourself without tools of any kind.
3.If youneedassistance or service inCanada... Contact the dealer from whom you purchased your appliance, or call the Customer Interaction Center toll free, 8:00 a.m.- 6:00 p.m. (EST), at 1-800-461-5681. OR Contact your nearest direct service branch or authorized servicing outlet to service your appliance. (See list below.) NOTE:When asking for help or service: Please provide a detailed description of the problem, your appliance's complete model and serial numbers, and the purchase date.
1187730 ©2003. All rights reserved. 11/03 Printed in U.S.A.
Contenido Seguridad deldeshumidificador ......................... instrucciones de instalaci6n .......................... 2 3-4 Requisitos el_ctricos .............................. Requisitos de,bicaci6n............................ C6mousareldeshumidificador ........................ 3 4 4-9 Ajuste deloscontroies ............................. C6mosacary vaciarelbaWedeagua.................. 4 7 Fiotador deniveldelaguay apagado autom_tico .......... Cuidado deldeshumidificador ...........................
Su seguridad y la seguridad de los demas es muy importante.
Requisitos el ctricos Instrucciones de conexi6n a tierra: Contactodepareddeconexidna tierracontresterminales Enchu_ tripo#rcon conexiGn "-..• .......... a fierra ''"I Peligro de Choque Electrico Conecte a un contacto de pared de conexi6n a tierra de 3 terminales. No quite el terminal de conexi6n a tierra. No use un adaptador. No use un cable electrico de extensi6n. No seguir estas instrucciones puede ocasionar la muerte, incendio o choque electrico. Se requiere una alimentaci6n el_ctrica de 115 volt.
Requisit0s deubicaci0n Para mejor rendimiento, necesita una buena Cuando est_ usando el deshumidificador, mantenga cerradas todas las puertas y ventanas que dan al exterior, y otras aberturas. El aire hOmedo del exterior se circulaci6n de aire - deje por Io menos de 12 a 18 pulg. (de 30,5 a 45,7 cm) de espacio para el aire alrededor del deshumidificador. aumentarh la carga de trabajo del deshumidificador.
Indicaqueelbaldeest_!leno .--'"" ControlB Temperatura minima de funcionamiento 55°F(13%) Selecciona la deventilaci6n 0 queelbaldeno est_bien colocado ........ Regula elpunto de ajuste de eliminaci6n de humedad (la cantidadde humedad que se elimina de la habitaci6n) Para encender el deshumidificador Velocidad de ventilaci6n (s61opara modelos con control B) Gire el DRYNESS CONTROL (CONTROL DE SEQUEDAD) en la direcci6n de las manecillas del reloj.
Ajuste deloscontroles Jndicaqueelbaldeest#!leno • "" ........... ControlC 0 queelbaldeno est#bien co!ocado Temperatura minima de funcionamiento 44°F(7°C) ........_'_.. Regula el punto de ajuste de eliminaciOnde •humedad (la canfidadde humedad que se elimina de la habitaciOn) Selecciona e!modo Para encender el deshumidificador Oprima el bot6n de ON/OFF (Encendido/Apagado). Si se enciende luz de EMPTY/ADJUST BUCKET (Vacie/Ajuste el balde), el deshumidificador no funcionar_.
Si usted ha seleccionado CONTINUOUS: Usted no puede seleccionar el nivel de humedad que desea quitar. En el modo continuo, el deshumidificador funcionar_ continuamente sin considerar el nivel de humedad. El deshumidificador se apagar_ solamente si el balde est_ Ileno o se quit6. NOTA: El deshelador apagar_ el compresor si existe un estado de baja temperatura. Oprimir _ o O no aumentar_ bajar_ la cantidad de humedad eliminada.
M_todo de conexi6n de la Parausarel baldesinla manguera dejardin: manguera de desagiie: Use un casquete de manguera de jardin para sellar el conector de la manguera de desagOe. (parasacaraguadelbaldecontinuamente) _,_, i _'_gg_ -- tapadelconectordela _ ,. "i _/-\__.... manguera dedesague(no I '_) ..... entodoslosmodelos) 1. Si su deshumidificador no tiene una tapa del conector de la manguera desagOe, vaya al paso 2.
Laposici6n "Alta": elFlotador deNiveldel Aguaest_preseleccionado enla posici6n de"alta';al ladoizquierdo dela abertura. Eldeshumidificador seapagar_ autom_ticamente cuando elbaldeest_ %Ileno. Laposicidn "Baja": deslice elFlotador de NiveldelAguaa laposicidn de"baja';al ladoderecho delaabertura, paraqueel baldeest_m_slivianopara transportarlo. Eldeshumidificador se apagar_ autom_ticamente cuando el baldeest_%Ileno.
Sinecesita servicio t_cnicoo Ilamarparahaceralgunapregunta, tengalista estainformacion: Numero del modelo Numero de serie Fecha de compra Numero de telefono Tienda El nOmero del modelo y el nOmero de serie est_n ubicados en la pared detr_s del balde de agua. 1.Antes deIlamarpara solicitar ayuda... Los problemas de funcionamiento con frecuencia se deben a pequehas cosas que usted mismo puede Iocalizar y arreglar sin necesidad de herramientas.
3.Sinecesita ayuda o servicio t cnicoen Canada... Contacte al distribuidor que le vendi6 su aparato, o Ilame gratis al Centro de Interacci6n del cliente, de 8:00 a.m. a 6:00 p.m. (hora del este), al 1-800-461-5681. 0 Contacte a la sucursal de servicio directo o al centro de servicio autorizado m_s cercano para darle servicio t_cnico a su aparato. (Vea la lista a bajo.
1187731:) 02003. Todos los derechos reservados. 1!/03 Impreso en los EE.UU.