M BY WHIRLPOOL CORPORATION ELECTRICAND GAS DRYERS U_ & Care Guide For questions about features, operation/performance, parts, accessories or service call: 1-800-447-6737 or visit our website at www.roperappliances.com Table of Contents ............................................................ "_mw_, m .
TABLEOF CONTENTS DRYER SAFETY ............................................................... 3 PARTS ANDFEATURES 5 .................................................. CHECKING YOURVENT .................................................... 6 DRYER USE ......................................................................... Starting Your Dryer ........................................................... Stopping and Restarting ................................................... Loading Clothes .........
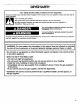
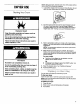
DRYERSAFETY Your safety and the safety of others are very important. We have provided many important safety messages in this manual and on your appliance. Always read and obey all safety messages, This symbol alerts you to potential hazards that can kill or hurt you and others. All safety follow the safety alert symbol and either the word "DANGER" or This is themessages safety alertwill symbol.
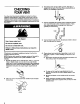
IMPORTANT SAFETY INSTRUCTIONS WARNING: To reduce the risk of fire, electric shock, or injury to persons when using the dryer, follow basic precautions, including the following: • • • • • • Read all instructions before using the dryer. Do not place items exposed to cooking oils in your dryer. Items contaminated with cooking oils may contribute to a chemical reaction that could cause a load to catch fire.
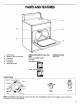
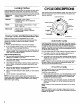
PARTSAND FEATURES 1. 2. Control panel Model and serial number label Additional have 3. 4. Dryer drum Unt screen End of Cycle Signal selector 5. Exhaust grill Large side-swing door 6.
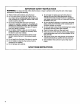
3. The exhaust vent can be muted up, down, left, fight, or straight out the back of the dryer. Space reduimments are listed in your Installation Instructions. 4. Use the straightest path possible when muting the exhaust vent. Use the fewest number of aibows and turns. Allow room when using elbows or making turns. Bend vent gradually to avoid kinking. 5. Use duct tape to seal all joints. Do not use screws to secure vent. Lint may catch on screws. 6.
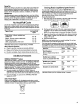
Before using your dryer, wipe the dryer drum with a damp cloth to remove dust from storing and shipping. DRYERUSE Sta ng 1. Load clothes loosely into the dryer and close the door. Do not pack the dryer. Allow space for clothes to tumble freely. 2. Turn the Cycle Control knob to the recommended cycle for the type of load being dried. Use the Energy Preferred Automatic Setting (*) to dry most heavyweight and medium weight loads. See "Drying, Cycle, and Temperature Tips." 3.
CYCLEDESCRIPTIONS Loading Clolhes Load clothes loosely into the dryer. Do not pack the dryer. Allow space for clothes to tumble freely. The following chart shows examples of balanced loads that would allow for proper tumbling.
DampDry Selectthissetting todryitems to a damp level or dry items that do not require an entire drying cycle. Damp dry items such as jeans (to prevent stiffness) or cotton clothes (to make pressing easier). Set the Temperature selector, if available, to High heat. Wrinkle Free Use this setting to remove wrinkles from items, such as clothes packed in a suitcase or items wrinkled from being left in the dryer too long.
DRYERCARE To wash 1. Wet both sides of lint screen with hot water. 2. Wet a nylon brush with hot water and liquid detergent. Scrub lint screen with the brush to remove residue buildup. 3. Rinse screen with hot water, Cleaning fine Unf Scr n Every load cleaning The lint screen is located on the top of the dryer. Clean it before each load. A screen blocked by lint can increase drying time. To clean 1. Pull the lint screen towards you. Roll lint off the screen with your fingers.
"[ROUBLESHOOTING Removing Accumulated Lint from inside the Dryer Cabinet Unt should be removed every two years, or more often, depending on dryer usage. Cleaning should be done by a qualified person. First try the soluUons suggested here and possibly avoid the cost of a service call... Clothes are not drying setisfactodly Changing the Drum light (on some models) The dryer light automatically you open the door.
Unt on load a a Is the lint screen clogged? Clean lint screen. Check for air movement. Is the load properly sorted? Sort lint givers (towels, chenille) from lint takers (corduroy, synthetics). Also sort by color. = Is the load too big or too heavy?. Dry smallerloadsso lintcan be carriedto the lintscreen, • Was the load overdrled? Use correct dryer settings for load type. Overdrying can cause lint-attracting static electricity. See "Drying, Cycle, and Temperature Tips.
ASSISTANCEOR SERVICE Before calling for assistance or service, please check "Troubleshooting." It may save you the cost of a service call. If you still need help, follow the instructions below. When calling, please know the purchase date and the complete model and serial number of your appliance. This information will help us to better respond to your request. If you need replacement parts If you need to order replacement parts, we recommend that you only usa FSP= replacement parts.
Notes 14
Notes 15
ROPER=DRYERWARRANTY ONE-YEAR FULL WARRANTY For one year from the date of purchase, when this dryer is operated and maintained according to instructions attached to or furnished with the product, Whirlpool Corporation will pay for FSP ® replacement parts and repair labor to correct defects in materials or workmanship. Service must be provided by a Whirlpool designated service company. Whirlpool Corporation will not pay for: 1. Service calls to correct the installation of your dryer, including venting.