ELECTRIC RANGES oCUISINIERES ELECTRIQUES Table of Contents/Table 9754174A des matieres ..................
TABLEOF CONTENTS TABLEDESMATIERES RANG E SAFETY ............................................................................. The Anti-Tip Bracket .................................................................... PARTS AND FEATURES ................................................................ 3 3 6 SECURITE DE LA CUlSINIERE ................................................... La bride antibasculement ........................................................... PII_CES ET CARACTI_RISTIOUES ..........
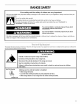
RANGESAFETY Your safety and the safety of others are very important. We have provided many important safety messages in this manual and on your appliance. Always read and obey all safety messages. This symbol alerts you to potential hazards that can kill or hurt you and others. All follow the safety alert symbol and either the word "DANGER" or Thissafety is themessages safety alertwillsymbol. "WARNING.
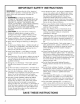
iMPORTANT SAFETY iNSTRUCTiONS WARNING: To reduce the risk of fire, electrical shock, injury to persons, or damage when using the range, follow basic precautions, including the following: [] WARNING: TO REDUCE THE RISK OF TIPPING OF THE RANGE, THE RANGE MUST BE SECURED BY PROPERLY INSTALLED ANTI-TIP DEVICES. TO CHECK IF THE DEVICES ARE INSTALLED PROPERLY, SLIDE RANGE FORWARD, LOOK FOR ANTI-TIP BRACKET SECURELY ATTACHED TO FLOOR, AND SLIDE RANGE BACK SO REAR RANGE FOOT IS UNDER ANTI-TIP BRACKET.
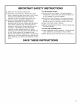
IMPORTANT SAFETY INSTRUCTIONS • Keep Oven Vent Ducts Unobstructed. For self-cleaning ranges - • Placement of Oven Racks - Always place oven racks in desired location while oven is cool. If rack must be moved while oven is hot, do not let potholder contact hot heating element in oven. • DO NOT TOUCH HEATING ELEMENTS OR INTERIOR SURFACES OF OVEN - Heating elements may be hot even though they are dark in color. Interior surfaces of an oven become hot enough to cause burns.
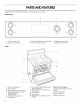
PARTSAND FEATURES This manual covers several different models. The range you have purchased may have some or all of the items listed. The locations and appearances of the features shown here may not match those of your model. Control Panel OF_A_aET O;F'ARRET lOW _A× LOW MAX 1 , 2 8 1_9 3 AR_IE_ ARRIER_ 2 8 _EAR 7 2e0 m 5 lOW 9 OF 150 _AX lOW MAX 1 2 8 1_9 3 7 150 AVA_ OVEN,_OUR F_ONT 9 AVAN_ 2 8 3 2 1. Left rear control knob 3. Electronic Display (on some models) 4.
COOKTOP USE Power On Lights The Power On lights beside the control knobs indicate which surface elements are turned on. A Power On light will glow when its corresponding surface element is turned on. ......... _1111 o 1. Powor on light Fire Hazard Turn off all controls when done cooking. Failure to do so can result in death or fire. Control knobs must be pushed in before turning them to a setting.
• Do not use plastic wrap to cover food. Plastic wrap may melt. • Use pot holders or oven mitts to remove food. 0 Use flat-bottomed cookware for best heat conduction and energy efficiency. Cookware with rounded, warped, ribbed or dented bottoms could cause uneven heating and poor cooking results. Determine flatness by placing the straight edge of a ruler across the bottom of the cookware. While you rotate the ruler, no space or light should be visible between it and the cookware. ON db To Use: 1.
Coilelements should belevelforoptimal cooking results. Burner bowls,whenclean, reflectheatbacktothecookware. Theyalso helpcatchspills. Cookware shouldnotextend morethan1in.(2.5cm)overthe coilelement. Ifcookware isuneven ortoolarge,itcanproduce excess heatcausing theburnerbowltochange color.Formore information, seethe"General Cleaning" section. NOTE: Before removing orreplacing coilelements andburner bowls,makesuretheyarecoolandthecontrol knobsareinthe offposition.
Usethefollowing chartasaguideforcookware material characteristics. COOKWARE CHARACTERISTICS Aluminum • Heats quickly and evenly. • Suitable for all types of cooking. • Medium or heavy thickness is best for most cooking tasks. • Heats slowly and evenly. • Good for browning and frying. • Maintains heat for slow cooking. Ceramic or • Follow manufacturer's Ceramic glass • Heats slowly, but unevenly. • Ideal results on low to medium heat settings. Copper • Heats very quickly and evenly.
The minute timer does not start or stop the oven. It works like a regular minute timer independent of the oven to time anything you like. The minute timer can be set in 1-minute increments up to 12 hours. IMPORTANT: Never place food or bakeware directly on the oven door or bottom. Permanent damage will occur to the porcelain finish. To use the Minute RACKS NOTES: Timer: 1. Press the TIMER pad (button). 2. Press the up or down pad (button) to set the TIMER.
This rack is located at the top of oven the storage drawer, and is designed to hold the broiler pan and broiler pan grid, allowing you to maximize the space within your oven storage drawer. 1. Oven vent coil element cooktop models The bakeware material affects cooking results. Follow manufacturer's recommendations and use the bakeware size recommended in the recipe. Use the following chart as a guide.
LgI't The oven light is turned on by the switch located on the control console. The oven does not need to be on for the light to come on. Before baking and roasting, position the racks according to the "Positioning Racks and Bakeware" section. When roasting, it is not necessary to wait for the oven to preheat before putting food in, unless recommended in the recipe. To Bake or Roast: 1. 2. Push in and turn the oven control knob to the desired temperature setting.
BROILING CHART RANGECARE For best results, place food 3 in. (7 cm) or more from the broil element. Times are guidelines only and may need to be adjusted for individual foods and tastes. Recommended rack positions are numbered from the bottom (1) to the top (5). For diagram, see the "Positioning Racks and Bakeware" section. FOOD Steak 1 in. (2.5 cm) thick medium rare medium well done RACK POSITION COOK TIME (in minutes) Side 1 Side 2 occur.
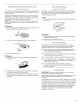
To Replace: 1. Hold oven door by the handle and place the top of the door under the cooktop overhang. 2. The 120v appliance outlets located on the control console may be used to run portable appliances placed on countertops beside the range. Use front of leg to apply pressure to slide hinges into the slots as far as possible. 3. Use side of leg to apply pressure to the bottom of the door front. The outlets operate independently control settings. 4. Lift door slightly.
SURFACE IMPORTANT: Before cleaning, make sure all controls are off and the oven and cooktop are cool. Always follow label instructions on cleaning products. Soap, water and a soft cloth or sponge are suggested first unless otherwise noted. UNDER ENAMEL For more information, • Steel-wool • Gently clean around the model and serial number plate because scrubbing may remove numbers. CONTROLS Do not use steel wool, abrasive cleansers or oven cleaner. Do not soak knobs.
TROUBLESHOOTING Try the solutions suggested here first in order to avoid the cost of an unnecessary service call. Oven temperature On slide-in models, does the cooling fan run during Bake, Broil or Clean? It is normal for the fan to automatically run when the oven is in use. This helps cool the electronic control. Nothing will operate • Is the power supply cord unplugged? Plug into a greunded 3-prong outlet.
SECURITEDE LA CUISlNIERE Votre s_curit_ et celle des autres est tres importante. Nous donnons de nombreux messages de securit6 importants dans ce manuel et sur votre appareil menager. Assurez-vous de toujours lire tous les messages de securit6 et de vous y conformer. _ Ce symbole d'alerte de securite vous signale les dangers potentiels de deces et de blessures graves & vous et & d'autres.
IIVIPORTANTES iNSTRUCTiONS AVERTISSEMENT : Pour reduire le risque d'incendie, de choc 6iectrique, de blessures ou de dommages Iors de I'utilisatJon de la cuisiniere, il convient d'observer certaines pr6cautions 616mentaires dont les suivantes : [] AVERTISSEMENT : POURMINIMISERLE RISQUE DE BASCULEMENT DE LA CUISINIF:RE, ELLE DOlT €:TRE BIEN IMMOBILISI2E PAR DES DISPOSITIFS ANTIBASCULEMENT CORRECTEMENT INSTALLES.
IMPORTANTES INSTRUCTIONS [] Ne pas tremper les el6ments de chauffage amovibles - Les el6ments de chauffage ne doivent jamais 6tre immerges dans I'eau. [] Ne pas faire cuire sur une table de cuisson endommagee - Si la table de cuisson est bris6e, les solutions de nettoyage et les renversements peuvent pen6trer dans la table de cuisson brisee et creer un risque d'un choc electrique. Contacter immediatement un technicien qualifie.
PIECESETCARACTERISTIQUES Ce manuel couvre plusieurs modeles differents. La cuisiniere que vous avez achetee peut comporter quelques-uns ou tousles enumeres. L'emplacement et I'apparence des caracteristiques illustrees peuvent _tre differents de ceux de votre modele.
UTILISATIONDE LATABLEDECUISSON N'OUBUEZ PAS : Quand I'appareil est utilise ou (sur certains modeles) durant le programme d'autonettoyage, toute la surface de la table de cuisson peut devenir chaude. T_moins d'alimentation Les temoins d'alimentation a c6te des boutons de commande indiquent quels elements de surface sont allumes. Un temoin d'alimentation s'illumine Iorsque son element de surface correspondant est allum& Risque d'incendie Fermer tous les r_glages Iorsque la cuisson est termin_e.
• Utiliser des ustensiles de cuisson de la m_me taille environ que la zone de cuisson a la surface. L'ustensile de cuisson ne doit pas depasser de plus de 1 po (2,5 cm) de la zone de cuisson. Utiliser des mitaines de four ou des poignees pour retirer les aliments. I// ON \\ db \ Utilisation : 1. Regler le commutateur a ON (marche). 2. a OFF (arr_t) apres avoir termin& Regler le commutateur , *, ,_, , £ .....
R_installation 1. : Aligner les ouvertures de la cuvette du brQleur avec la prise de I'element. \ La lumiere de la table de cuisson se trouve en haut du panneau de commande. Le commutateur se trouve sur le panneau de commande. Enfoncer le commutateur pour allumer la lumiere. La lumiere peut prendre quelques secondes pour s'allumer. Les _lements en spirale devraient 6tre a niveau pour une cuisson ideale.
COMMANDE IMPORTANT : Ne jamais laisser un ustensile de cuisson vide sur une surface de cuisson, un element ou un brQleur de surface chauds. ELECTRONIQUE DU FOUR Les ustensiles de cuisson ideals doivent avoir un fond plat, des parois droites, un couvercle qui ferme bien et le materiau dolt _tre d'epaisseur moyenne a forte, Les finis rugueux peuvent egratigner la table de cuisson. L'aluminium et le cuivre peuvent _tre utilises comme fond ou base d'un ustensile de cuisson.
La minuterie ne met pas en marche et n'arr_te pas le four. Erie fonctionne comme une minuterie ordinaire independamment du four pour minuter ce que vous souhaitez. La minuterie peut @re reglee par tranches de 1 minute jusqu'a 12 heures. Pour utiliser la minuterie : 1. Appuyer sur la touche (bouton) TIMER (minuterie). 2. Appuyer sur la touche (bouton) "vers le haut" ou "vers le bas" pour regler la MINUTERIE. La minuterie se mettra en marche automatiquement 5 secondes apres que I'heure soit entree.
USTENSILES CUlSSON/ RI_SULTATS DE Plats en verre, vitroceramique ou c_ramique allant au four • RECOMMANDATIONS • Peut n_cessiter de reduire la temperature de cuisson de 25°F (15°C). Cro_tes brunes, croustillantes Ce support se trouve & la partie sup@ieure du tiroir de rangement et il est congu pour ranger la lechefrite et sa grille et vous permettre de maximiser I'espace dans le tiroir de rangement du four. Le mat@riau des ustensiles de cuisson affecte les r@sultats de cuisson.
La lumiere du four s'allume au moyen du commutateur situe sur le tableau de commande. Le four n'a pas besoin d'etre en marche pour que cette lumiere s'allume. La cuisson au gril utilise la chaleur radiante directe pour cuire les aliments. Le changement de temperature Iors de la cuisson au gril permet d'obtenir des resultats plus precis. Plus la temperature est basse, plus la cuisson est lente.
TABLEAU DE CUISSON AU GRIL Pour obtenir les meilleurs resultats, placer I'aliment a au moins 3 po (7 cm) de I'element du gril. Les durees de cuisson sont citees a titre indicatif seulement; on peut les ajuster en fonction des aliments et goQts personnels. Les positions recommandees de la grille sent enumer6es de la base (1)jusqu'en haut (5). Pour le schema, voir la section "Positionnement des grilles et ustensiles de cuisson'.
.......... pou menc ge s Pour r_installer la porte : 1. Tenir la porte du four par la poignee et placer le dessus de la porte sous le porte-a-faux de la table de cuisson. 2. Les prises de 120 V pour appareils menagers sur la console de commande peuvent _tre utilisees pour des appareils menagers portatifs places sur le comptoir a c6te de la cuisiniere. Avec le devant de la jambe, appliquer une pression de fagon glisser les charnieres dans les fentes aussi loin que possible. 3.
• Produit nettoyant leg_rement abrasif : Frotter avec un tampon de recurage humide. IMPORTANT : Avant le nettoyage, s'assurer que toutes les commandes sont desactivees et que le four et la table de cuisson sont refroidis. Toujours suivre les instructions sur les etiquettes des produits nettoyants. I_mail de porcelaine • Lave-vaisselle SURFACE modules) Du savon, de I'eau et un linge doux ou une eponge sont recommandes, & moins d'indication contraire.
DEPANNAGE Essayer les solutions sugger6es ici d'abord afin d'eviter le coot d'une visite de service non necessaire. Rien ne fonctionne • • Est-ce que le cordon d'alimentation est debranche? Brancher sur une prise reliee & la terre (a trois alveoles). • Un fusible est-il grill_ ou le disjoncteur s'est-il ouvert? Remplacer le fusible ou remettre le disjoncteur en fonction.