Table of Contents ......... 2 (complete) A Note to You ................ 2 m 1 Refrigerator Safety ....... 3 Parts and Features ....... 4 Before Using Your Refrigerator.. ................. 5 Using Your Refrigerator.. ................. 7 Caring for Your Refrigerator.. ............... 15 Food Storage Guide ........................... 19 Troubleshooting ......... 21 Requesting Assistance or Service.. .................. 22 Index ........................... 23 Warranty .....................
Table of Contents Using the optional automatic ice maker ........................................... 10 Changing the light bulb ...................... 11 Before Using Your Refrigerator .............. 5 Understanding the sounds you may hear ..................................... 12 Cleaning your refrigerator .................... 5 Saving energy .................................... 12 A Note to You ............................................ 2 Refrigerator Safety ...................................
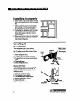
Refrigerator Your safety is important Safety to us. This guide contains statements under warning symbols. Please pay special attention to these symbols and follow any instructions given. Here is a brief explanation of the use of the symbol. IMPORTANT SAFtXY Read all instructions before using the refrigerator. l Chikf entrapment and suffocation are not problems of the past. Junked or abandoned refrigerators are still dangerous . . . even if they will “just sit in the garage a few days.
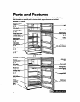
Parts and Features Below are illustrations of your appliance with the parts and features called out. To help you find information on specific parts or features faster, page references are included. Model RT18DK Freezer control Juice can rack Door shelf I I I \ Maet drawer Refrigerator control panel @- 7) mw compartment Stationary door shelvw (P.
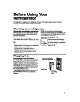
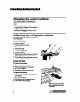
Before Using Your Refrigerator It is important to prepare your refrigerator for use. This section tells you how to clean it, connect it to a power source, install it, and level it. Cleaning Removing your packaging refrigerator materials Remove tape and any inside labels (except the model and serial number label) before using the refrigerator. To remove any remaining glue: Rub briskly with thumb to make a ball, then remove.
Installing it properly 1. Allow I% inch (1.25 cm) air space on each side of the refrigerator for ease of installation. 2. Allow 1 inch (2.5 cm) air space behind and 3 inches (7.5 cm) air space ahove the refrigerator for proper circulation. 3. If instalting the refrigerator with the hinge side against a wall, you might want to leave extra space so the door can he opened wider. 4. Make sure the fbor below the refrigerator is level and strong enough to support a fully-loaded refrigerator.
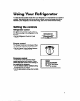
Using Your Refrigerator To obtain the best possible results from your refrigerator, it is important that you operate it properly. This sections tells you how to set the controls, remove and adjust some of the features in your refrigerator, how to save energy, and how to reverse the door swing. Setting the controls Refrigerator control The Refrigerator Control is in the refrfgerator. When you plug in the refrigerator for the first time: l Set the Refrigerator Control to 0 (mid setting).
Changing the control settings If you need to adjust the temperature in either compartment, keep these things in mind: l Adjusting the Refrigerator Control or the Freezer Control changes the temperature in BOTH compartments. l Setting the Refrigerator Control to OFF stops cooling in BOTH compartments. Adjusting the refrigerator shelves Adjust the shelves to match the way you use your refrigerator. Model RT18DK To remove shelves: 1. 2. 3. 4. Remove items from shelf. Tilt shelf up at front.
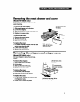
Removing (Model RTISDK the meat drawer and cover only) Remove the meat drawer and cover for easier cleaning. Lift the front, then the back. To remove the meat drawer: 1. Slide meat drawer out to the stop. 2. Lift the front slightly. 3. Slide meat drawer out the rest of the way. 4. Replace in reverse order. To remove the cover: 1. Remove the meat drawer. 2. Tilt front of cover up. 3. Pull cover up and out. To replace the cover: 1. Fit bottom notches of cover over rear and center cross bars of shelf. 2.
Using the ice cube trays If cubes are not used, they may shrink. The moving cob air starts a slow evaporation. The longer you store cubes, the smaller they get. To remove ice: 1. Hold tray at both ends, 2. Twist slightly. Using the optional automatic ice maker If your refrigerator has an automatic ice maker, or if you plan to add one later (Kit No. FRKIT94). here are a few things you will want to know. l The ON/OFF lever is a wire signal arm.
Solving common ice maker PROBLEM Ice crescents attached at corners Ice maker will not operate or Ice is not made fast enough Off-taste or odor In ke POSSIBLE CAUSE/SOLUTION l l l l l l l Changing Electrkal problems This is normal. They break apart easily. Shake bin occasionally to keep cubes separated. ON/OFF lever is in the OFF (up) position. Lower lever to the ON (down) position. Freezer is not cold enough. Adjust temperature controls and wait 24 hours.
Understanding the sounds Your new refrigerator may make sounds that your old one didn’t. Because the sounds are new to you, you might be concerned about them. Don’t be. Most of the new sounds are normal. Hard surfaces like the floor, walls, and cabinets can make the sounds seem louder. The following describes the kinds of sounds that might be new to you, and what may be making them. Slight hum, soft hiss You may hear the refrigerator’s and moving air.
Reversing the door swing If you wish to reverse the swing of the doors, follow the steps below. NOTE: lf removing doors to move refrfgerator through a doon,vay, and not reversing the door swing, it may not be necessary to remove the bottom hinge. To reverse the door swing: 1. Remove the top hinge assembly as shown. Keep all parts together. After removing top hinge assembly, lift freezer door up off center hinge.
5. Remove both handle assemblies as shown. Keep all parts together. Remove hole plugs from opposite side of doors. Reinstall handles on new side. Seal all original holes with hole plugs from new side. MODEL RT18DK w 10. Remove screws (or plugs) from the hinge holes in the top of the cabinet and reinstall them in the opposite side. Freezer handle Refrigerator handle II M MODEL RT18EK ?’ I 11. Remove plug from upper bearing of freezer door and reinstall on opposite side. r-- /--------I D 6.
Caring for Your Refrigerator Your refrigerator is built to give you many years of dependable service. However, there are a few things you can do to help extend its product life. Thii section tells you how to clean your refrigerator and what to do when going on vacation, moving, or during a power outage. Cleaning q . your refrigerator Both the refrigerator and freezer sections defrost automatically. However, clean both about once a month to help prevent odors from building up.
PART WHAT TO USE HOW TO CLEAN Door liners and gaskets Sponge, soft cloth, or paper towel with mib detergent and warm water l Plastic parts Soft, clean sponge or soft, clean cloth with miki detergent and warm water (covers and pane4 Defrost pan (behind refrigerator on top of compressor) Sponge or cloth with mild detergent and warm water l l l l (on hack of cabinet) Vacuum cleaner with extended narrow attachment l l l l Floor under refrigerator Floor cleaners l l l l 16 Roll refrigerat
Vacation Long and moving vacations If you will be gone a month or more: 1. Remove all food from the refrigerator. 2. If your refrigerator has an automatic ice maker: l Turn off the water supply to the ice maker at least one day ahead of time. l When the last load of ice drops, turn off the ice maker. Make sure all ice is dispensed out of the ice maker mechanism. 3. Unplug the refrigerator. 4. Clean it, rinse well, and dry. 5.
Power interruptions If ebctricii goes off, call the power company. Ask how long power will he off. 1. If service will he interrupted 24 hours or less, keep both doors closed. This helps foods stay frozen. 2. If service will he interrupted longer than 24 hours: (a) Remove all frozen food and store in a frozen food locker. OR (b) Place 2 Ihs. (0.9 kg) of dry be in freezer for every cubic foot of freezer space. Thii will keep food frozen for 2 to 4 days. Wear gloves to protect your hands from dry be bums.
Food Storage Guide There is a correct way to package and store refrigerated or frozen food. To keep food fresher, longer, take the time to study these recommended steps. Storing fresh food Wrap or store food in the refrigerator in airtight and moisture-proof material. This prevents food odor and taste transfer throughout the refrigerator. For dated products, check code date to ensure freshness. Leafy vegetables Remove store wrapping and trim or tear off bruised and discolored areas.
Storing frozen food The freezer section is designed for storage of commercially frozen food and for freezing food at home. NOTE: For further information about preparing food for freezing or food storage times, contact your local Cooperative Extension Service or check a freezer guide or reliable cookbook. Packaging The secret of successful freezing is in the packaging. The way you close and seal the package must not allow air or moisture in or out.
Troubleshooting Listed in the chart below are the most common problems consumers run into with their refrigerator. Please read through this chart before calling for service. It could save you the cost of a service call.
Assistance Requesting Service or Before calling for assistance or service, please check “Troubleshooting” on page 21. lt may save you the cost of a service call. If you still need help, follow the instructions below. 1. lf you need w Ea kssistance’ ... Call our tolCfree telephone number. Dial free from anywhere In the U.S.A.: 1-8004440PER (1-800-447~737) and talk with one of our trained consultants.
Index This index is alphabetical. page number. - Look for the word or phrase you are interested in, then look for the PAGE TOPIC CARE Moving .................................................. Power interruptions ............................... Vacation ................................................ CLEANING ...................................... 17 18 17 5, 15-16 8 7 CRISPERS Cover ................... . .................................. Removing ................................................
ROPER” Refrigerator r LENGTH OF WARRANTY Warranty WE WILL PAY FOR FULL ONE-YEAR WARRANTY FSP@ replacement parts and repair labor to correct defects in materials or workmanship. Service must be provided by an authorized Roper service company. (from date of purchase) FULL FIVE-Y EAR WARRANTV FSP replacement parts and repair labor for the sealed refrigeration system (compressor, evaporator, condenser, drier, or connecting tubing) which we find to be defective in materials or workmanship.