Vista DVI Plus KVM Switch with USB / Audio INSTALLATION AND OPERATIONS MANUAL 10707 Stancliff Road Houston, Texas 77099 Phone: (281) 933-7673 WWW.ROSE.
LIMITED WARRANTY Rose Electronics® warrants the Vista DVI Plus to be in good working order for one year from the date of purchase from Rose Electronics or an authorized dealer. Should this product fail to be in good working order at any time during this one-year warranty period, Rose Electronics will, at its option, repair or replace the Unit as set forth below. Repair parts and replacement units will be either reconditioned or new. All replaced parts become the property of Rose Electronics.
DECLARATION of CONFORMITY DECLARATION OF CONFORMITY ACCORDING TO COUNCIL DIRECTIVE 93/68/EEC Electromagnetic Compatibility Directive 89/336/EEC This equipment is in conformity with the protection requirements of the following Council Directives: The Declaration of Conformity is based upon compliance of the product with the following harmonized standards: EN55022: Radio Frequency Energy All interface cables used with this equipment must be shielded in order to maintain compliance with radio frequency energ
TABLE of CONTENTS Contents Page # Disclaimer .................................................................................................................................1 System Introduction...................................................................................................................1 Features ....................................................................................................................................1 Package Contents ......................................
INTRODUCTION Disclaimer While every precaution has been taken in the preparation of this manual, the manufacturer assumes no responsibility for errors or omissions. Neither does the manufacturer assume any liability for damages resulting from the use of the information contained herein. The manufacturer reserves the right to change the specifications, functions, or circuitry of the product without notice.
MODELS Package Contents Vista DVI Plus unit as ordered Flash cable (Optional for the 1x4 model) Power adapter + power cord Rackmount brackets (Optional for the 1x4 model) Documentation CD Models The Vista DVI Plus is available in 2 different configurations. All models operate the same and computers and peripherals are switched in the same manor.
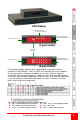
LED display Peripherals switched to selected computer Select Peripherals (KVM, SPK, USB1 / 2) Select computer (1-4) (4 port model) Selected Computer Select Peripherals (KVM, SPK, USB1 / 2) Select computer (1-8) (8 port model) The front panel display indicates which computer port is selected and which peripherals (KVM, Speakers, USB1 or USB2) are switched to the current computer.
INSTALLATION Installation Installation of the Vista DVI Plus unit consists of: 1. Connecting the User console equipment to the unit 2. Connecting the USB peripherals to the unit 3. Connecting the Computers to the unit 4. Applying power to all equipment The following installation instructions are a guide to properly connecting all of the equipment to the Vista DVI Plus unit.
3- Connecting the Computers to the unit Up to 4 single head computers can be connected to the Vista DVI Plus unit. (8 single head computers on the 1 x 8 model) Connect each computer’s DVI video output to the corresponding DVI-I connector on the Vista DVI Plus rear panel using a DVI MM video cable. Using a USB type A/B cable, connect each USB type B port on the Vista DVI Plus unit to the corresponding USB type A connector on each computer. A stereo 3.
OPERATION System Operation Selecting / switching to a computer There are four ways to switch to a computer: 1- Using the front panel controls 2- Using hotkeys 3- Using mouse button presses 4- Serial command to the “Option” port 1- Front panel controls The front panel controls (Figure 1) consist of two buttons, “Computer” and “Mode”, and a LED display showing which peripherals are connected to the selected computer.
2- HotKey switching The User Console USB keyboard can be used to issue Hotkey commands to the Vista DVI Plus unit. These hotkey commands can quickly switch the keyboard, monitor, mouse, speakers, and the USB peripherals to any computer channel. The default hotkey is the Ctrl + Alt key pressed simultaneously. If the default hotkey setting conflicts with other software or hardware, it can be easily changed to one of seven choices or hotkey switching can be disabled.
4- Serial command to the “Option” port To switch channels using serial commands to the “Option” port, connect a serial cable from a computer’s serial port to the “Option” port on the Vista DVI Plus unit. The serial cable is usually an 8p8c connector on one end and a DB9F connector on the other end. The “Option” port on the Vista DVI Plus uses a 10p10c socket. This socket will accommodate a 10p10c and an 8p8c connector.
Configuration mode When you enter the configuration mode, each menu mode offers several settings that can be used to customize the actions of the Vista DVI Plus unit. To enter the configuration mode, press and hold the front panel “Computer” button for approximately five (5) seconds. 1. After 5 seconds, the display will show a bracket symbol ‘ [ ‘ 2. Using the user console keyboard enter the Menu Mode Selection Letter. The display will show the selected letter. (e.g. H) (See table 2) 3.
User Preference U 1 Enter U 2 Enter U 7 Enter U 8 Enter (User defined preferences) Enable mouse switching Disable mouse switching Cycle all port (when using ‘Hotkey + Tab’ or ‘Auto-scan’) Cycle only active ports (when using ‘Hotkey + Tab’ or ‘Autoscan’) Table 2. Configuration menu options Pressing the Esc key will exit from an option choice and return to the main menu ( [ ). Note: Using the front panel will switch USB 1 or USB 2 to a computer.
Auto scanning The auto-scan feature switches between the connected computers, in sequence, at a pre-defined rate. (See Table 2, Auto-scan Time T x) There are two scanning mode options, cycle all ports and cycle only the active ports. The auto-scan mode option is set in the User Preference, U 7 or U 8 section (See Table 2).
Functions Selecting “Functions” from the main menu will display the Functions screen. From this screen you can reset the Vista DVI Plus unit to the original factory defaults. WARNING: This function will clear all stored computer names. The F7 key must be pressed to confirm the reset to factory default action. A confirmation message will display when the unit is reset. Global Preferences Selecting “Global Preferences” from the main menu will enable several settings that configure various operations.
Default Mode: Selection: ALL, KVM + SPK, KVM ONLY, SPK ONLY, USB1 ONLY, USB2 ONLY Selects which peripheral switching mode to set as the standard mode. On screen menu or front panel switching only. Mouse or hotkey switching switches both KVM and speakers. Reminder Banner Settings: ALWAYS, AFTER OSD, NEVER A pop up window will momentarily display the current connected computer following a change to the selected computer or when exiting the on screen menu. Use the OSD Dwell time to set the banner display time.
Setup Options The Setup Option menu allows you to define the language used for the onscreen menus and the keyboard layout English, German, and Swedish keyboard layout = QWERTY French keyboard layout = AZERTY Language Settings: ENGLISH, FRENCH, GERMAN, SWEDISH Specifies the language for the on-screen menu and keyboard layout. Hotkeys Settings: CTRL+ALT, CTRL+SHIFT, ALT+SHIFT, ALT GR.
Edit Computer List The edit computer list allows you to change, insert or remove entries in the list. You can edit each entries name, change the channel number and include or exclude the channel from the autoscan feature. 1. 2. 3. Highlight the computer name and press enter. Press the backspace key to delete the name characters and enter the new computer name (up to 16 characters). Press return to move to the computer channel. Change or enter the channel address of the computer and press enter.
SERVICE and SUPPORT Service This Unit does not contain any internal user-serviceable parts. In the event a Unit needs repair or maintenance, you must first obtain a Return Authorization (RA) number from Rose Electronics or an authorized repair center. This Return Authorization number must appear on the outside of the shipping container. See Limited Warranty for more information.
SAFETY The Vista DVI Plus has been tested for conformance to safety regulations and requirements, and has been certified for international use. Like all electronic equipment, the Vista DVI Plus should be used with care. To protect yourself from possible injury and to minimize the risk of damage to the Unit, read and follow these safety instructions. Follow all instructions and warnings marked on this Unit.
APPENDICES Appendix A – Specifications Part Number KVM-4TDDL/A1 KVM-8TDDL/A1 (All models feature KIT-RCSMDM005 RM-VDP14/19 KIT-ACC-ATRF/4.0 Description DVI-I Dual Link, USB 2.0, 1x4 KVM switch DVI-I Dual Link, USB 2.0, 1x8 KVM switch Dual-Link video, USB 2.0, and Audio support) Sync serial cable Rackmount kit for 1x4 model Serial cable Dimensions: Width Model (in / mm) 1x4 9.2 / 233 1x8 19 / 482 Depth (in / mm) 4.5 / 115 8.5 / 215 Height (in / mm) 1.75 / 44 1.8 / 45 Weight (lbs / kg) 1.8 / 0.67 4.
Appendix B – Default Video Modes 1024 x 768p at 60Hz 720 x 400p at 70Hz 720 x 400p at 88Hz 640 x 480p at 60Hz 640 x 480p at 67Hz 640 x 480p at 72Hz 640 x 480p at 75Hz 800 x 600p at 56Hz 800 x 600p at 60Hz 800 x 600p at 72Hz 800 x 600p at 75Hz 832 x 624p at 75Hz 1024 x 768i at 87Hz 1024 x 768p at 60Hz 1024 x 768p at 70Hz 1024 x 768p at 75Hz 1280 x 1024p at 75Hz 1152 x 870p at 75Hz 1600 x 1200p at 60Hz 1680 x 1050p at 60Hz 1360 x 765p at 60Hz 1360 x 768p at 60Hz 1440 x 900p at 60Hz 1280 x 720p at 60Hz 1920 x
10707 Stancliff Road Houston, Texas 77099 Phone: (281) 933-7673 WWW.ROSE.