
Instruction manual


CrystalView DVI Multi Installation and Operations Manual 5
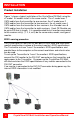
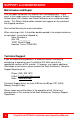
Figure 1. Typical connections
The following Installation steps should be used as a guideline to properly
install the CrystalView DVI Multi transmitter and receiver units.
It is recommended that the same type of monitors be connected to all of
the Receiver units. Refer to figure 5.
1. Remove power from the computer and all monitors
2. Connect a DVI-D mm cable from the computer DVI-D video out
connector to the Transmitter’s DVI IN connector
3. Connect a monitor to the DVI OUT connector on the Transmitter
(See EDID Learning)
4. Apply power to the monitor
5. Connect the supplied power adapter to the Transmitter and a power
source. Upon power-up the Transmitter will “Learn” the EDID
specifications of the monitor connected to the DVI OUT connector.
6. Remove the monitor from the Transmitter and connect it to a Receiver
units DVI-OUT connector.
7. Connect a shielded CAT6 or better cable from the RJ45 connector on
the Transmitter to the RJ45 connector on the Receiver.
8. Connect the supplied power adapter to the Receiver and a power
source.
9. Make sure power is applied to the Transmitter, Receiver(s), and all
connected DVI monitors, then boot the computer.
You should see the boot-up sequence on all connected monitors.
NOTE: The CrystalView DVI Multi will automatically read, on power-up,
the EDID information from any monitor connected to the
Transmitter’s DVI-OUT connector and save the information. If no
monitor is connected the internal EDID data will not be modified.