
Installation Manual


12
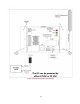
3.3 Connect the RF Antenna
The RF Antenna is connected by threading the Antenna connector to the
WAF RF jack on the FJ3.
3.4 Mount the RF Antenna
The RF Antenna is mounted by removing the protective layer from the adhesive tape
and attaching to the vehicle windshield. The same location can be used near the
rear window if desired.
Note: Clean the windshield before mounting the antenna.
In busses, the RF Antenna can be mounted in the sign compartment area, if it is made
of fiberglass.
The antenna must not be concealed on all sides by metal.
Note
The RF Antenna should be fastened and secured appropriately. Do not coil
the antenna wire.
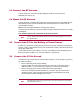
3.5 Connect the FJ3 to the Battery or Power Source
Positive (+) connection can be from any 12 VDC or 24 VDC constant or timed power
source. If using a timed power source, we recommend at least a 30-minute power off
delay after Ignition Off.
If your power source is the battery, run an 18 – 20 AWG wire from the battery to the
FJ3 and connect it to BATT (+). This wire requires a 3 Amp fuse.
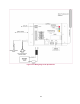
3.6 Connect the FJ3 to Ground
Connect the FJ3 to a ground, the vehicle metal chassis, or to the negative (-) post on
the vehicle's battery.
• When connecting to the vehicle battery:
Prepare a black auto wire with a terminal on each end. Connect the black (-)
cable from BATT (-) on the FJ3 to the negative (-) terminal on the battery.
• When connecting to the vehicle metal chassis (see note below):
Connect a black ground cable from BATT (-) on the FJ3 to one of the FJ3’s
mounting screws. Loop the cable end around the screw between the screw
head and the FJ3 plate and tighten the screw.
Note
This will connect the FJ3 to ground only if the FJ3 is affixed to the grounded
metal chassis of the car.